
What is Flodesk Checkout and how do I use it?
Overview
Flodesk Checkout lets you sell products, services, and subscriptions directly from Flodesk—without needing a separate website or third-party checkout tool.
With Flodesk Checkout, you can:
Accept payments through Stripe
Create sales pages, checkout pages, and delivery pages
Automatically add buyers and subscribers to the right segments
Deliver digital products or next steps using Workflows
Charge sales tax and VAT based on your buyer's specific location
Assign specific tax categories to every product and upsell to ensure the correct rates are applied every time
It’s designed to work seamlessly with Flodesk Email, Forms, and Workflows so you can sell and deliver in one connected system.
What can you sell with Flodesk Checkout?
Flodesk Checkout supports:
Digital products (downloads, courses, templates)
Services (coaching, sessions, consultations)
Free offers (lead magnets, opt-ins)
Subscription products (paid newsletters, memberships, recurring programs)
Learn more: How to set up a subscription product in Flodesk Checkout
How Flodesk Checkout works (high-level)
Every Flodesk Checkout includes three connected pages:
Sales page – explains your offer and drives people to buy
Checkout page – collects payment and customer information
Delivery page – confirms the purchase and explains what happens next
After purchase, you can:
Deliver content directly on the Delivery page
Send follow-up emails and deliver assets using Workflows
Note: Flodesk also offers simple "Checkout-only templates", which include a Checkout page and a Delivery page.
Step 1: Create your Checkout
Go to your Checkouts dashboard
Click + New checkout
Choose a template that fits your offer:
Digital product
Education
Service
Freebie
Checkout-only
You can preview templates before selecting Customize.

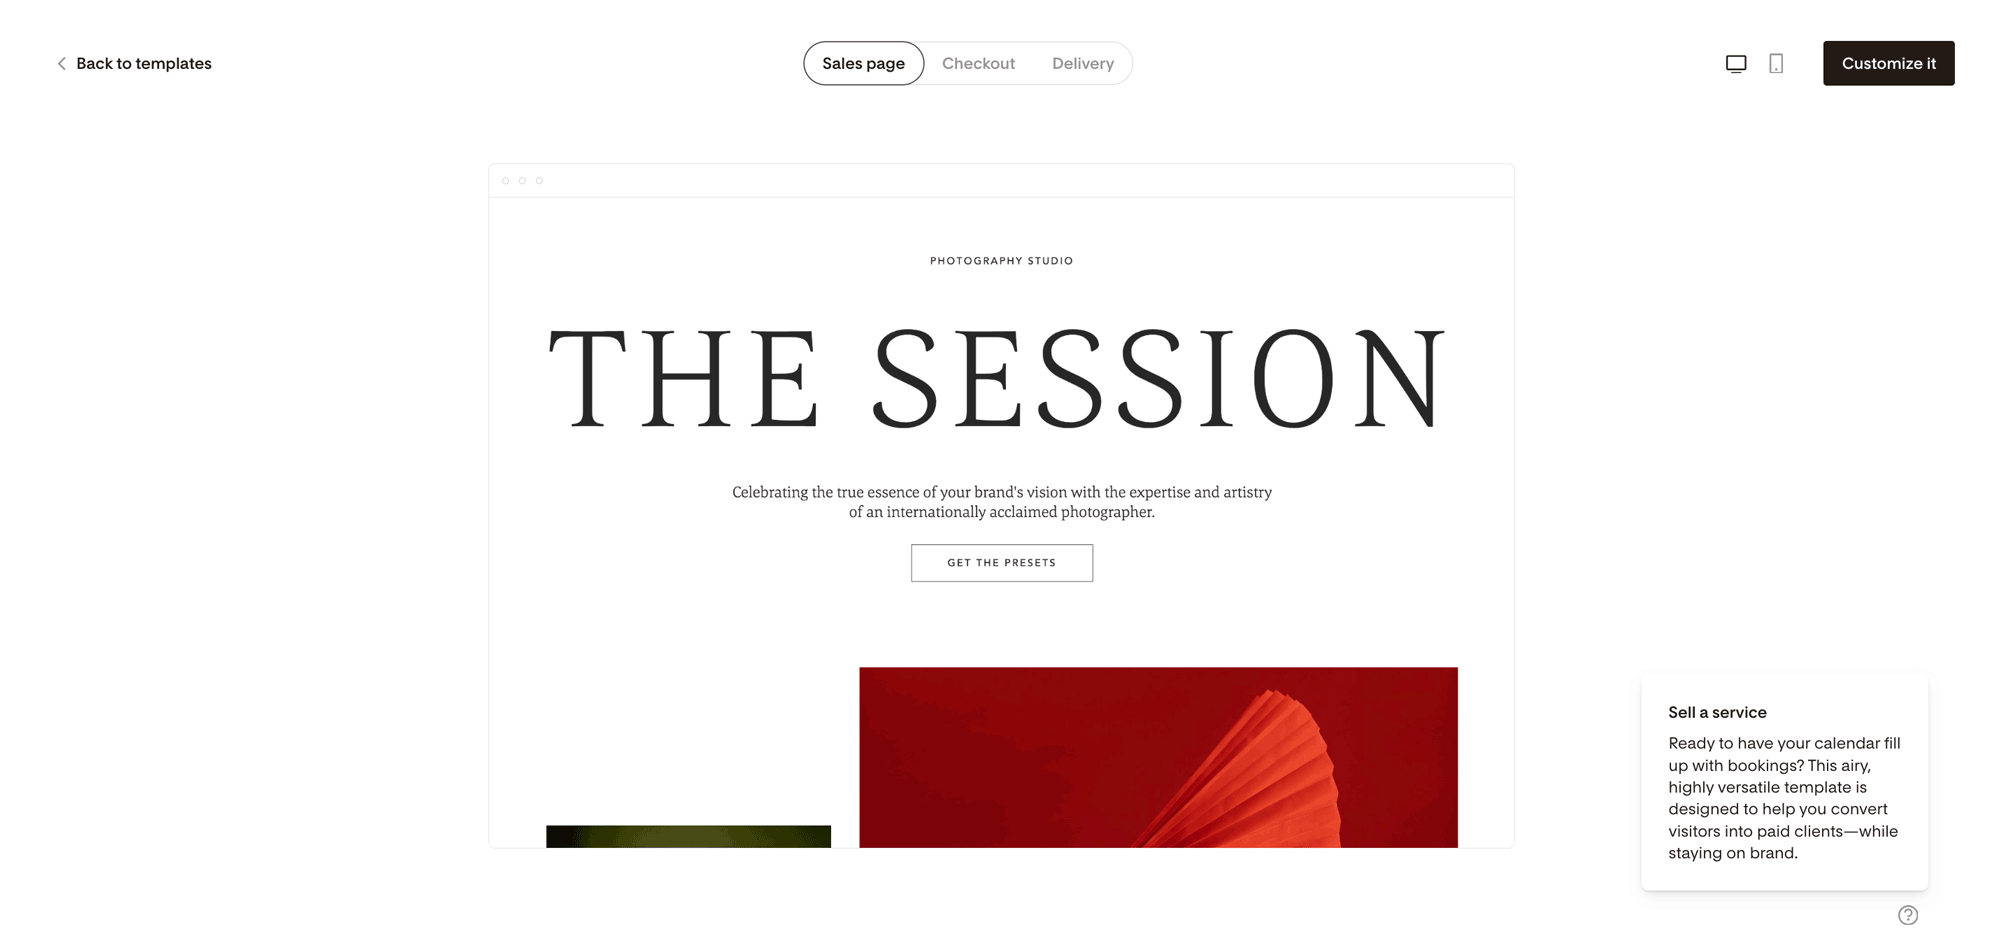
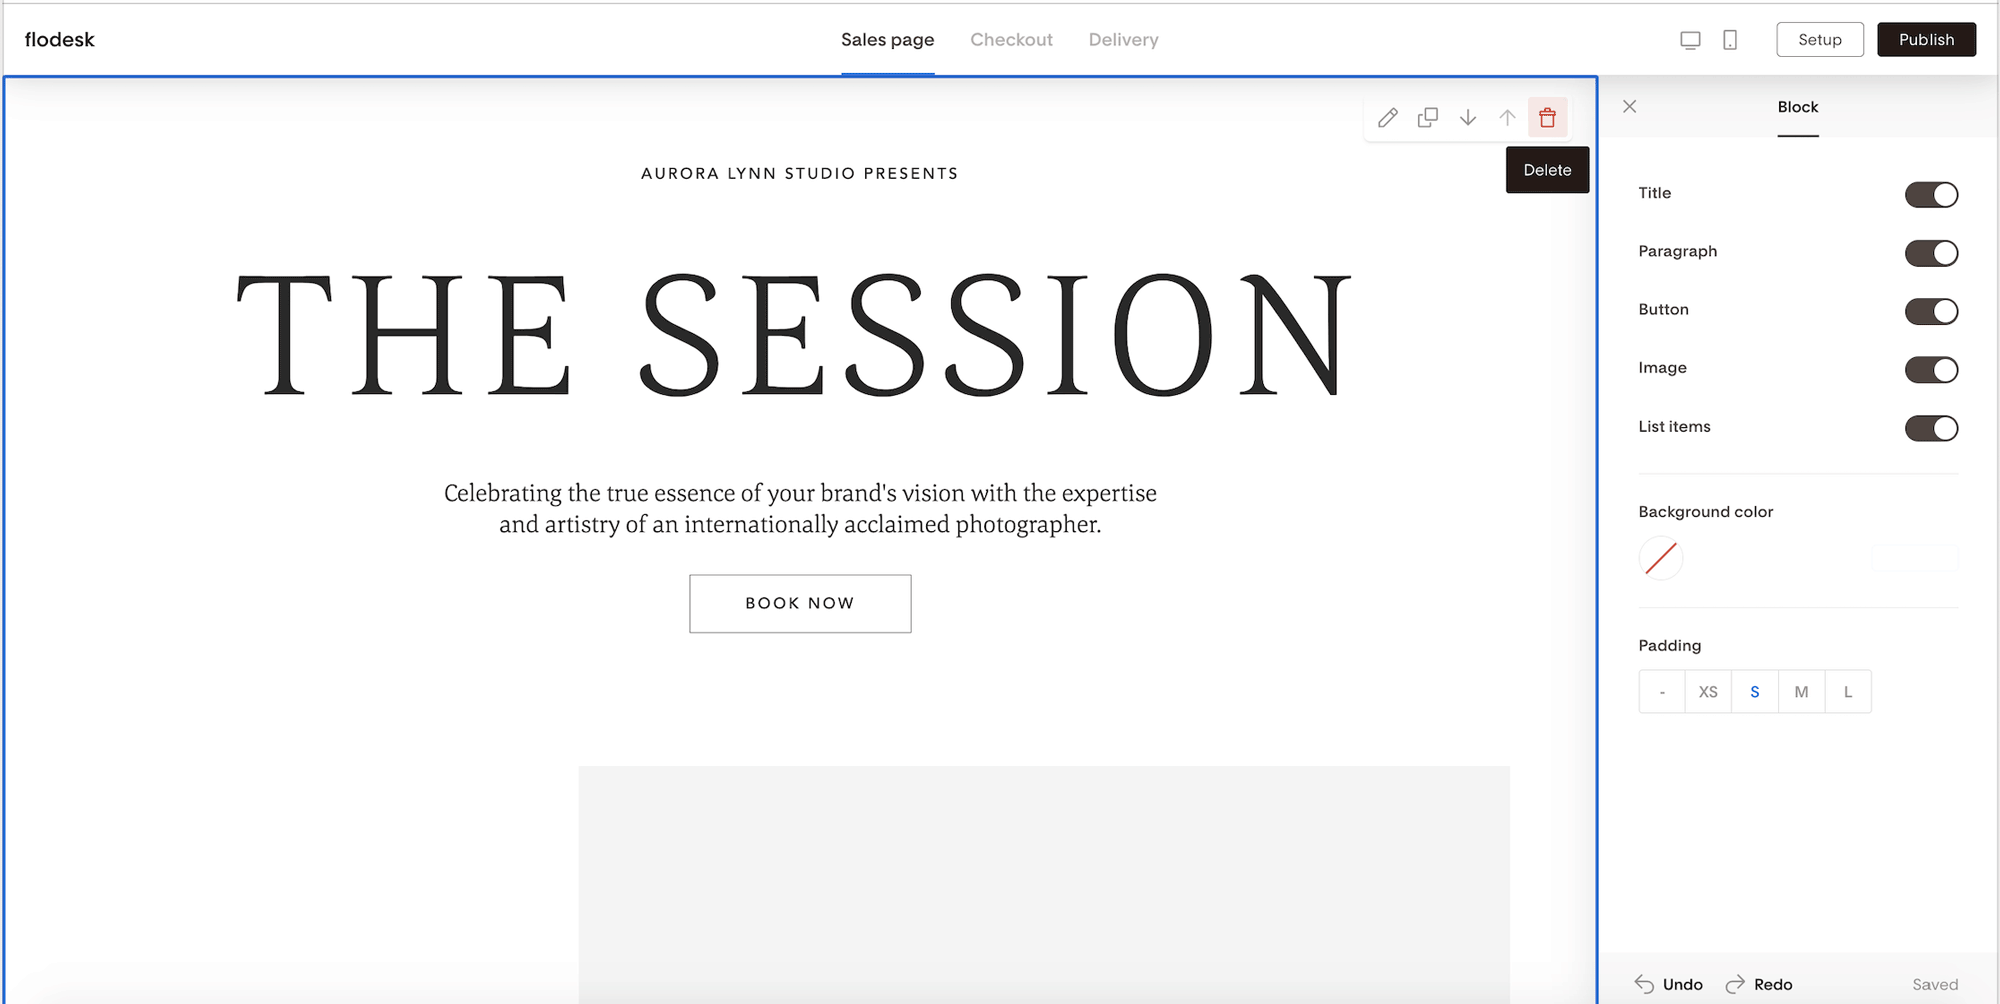
Step 2: Customize your Sales page
Your Sales page is where you explain the value of your offer.
You can:
Edit text, images, and CTAs
Add or remove content blocks
Preview desktop and mobile views
Rearrange or delete blocks as needed
You can always return to this page later. Nothing is locked in.

To view how your page looks on mobile or desktop, click the mobile or desktop icons in the top right corner.

When you’re happy with the look and feel of your sales page, click the second tab at the top of the page, the Checkout tab.

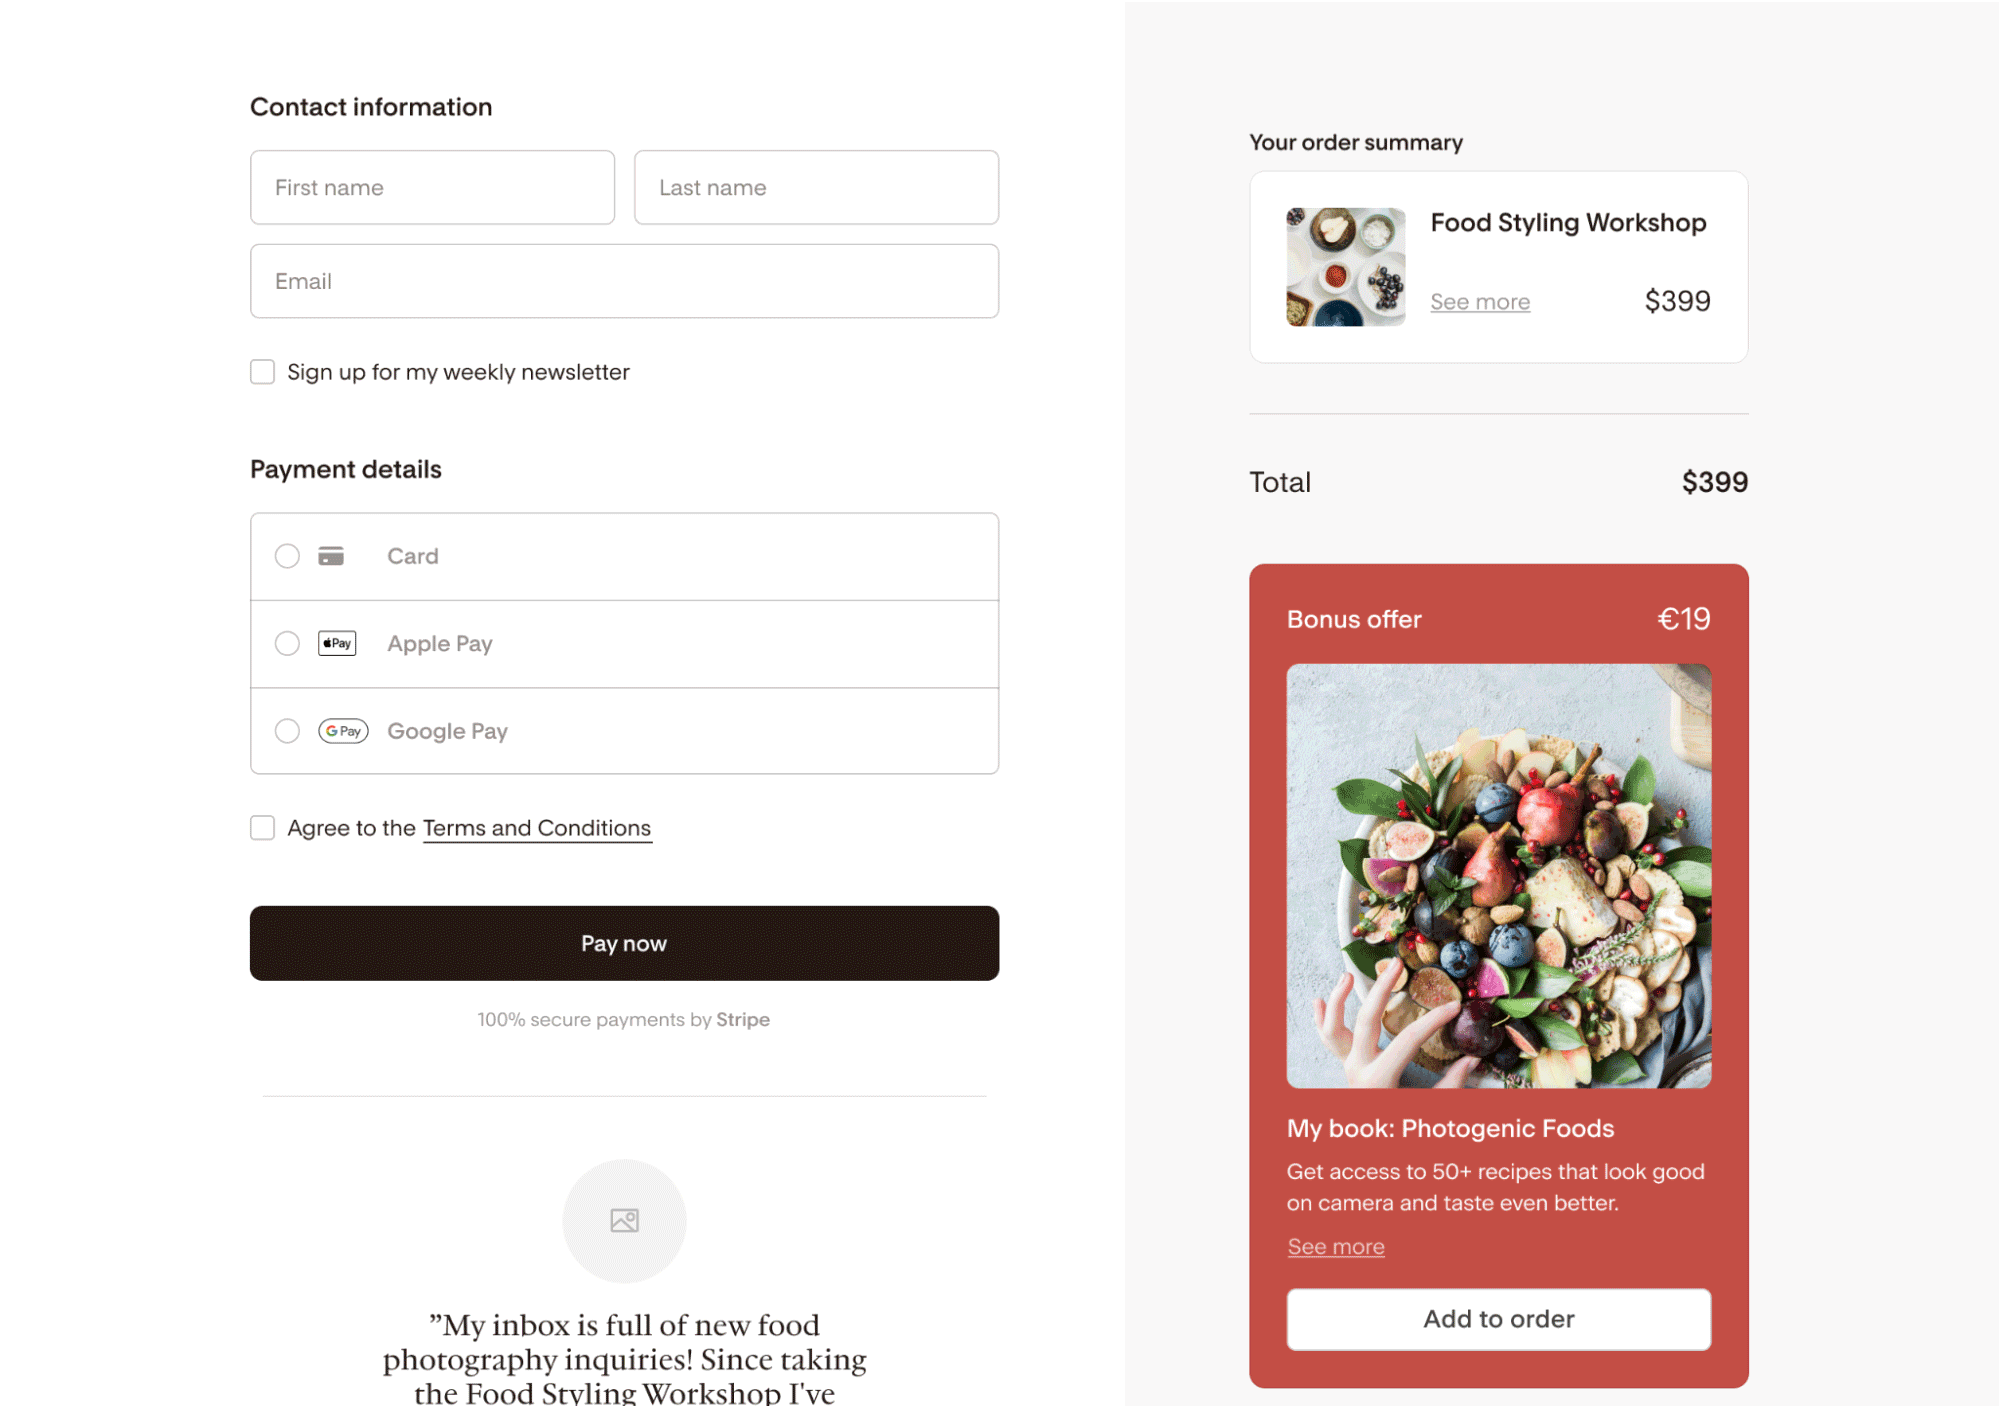
Step 3: Build your Checkout page
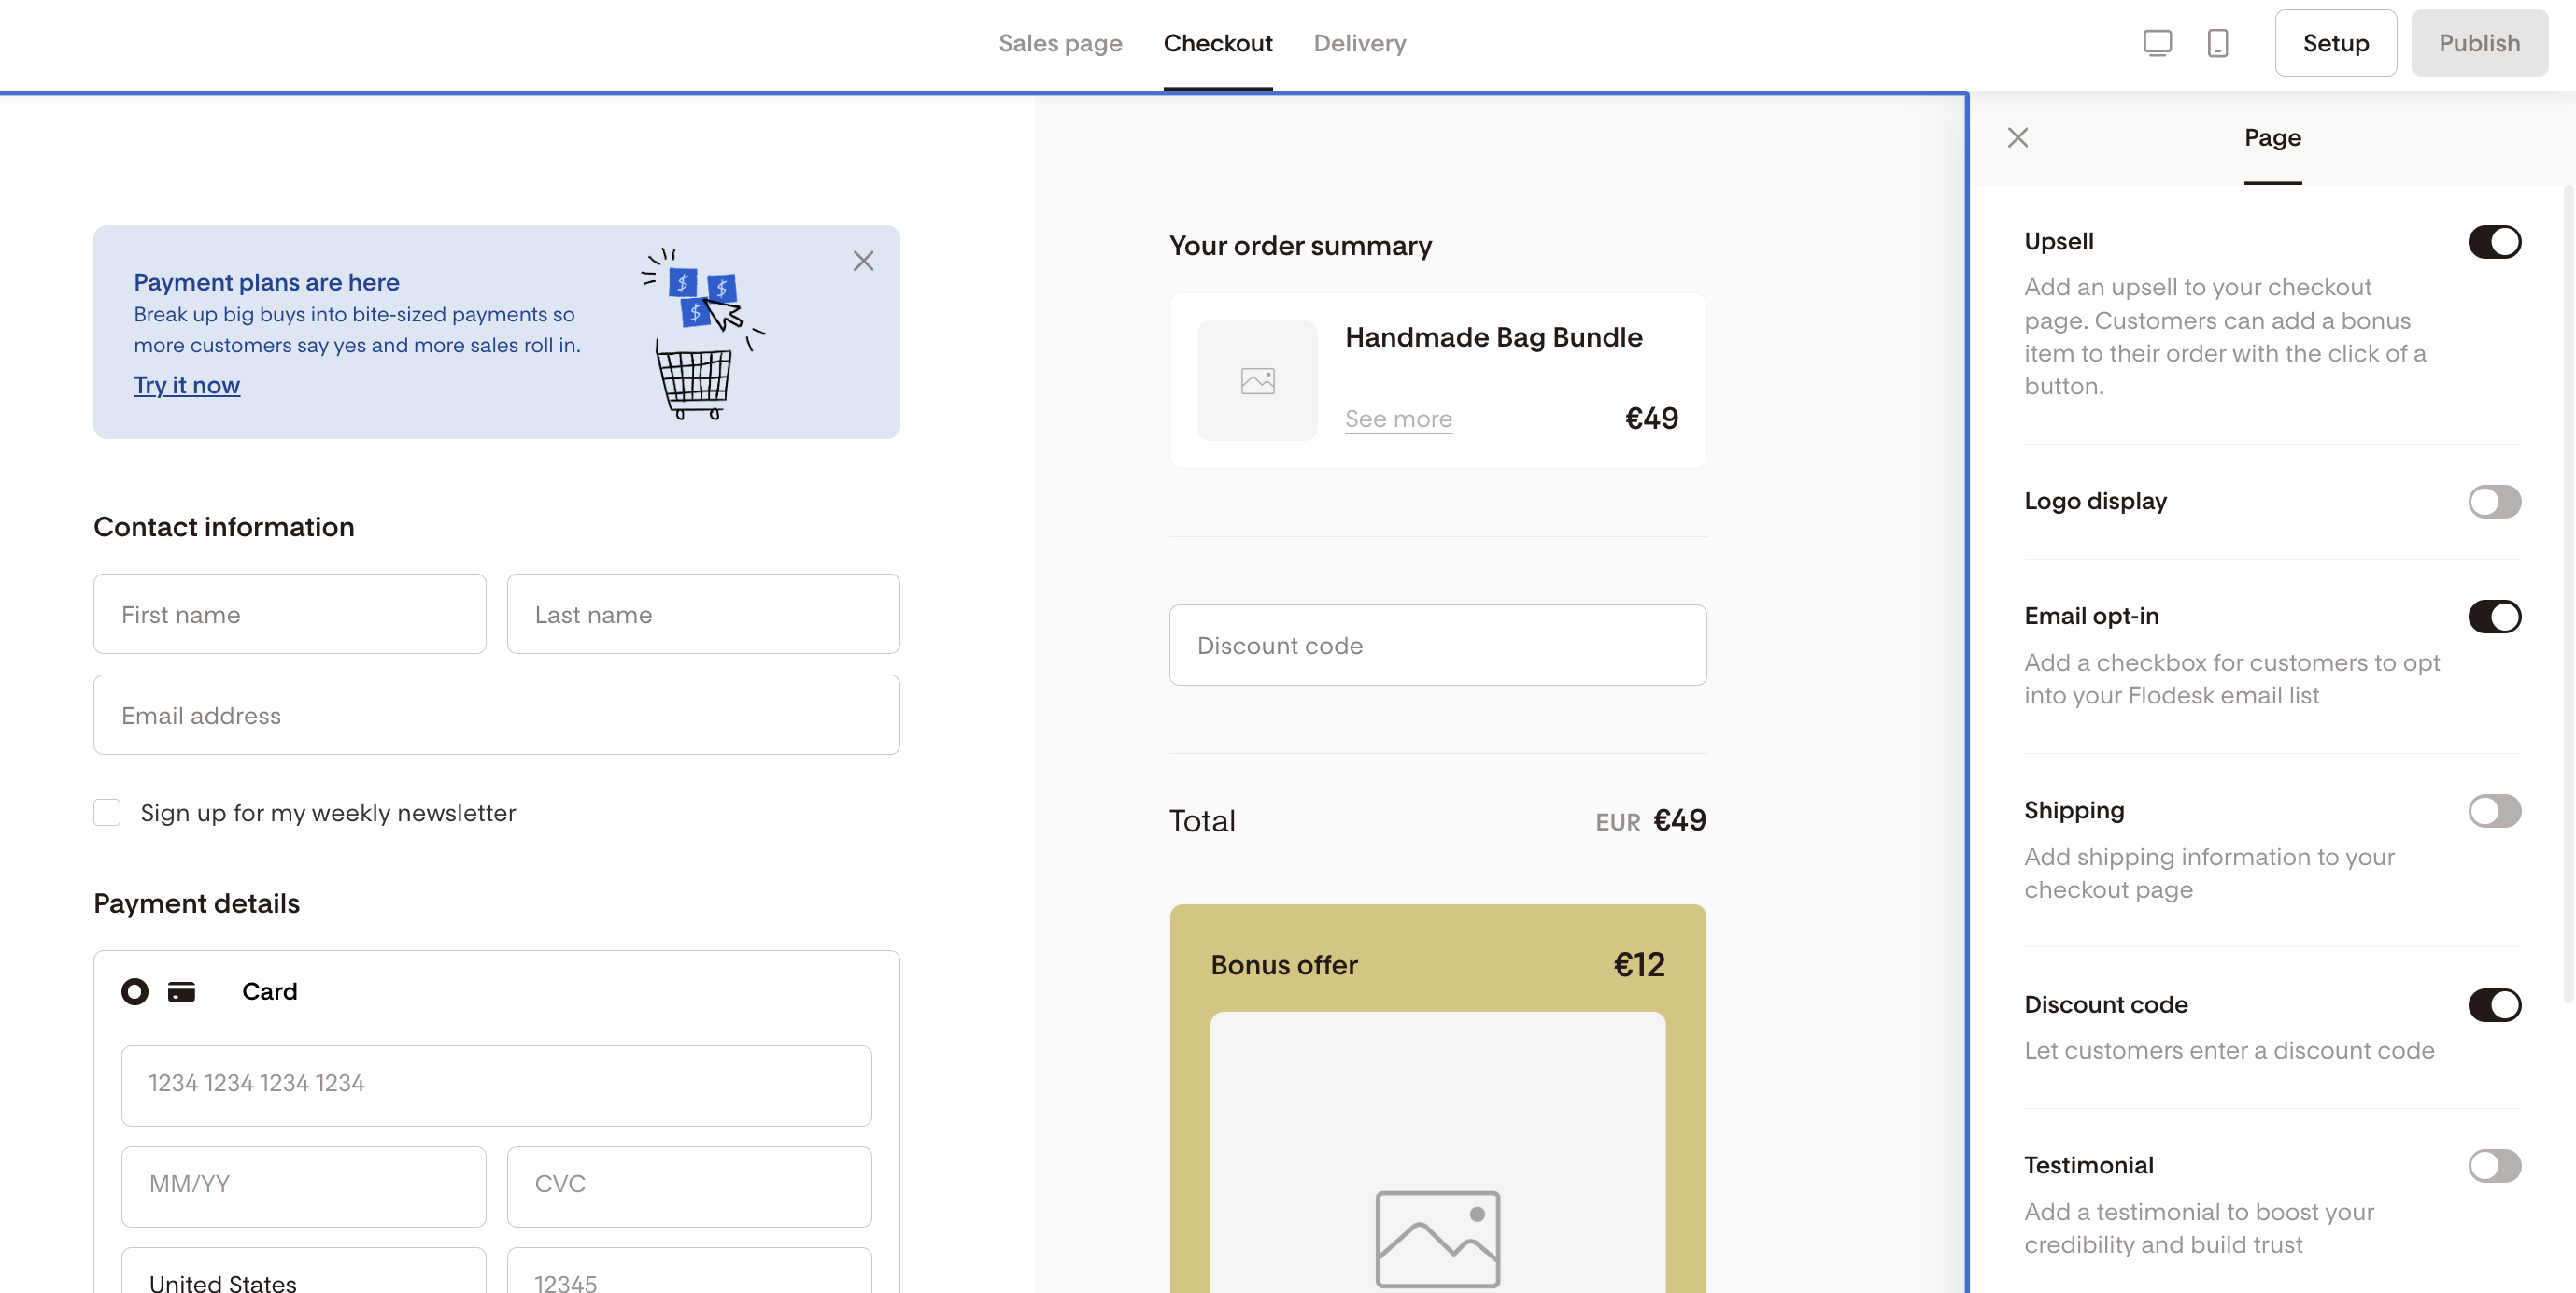
The Checkout page is where payment and customer details are collected.
Checkout settings include:
Product tab – price, sale pricing, free products, product image, quantity limit, availability end date, sales tax category, product segment
Upsell tab – optional additional offer (can be toggled off), price, sale pricing, product image, sales tax category, upsell segment
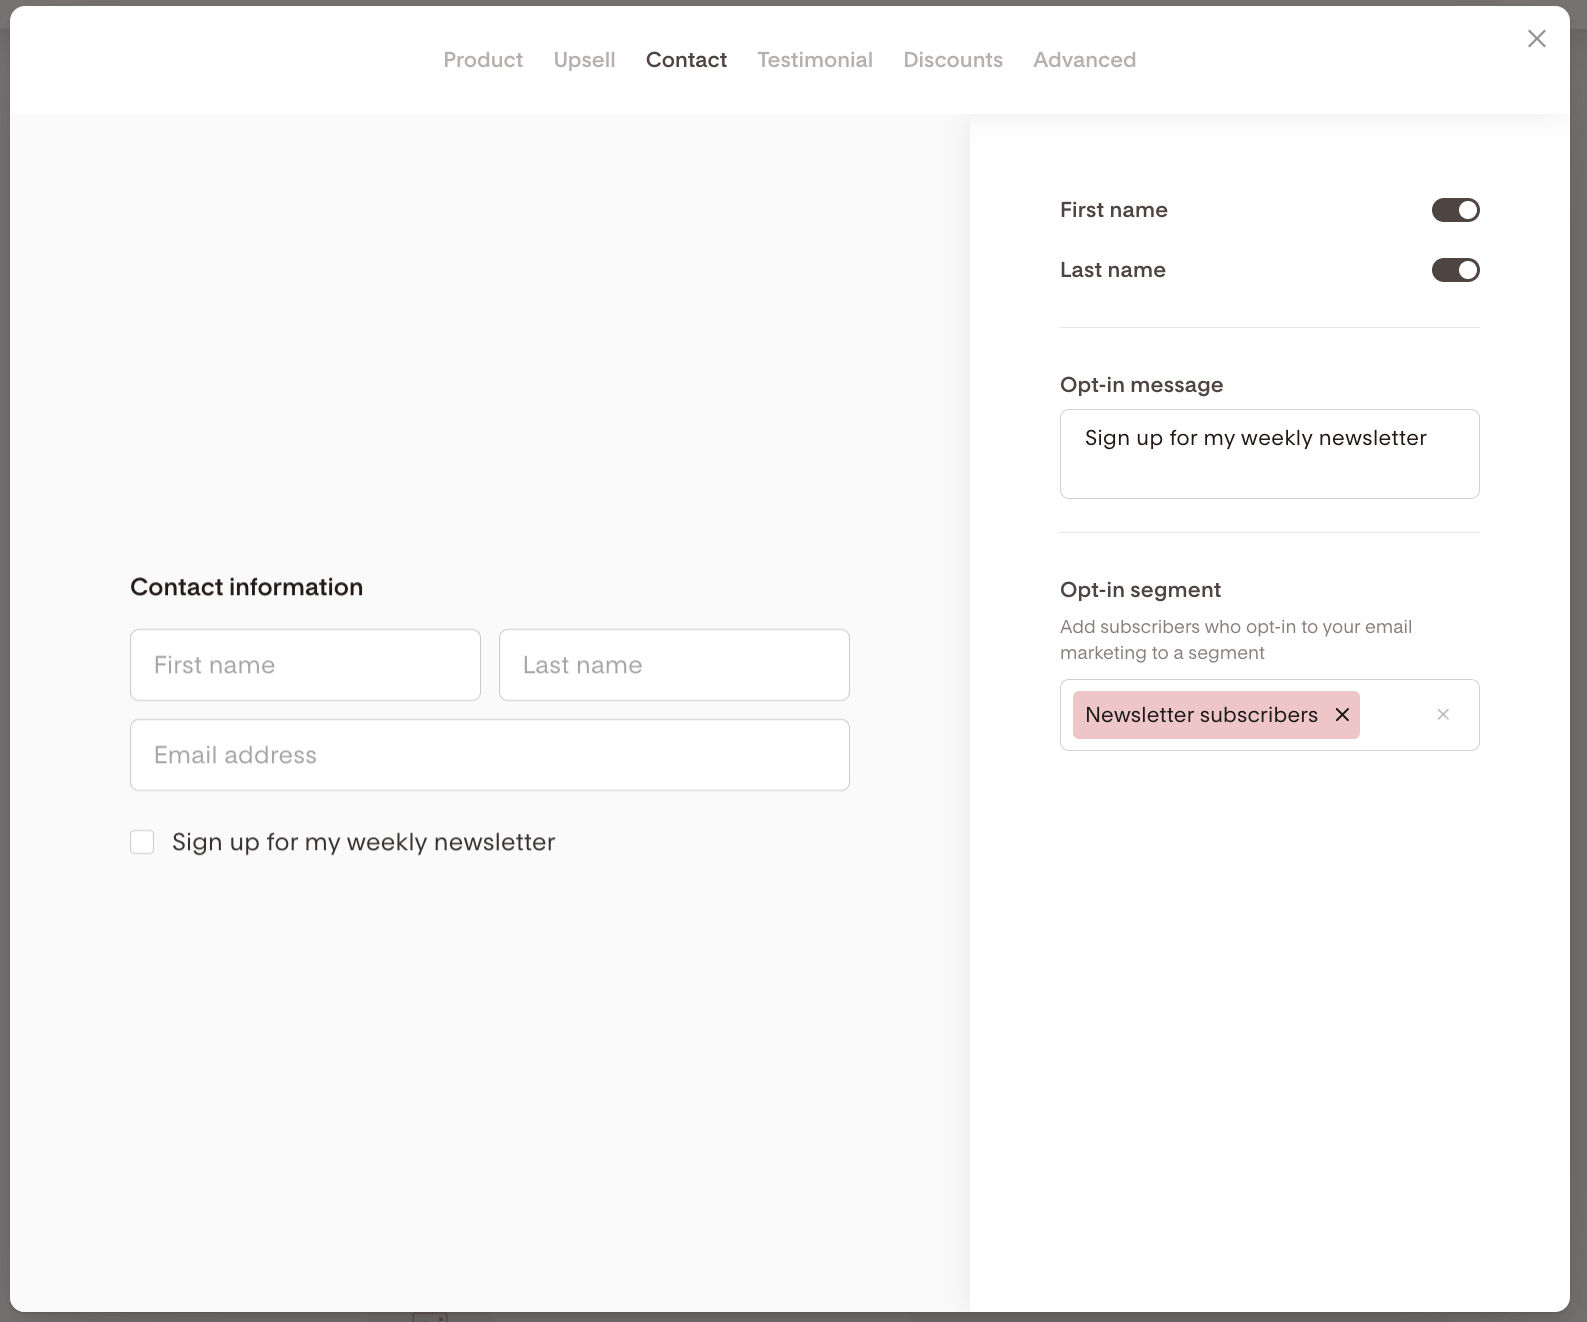
Contact tab – customer info + newsletter opt-in segment
Testimonial tab – optional social proof (can be toggled off), image, testimonial, customer name
Discounts tab – coupon and promo codes
Advanced tab – customize your public Checkout URL, add Meta Pixel, Terms & conditions, Privacy policy
To get started, click on any of the blocks.
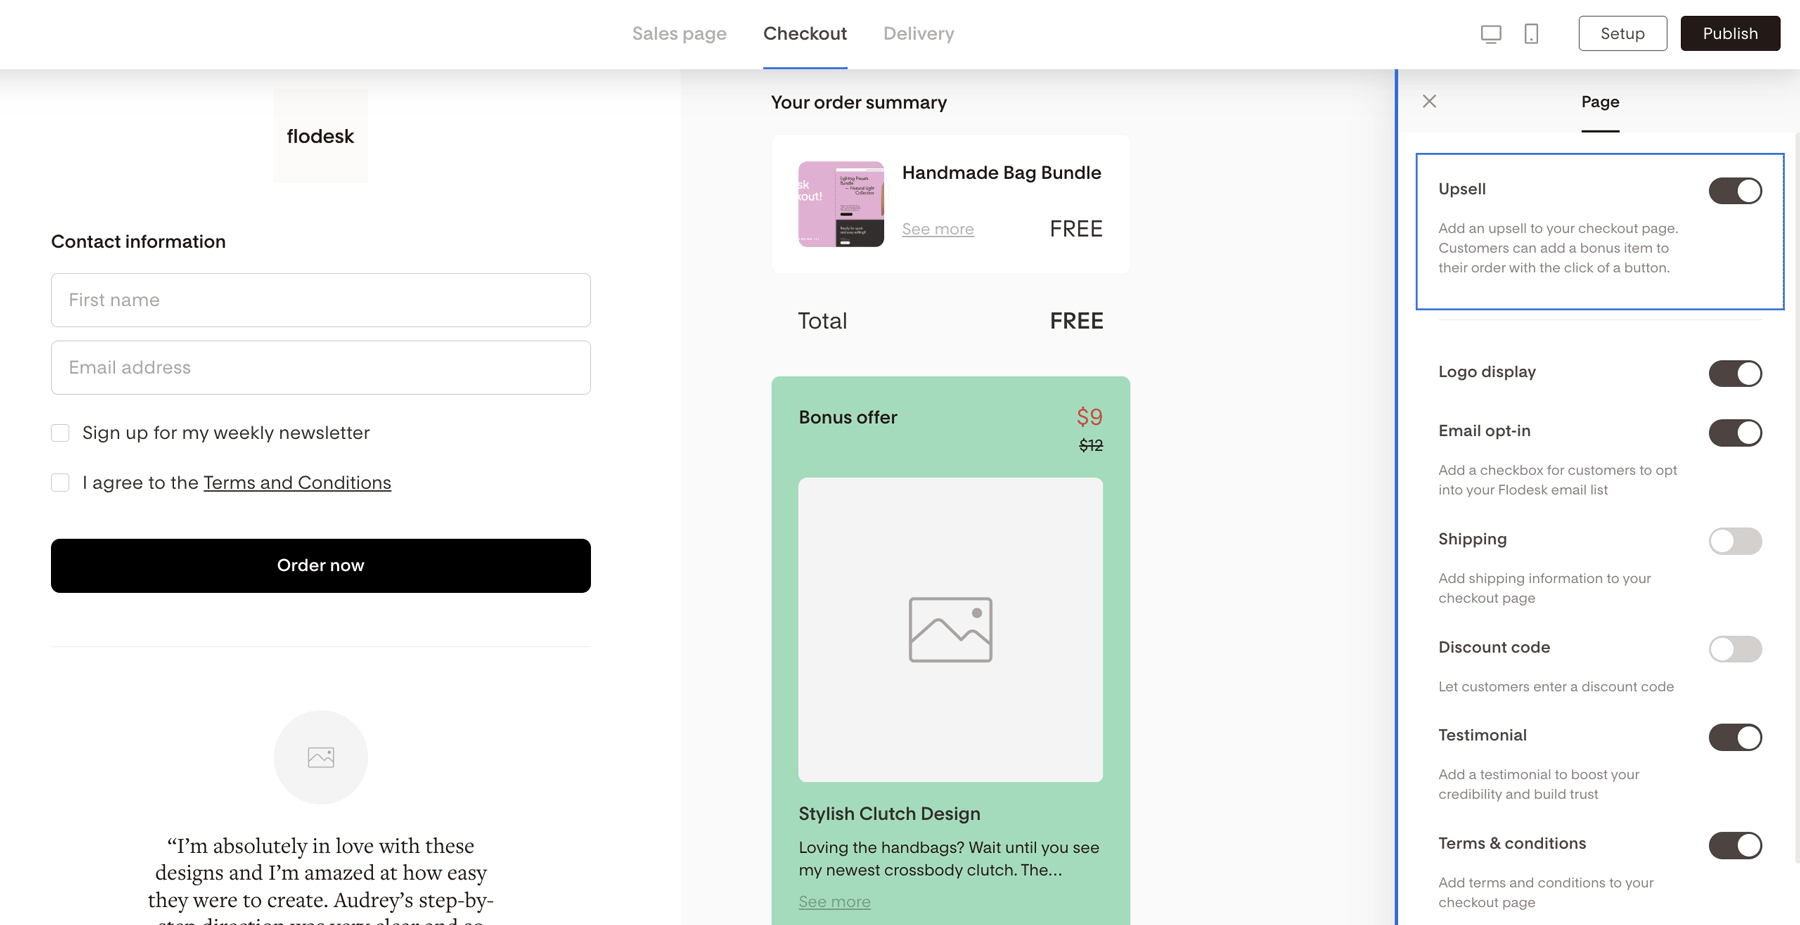
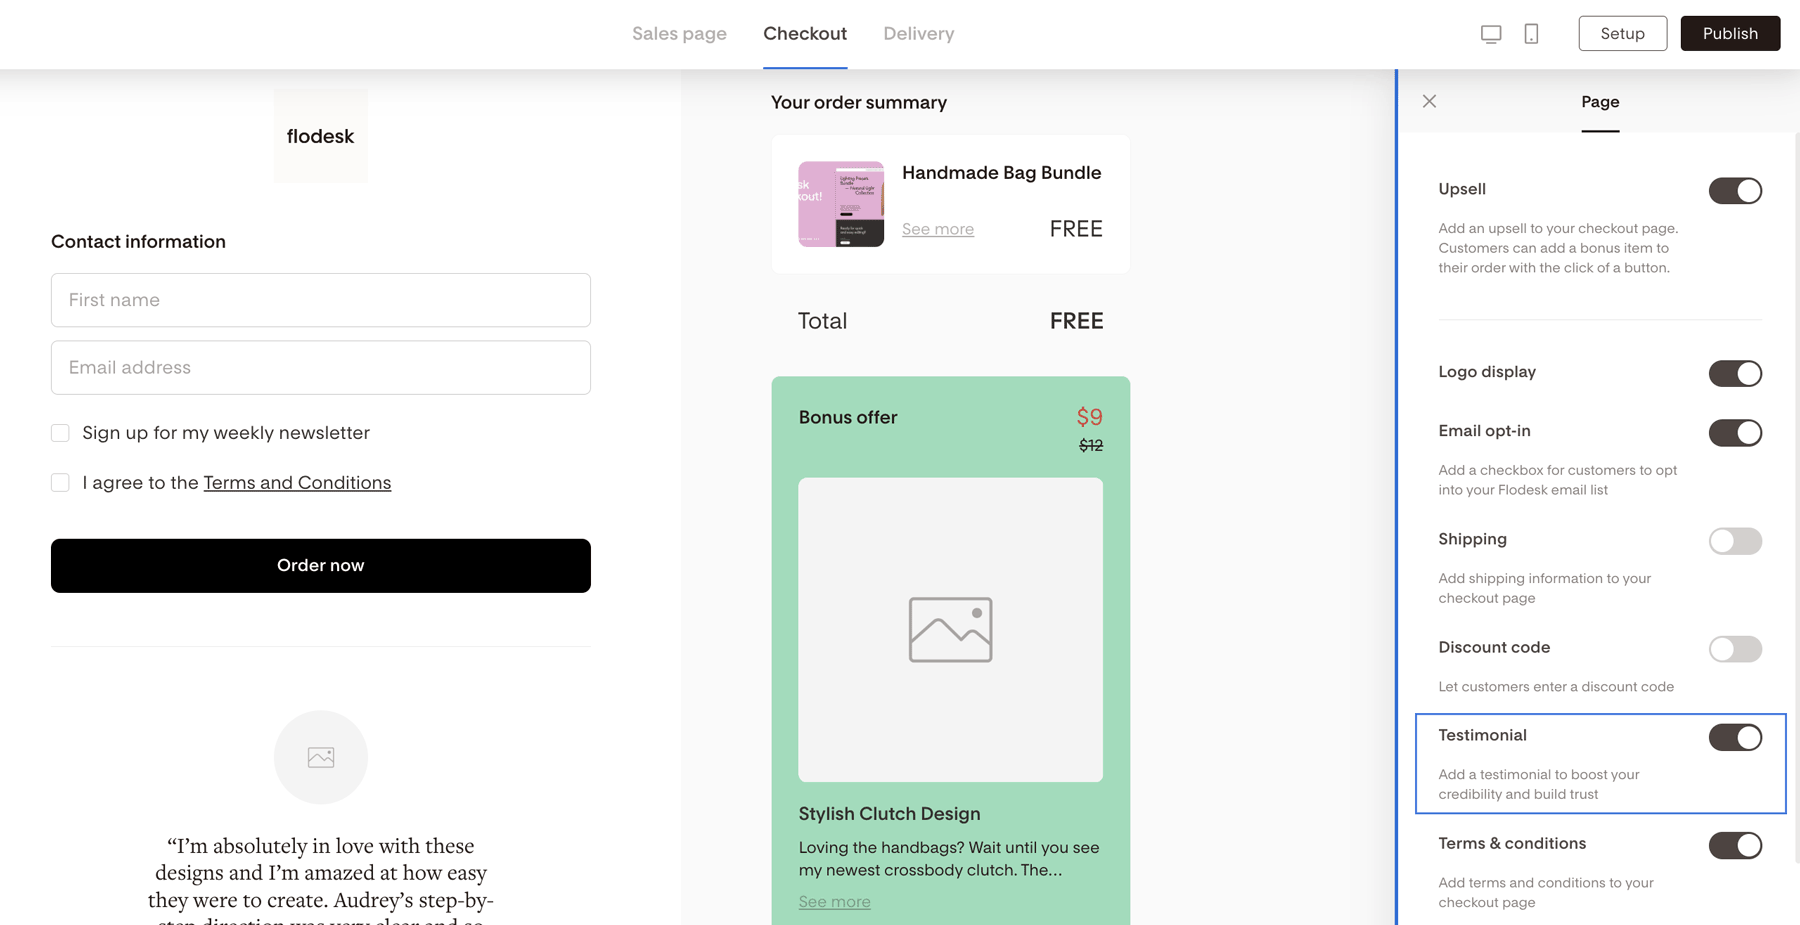
Removing upsells or testimonials
Click the page background (not a block)
Open Page settings
Toggle Upsell or Testimonials off
Step 4: Set up product and opt-in segments (important)
Flodesk Checkout uses segments to organize buyers and subscribers.
Newsletter opt-ins → set under the Contact tab
Product purchasers → set under the Product tab
Using separate segments lets you:
Email buyers differently from subscribers
Trigger delivery workflows correctly

Once you built your checkout page, all that is left is to customize how customers will receive the product(s). You will set this up on the Delivery page.

Step 5: Deliver what you’re selling
Flodesk Checkout does not automatically deliver files by itself. You choose how delivery works.
You have two options (and can use both):
Option 1: Delivery page (default, built-in)
After payment, buyers are redirected to the built-in Delivery page, where you can:
Add download links
Share instructions or next steps
Confirm access details
Learn more: How to customize the Delivery page
Option 2: Workflow delivery (optional)
For automated delivery:
Create a Product segment
Connect that segment to a Workflow
Send emails with downloads, links, or access instructions
This is the recommended method for digital products and subscriptions.
How do I delete page elements from the sales, checkout and delivery pages?
Do you want to delete blocks from any or all of the pages? We’ll walk you through how to do it.
If you want to delete blocks from the Sales page, you can click into any individual block and click the trash can icon, as shown below. You can also rearrange the blocks on the page by clicking on the up and down arrows.

For the Checkout and Delivery pages, do the following:
Navigate to the page you want to remove elements from first. Do this by clicking on either the Checkout or Delivery tab.
Click on the background of the page, outside of the blocks, somewhere under the desktop / mobile preview icons, and you will see the Page settings tab on the right side.

To turn on any element on the page, toggle the slider to the the right. To turn off any element, toggle the slider to the left. For example, if you don’t want an upsell, all you have to do is toggle the slider next to Upsell to the left. If you want to collect Shipping information from your buyers, turn on the "Shipping" toggle.
Step 6: Publish and connect Stripe
When you click Publish on your first Checkout, you’ll be prompted to connect to Stripe if you have not already done so.
Stripe powers all payments in Flodesk Checkout
You only need to connect Stripe once
After verification, return and click Publish again
Note: if you want to get your Stripe account disconnected from Flodesk, you need to email our team at support@flodesk.com with your account details.
Supported countries and Stripe availability
If you see this message during publishing:
“We partner with Stripe to power Checkout payments. Check back soon for availability in your area.”
…but you’re located in a supported country:
Check the full list here:
What countries and territories does Flodesk Checkout support?Email support@flodesk.com for assistance
Using Flodesk Checkout with your existing website
You do not lose your website or brand.
You can:
Link to Flodesk Checkout from your site
Embed Checkout links in buttons or CTAs
Keep using your existing domain and branding
Learn more:
How to use Flodesk Checkout with your existing website
Shipping and physical products (important limitation)
Flodesk Checkout is optimized for digital products and services.
You can collect shipping information (name, address)
Shipping fields are supported
Shipping costs are not collected
Any shipping expenses must be covered by you
Learn more:
How to collect shipping information in Flodesk Checkout
FAQ
What is Flodesk Checkout?
Flodesk Checkout is a built-in payment and delivery tool that lets you sell products, services, and subscriptions directly from Flodesk using Stripe.
Do I need a website to use Flodesk Checkout?
No. Flodesk Checkout provides hosted sales, checkout, and delivery pages. You can also use it alongside your existing website.
How do customers receive what they purchased?
Customers are redirected to a Delivery page after payment, and you can also deliver content automatically using Workflows connected to product segments.
Can I sell subscriptions or recurring products?
Yes. Flodesk Checkout supports subscription products like memberships, paid newsletters, and recurring programs.
Can I charge Sales Tax or VAT?
Yes. Flodesk Checkout uses Stripe Tax to automatically calculate sales tax or VAT based on:
Your Stripe Tax setup
The buyer’s billing location
Your product’s tax category
Once Stripe Tax is enabled, Flodesk Checkout handles tax calculation at checkout so buyers see the correct total before completing their purchase. Learn more here: https://help.flodesk.com/en/articles/10782145
Why can’t I publish my checkout?
Publishing requires a connected Stripe account and availability in your country. If you’re in a supported region and see an error, contact support@flodesk.com.
Can I remove upsells or testimonials?
Yes. Both can be toggled off in the Checkout page settings.
Can I sell physical products?
Flodesk Checkout can collect shipping details, but it does not collect shipping fees. It’s best suited for digital products and services.
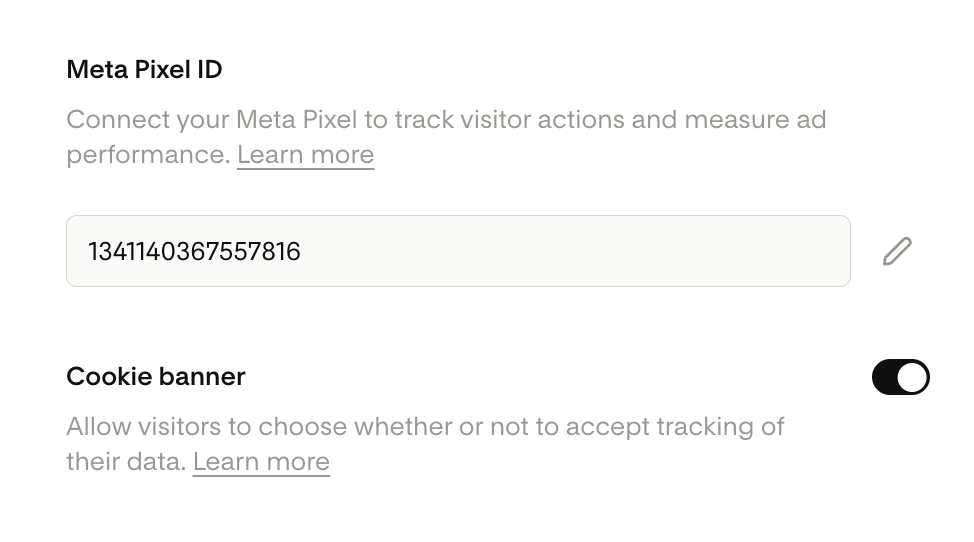
Can I add a Facebook Meta pixel to my checkout?
Yes. Open the checkout page you want to edit. Then, go to Setup > Advanced. Find the Meta Pixel ID field, click the pencil icon to edit it and enter your Meta Pixel ID. Save your changes. Optionally, toggle on the Cookie banner. When the cookie banner is toggled ON, you give visitors the chance to opt out of being tracked by the Meta Pixel. You may see less data appear in your Meta dashboard as a result.
How do I remove or hide elements on my Sales, Checkout, or Delivery pages?
You can remove or hide page elements differently depending on which page you’re editing.
On the Sales page
Click directly on the block you want to remove
Click the trash can icon to delete it
Use the up/down arrows to rearrange blocks instead of deleting them
On the Checkout or Delivery pages
Navigate to the Checkout or Delivery tab
Click on the page background (outside of any blocks)
Open Page settings on the right
Use the toggles to turn sections on or off
Turn Upsell off if you don’t want one
Turn Testimonials off if not needed
Turn Shipping on if you want to collect shipping information
Changes are saved automatically and can be updated at any time.
Summary
Flodesk Checkout gives you everything you need to sell, collect payments, and deliver offers—all inside Flodesk.
You can:
Build high-converting pages
Accept payments through Stripe
Segment buyers and subscribers automatically
Deliver products using Delivery pages and Workflows
Once published, simply share your Sales page URL and start selling.