
What is DMARC and how do I set it up for my domain?
DMARC helps protect your email reputation by stopping scammers from sending emails that pretend to come from you.
If you’re sending emails from a custom domain (like hello@yourbusiness.com), setting up DMARC is an important step to keep your emails trusted and out of spam.
Starting in early 2024, major inbox providers like Gmail and Yahoo began enforcing stricter authentication requirements for bulk senders. DMARC used to be considered a best practice. Now, it’s becoming essential for deliverability.
What is DMARC?
DMARC stands for Domain-based Message Authentication, Reporting & Conformance.
In simple terms, DMARC tells inbox providers:
Which emails are allowed to use your domain
What to do if an email fails authentication
How to protect your domain from being spoofed by bad actors
DMARC works on top of SPF and DKIM. While SPF and DKIM check whether an email is legitimate, DMARC decides what happens if those checks fail.
Important to know:
DMARC is not managed inside Flodesk, meaning it’s not a Flodesk or ESP-specific record
It’s set up directly with your domain provider
It only works if you’re sending from a custom domain email
If you’re sending from a free email address (like Gmail or Yahoo), DMARC isn’t available.
Why DMARC matters
Without DMARC, inbox providers have limited guidance on how to handle suspicious emails sent from your domain.
With DMARC in place, you can:
Prevent spoofing (emails pretending to be you)
Protect your brand and sending reputation
Reduce the chance of your real emails landing in spam
Give inbox providers clear instructions they can trust
This helps your legitimate emails reach inboxes more consistently over time.
Do I need DMARC?
You should set up DMARC if:
You send emails from a custom domain
You send marketing or bulk emails
You want to protect your domain from misuse
You can’t use DMARC if:
You send from a free email address (like Gmail or Yahoo)
You don’t control your domain’s DNS settings
How DMARC works (high level)
When an email is sent from your domain:
Inbox providers check SPF and DKIM
DMARC reviews those results
DMARC tells the inbox provider what to do if authentication fails
That final step depends on the DMARC policy you choose.
Choosing your DMARC policy
When setting up DMARC, you’ll choose one of three policies. These control how strict DMARC is.
p=none — monitor only
Emails are not blocked
Failed emails are still delivered
You can safely monitor activity without affecting deliverability
Recommended starting point if this is the first time you add a DMARC record for your domain.
p=quarantine — send failures to spam
Emails that fail DMARC are sent to spam
Adds more protection
Can impact delivery if something is misconfigured
p=reject — block failures entirely
Emails that fail DMARC are rejected
Strongest protection
Best used only after everything is working correctly
Our recommendation:
Start with p=none, then move to a stricter policy later if needed.
How to set up your DMARC record
You’ll add DMARC to your domain as a TXT record in your domain provider’s DNS settings (such as GoDaddy, Squarespace, Shopify, or Cloudflare).
Step 1: Choose your DMARC record
To keep things simple and safe, start with this value:
v=DMARC1; p=none;
You can always update this later once you’re confident everything is working. Flodesk provides this initial record in your account under Account settings > Domain setup so that you can copy and paste it.
Step 2: Add the DMARC record to your domain
Log in to your domain provider and open the area that manages DNS settings.
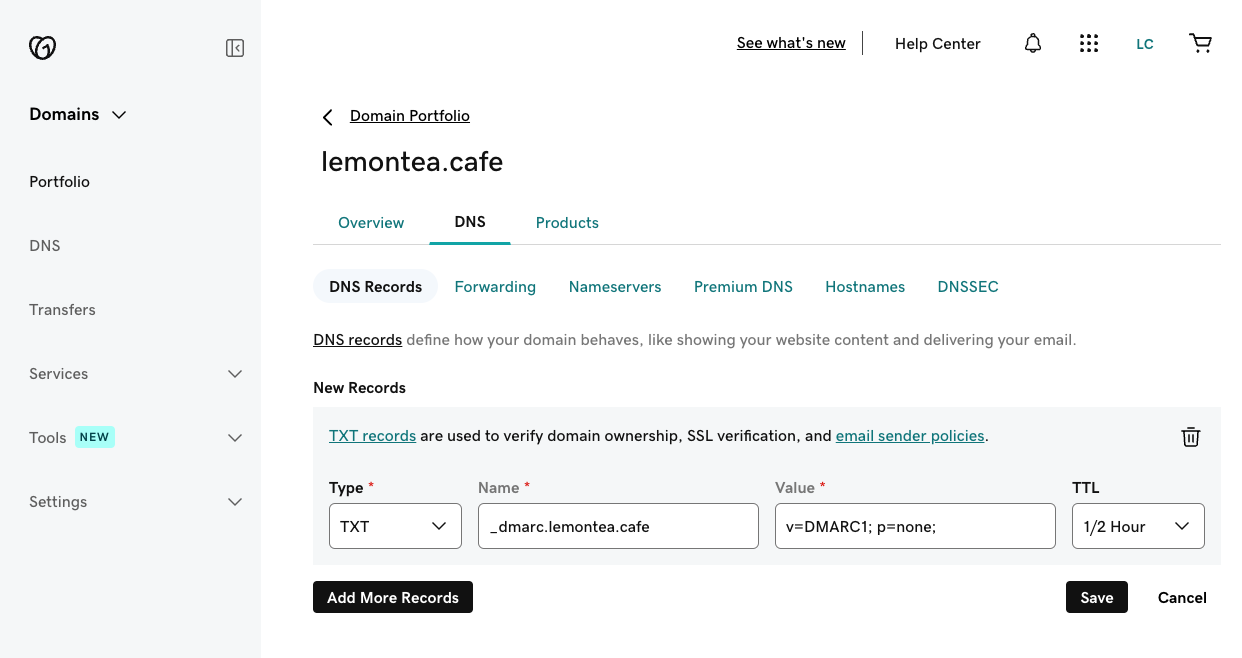
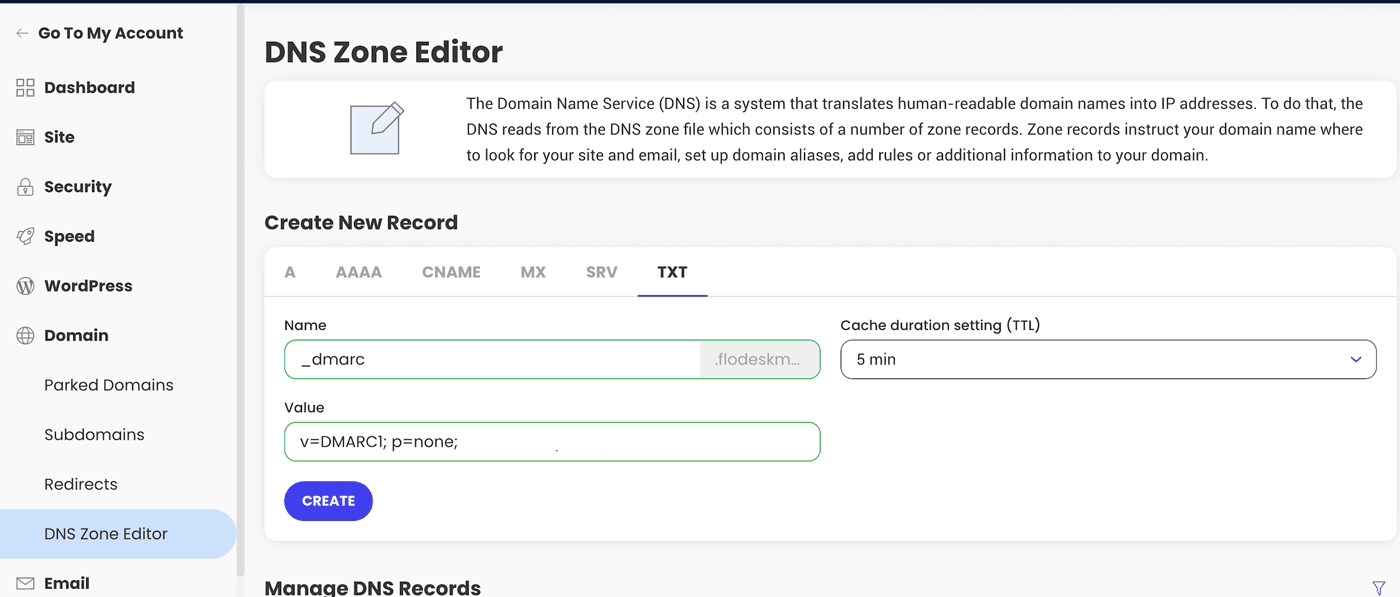
Create a new TXT record with the following values:
Name / Host / Target:
_dmarc.[insert your domain]
Examples:
Note: Some providers automatically add your domain name.
If that’s the case, enter only _dmarc
Value / Record / Data
v=DMARC1; p=none;
You should only have one DMARC record per domain. If a DMARC record already exists, do not add a second one.
Here is a visual example for the domain lemontea.cafe from domain provider GoDaddy:
Here is a visual example for another domain in Siteground, where the domain name is automatically populated:
Step 3: Wait for your DMARC record to validate
DMARC changes usually take 24–48 hours to fully propagate.
You can check whether your DMARC record is live (authenticated) in your account under Account settings > Domain setup
Once your DMARC record is set up, do not remove it. Removing DMARC may cause deliverability issues.
Domain provider instructions
Each platform looks a little different, but the steps are similar everywhere. Use the guide that matches your provider:
How to add a TXT record on Squarespace
How to add a TXT record on GoDaddy
How to add a TXT record on Shopify
How to add a TXT record on Bluehost
How to add a TXT record on Cloudflare
How to add a TXT record on Siteground
How to add a TXT record on Wix
How to add a TXT record on Namecheap
How to add a TXT record on Crazy Domains
How to add a TXT record on Name.com
How to add a TXT record on Hostinger
How to add a TXT record on HostGator
How to add a TXT record on Porkbun
How to add a TXT record on InMotion
If your provider isn’t listed, search for “Add TXT record on [your provider]” or contact their support team.
If you bought your domain on one platform but host your website elsewhere, add the DMARC record where your DNS is managed.
For example, if you purchased your domain from GoDaddy.com but are hosting the website on Squarespace, you will need to add the DMARC record to Squarespace.
Common mistakes to avoid
Adding multiple DMARC records to the same domain
Setting p=reject before SPF and DKIM are fully working
Removing your DMARC record after setup
Trying to use DMARC with a free email address
Summary
DMARC protects your domain from spoofing
It works alongside SPF and DKIM
DMARC is managed through your domain provider, not Flodesk
Only custom domain senders can use DMARC
Starting with p=none is the safest approach
FAQ
What does DMARC stand for?
DMARC stands for Domain-based Message Authentication, Reporting & Conformance.
Can I use DMARC if I send from Gmail or Yahoo?
No. DMARC only works with custom domain email addresses.
Does Flodesk control my DMARC record?
No. DMARC is set up and managed through your domain provider. It’s not Flodesk or ESP-specific.
Will DMARC improve deliverability?
Yes. When set up correctly, DMARC helps inbox providers trust your emails and protect your sending reputation.
What happens if I remove my DMARC record?
Removing DMARC may cause deliverability issues and increase the risk of spoofing.
Do I need to change my DMARC policy later?
Not necessarily. Many senders keep p=none, which meets inbox provider requirements and helps protect deliverability.
As a best practice, some senders choose to move to p=quarantine or p=reject over time for additional security, but this should only be done once you’re confident all legitimate email sources are properly authenticated.
Remember, you may send email from more than just Flodesk. Other tools like your website platform (CMS), customer support software, invoicing or checkout tools, membership platforms, or CRM systems may also send email from your domain. All of those need to be properly authenticated before tightening your DMARC policy.