
How to Use Yes/No branch Steps in Flodesk Workflows
Yes/No branches let you personalize your automated workflows by splitting subscribers into two paths based on their behavior or profile data.
In simple terms:
If this is true → send them down the Yes path.
If not → they follow the No path.
Important update: branches now rejoin automatically
Yes/No branches no longer create permanently separate paths by default.
After subscribers move through the Yes or No path, they automatically rejoin the main workflow and continue together—unless you explicitly stop them with an Exit step.
This keeps workflows shorter, easier to manage, and prevents duplicated steps.
Note: Auto re-join applies to newly added branch steps. Existing workflows remain unchanged unless you modify them.
What you can do with a Yes/No branch
Use a Yes/No branch to check whether a subscriber:
Opened a workflow email
Clicked a link in a workflow email
Belongs to specific segment(s)
Matches custom data field values
Has certain profile attributes (signup source, activity, email address, etc.)
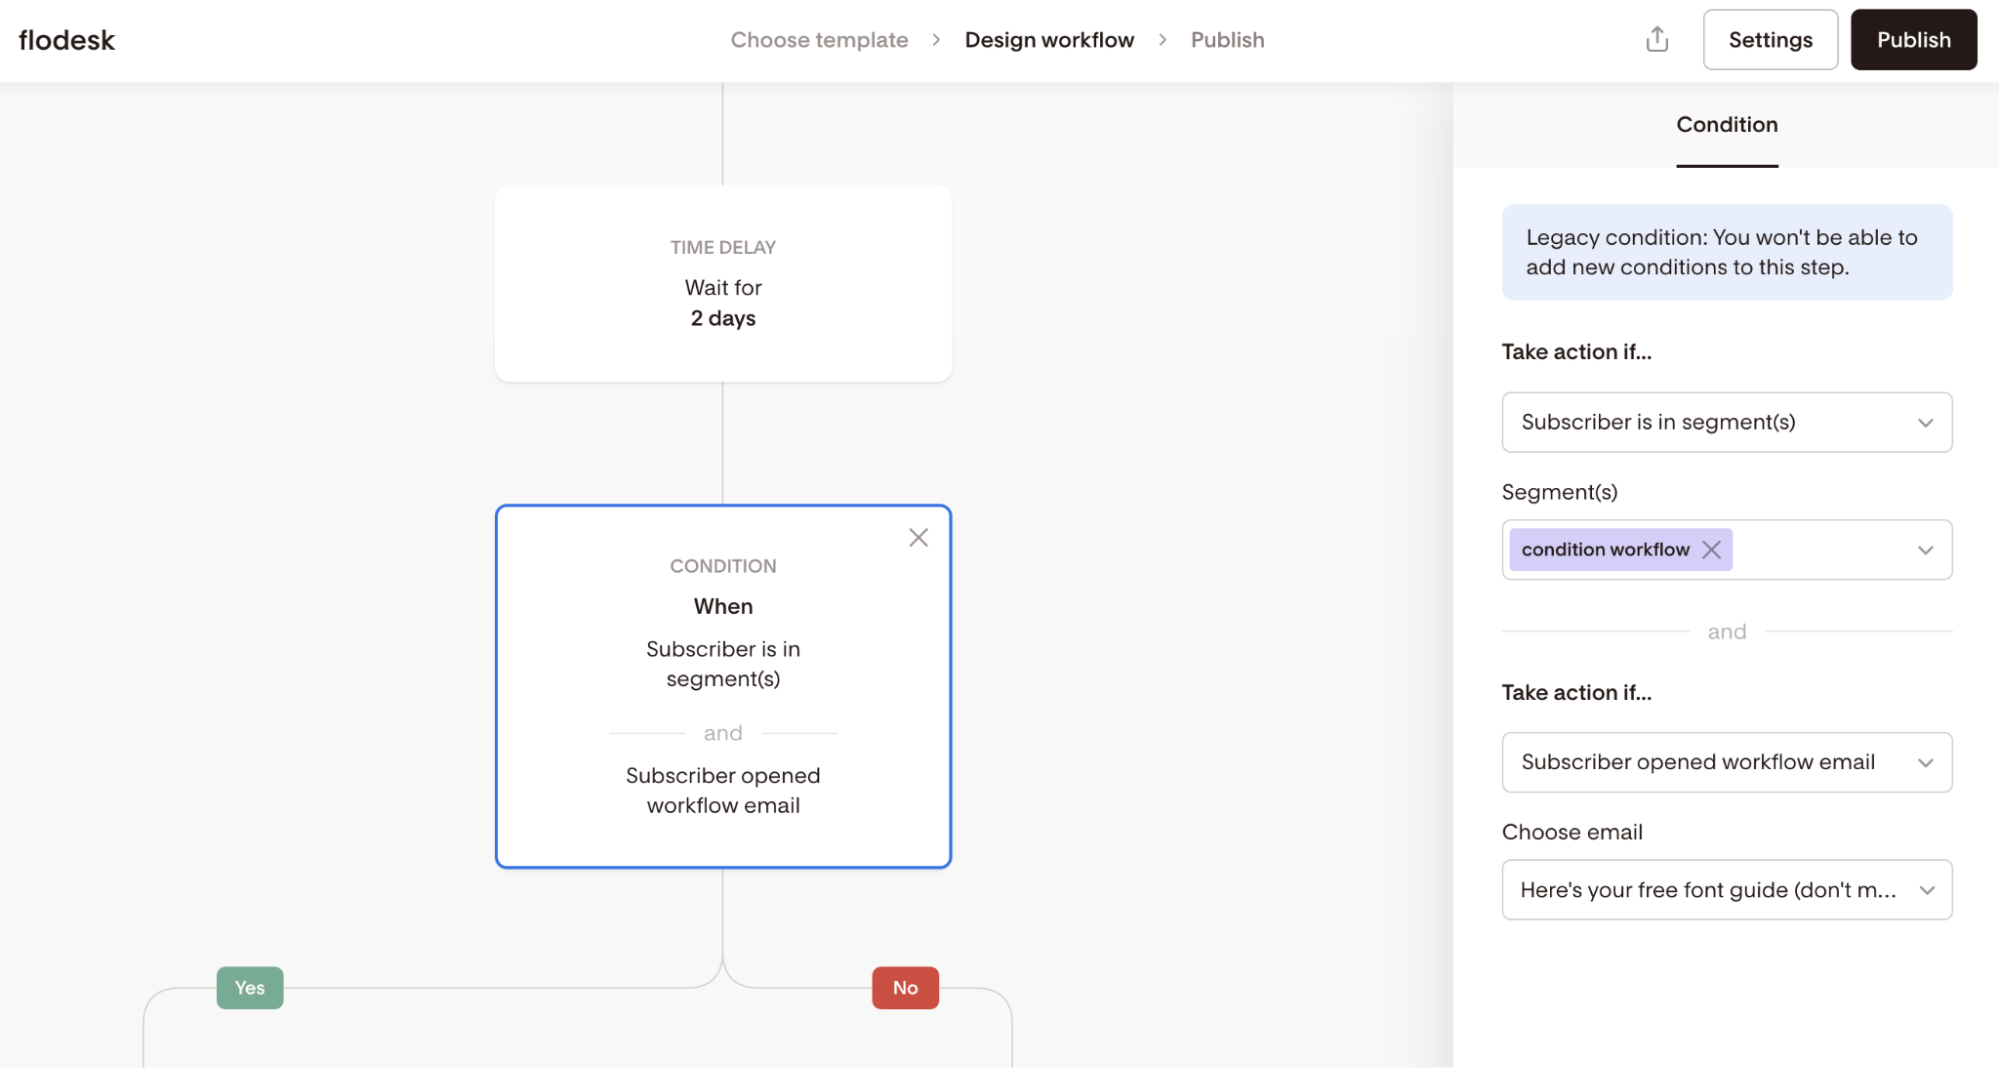
These steps replace the legacy Condition step in older workflows.
Before you start
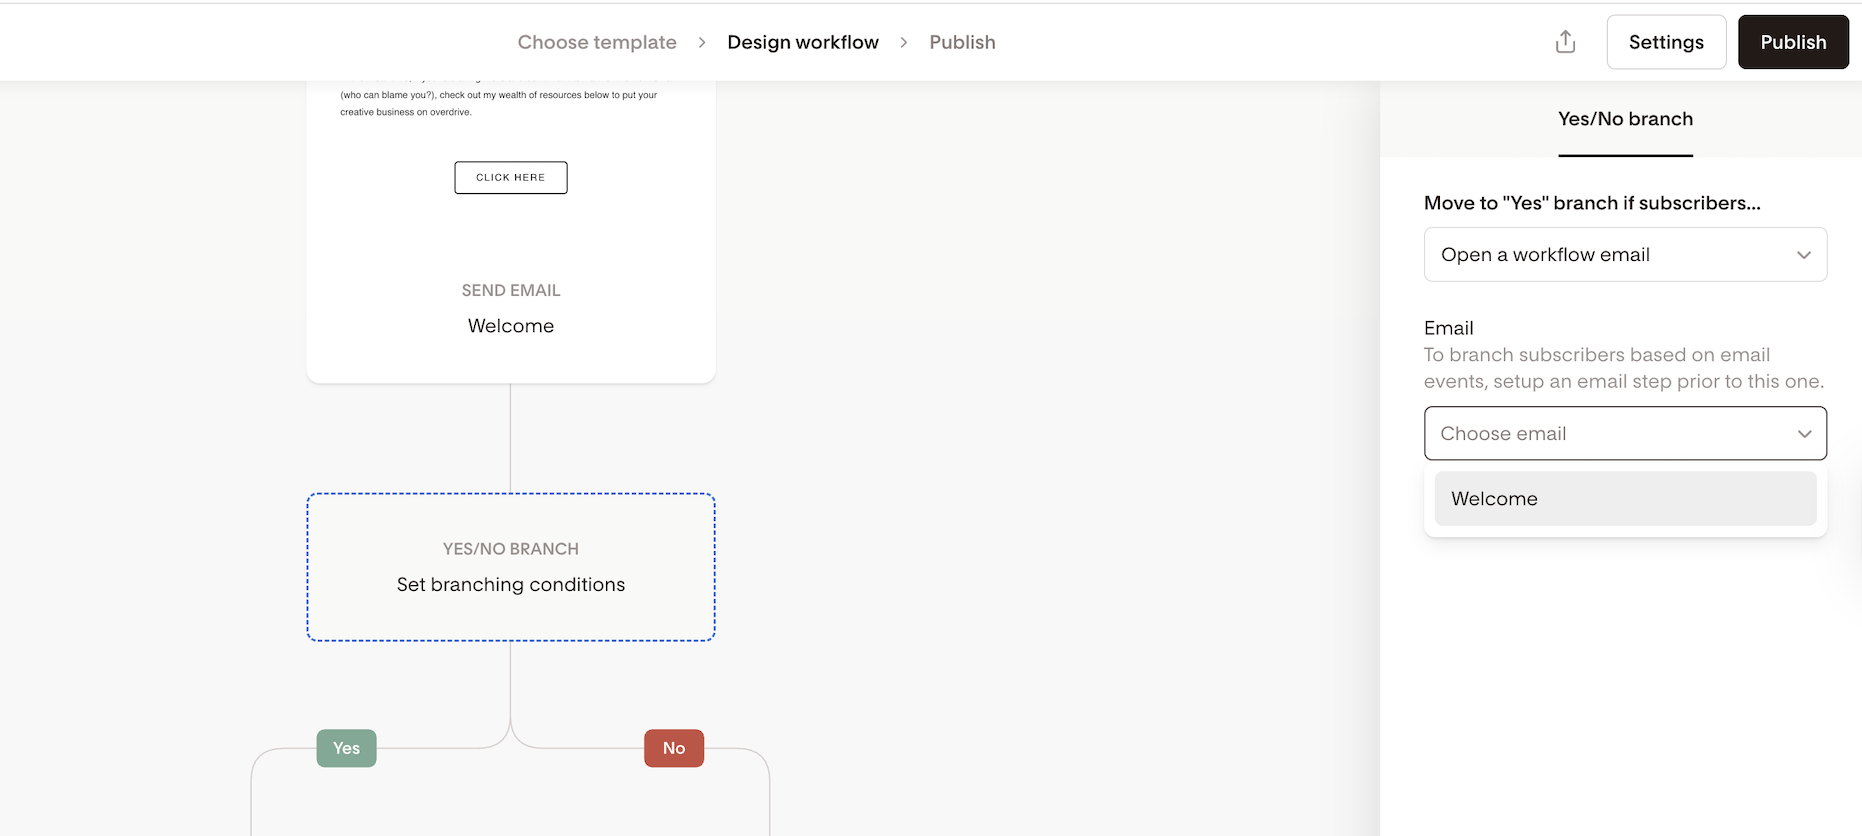
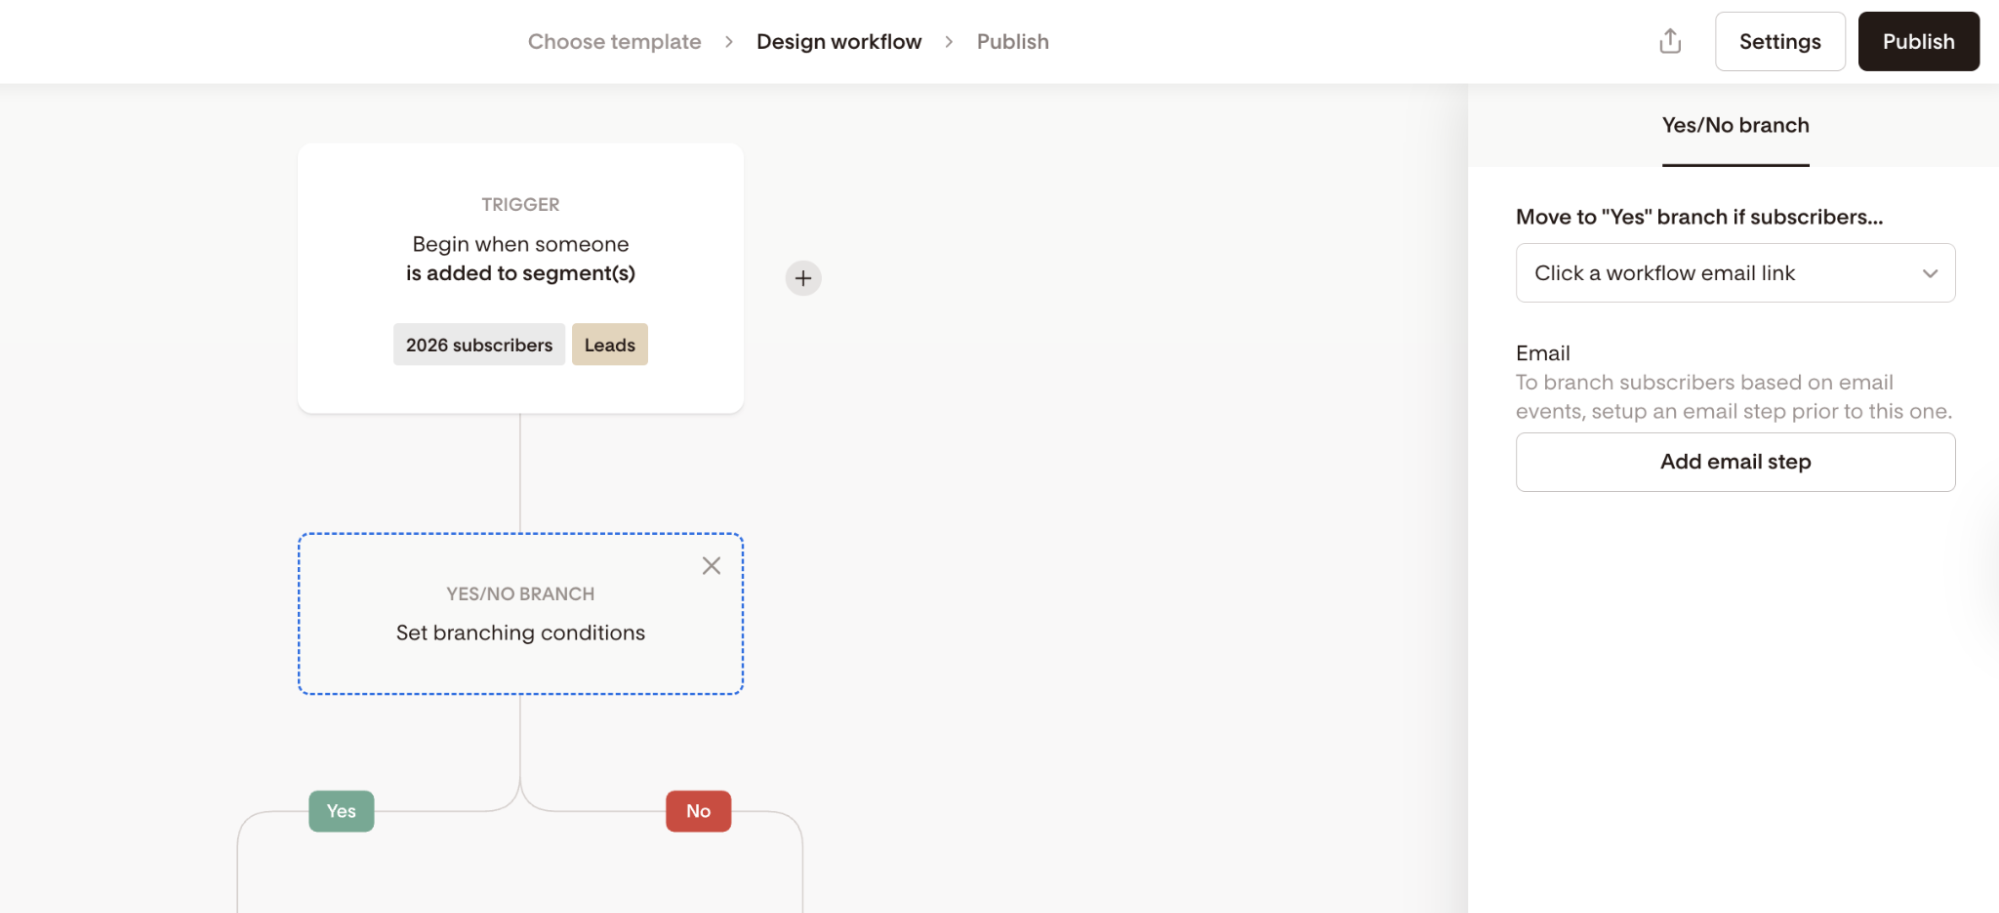
If you’re branching based on email opens or clicks, you must add an Email step before the Yes/No branch.
If you edit an old “Condition” step, it will automatically convert to a Yes/No branch once modified.
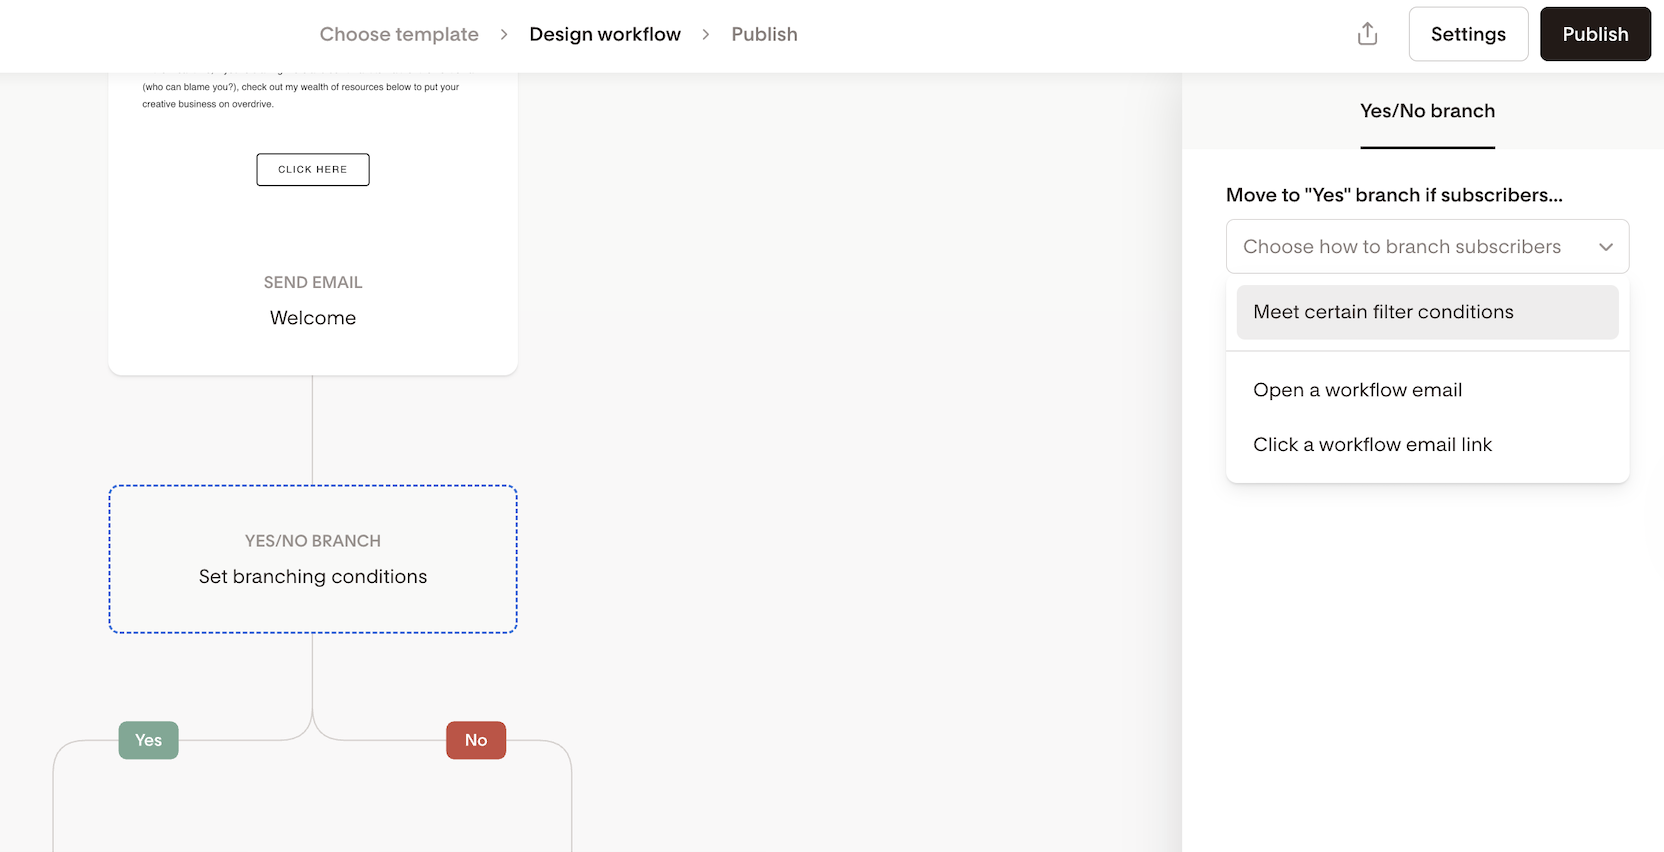
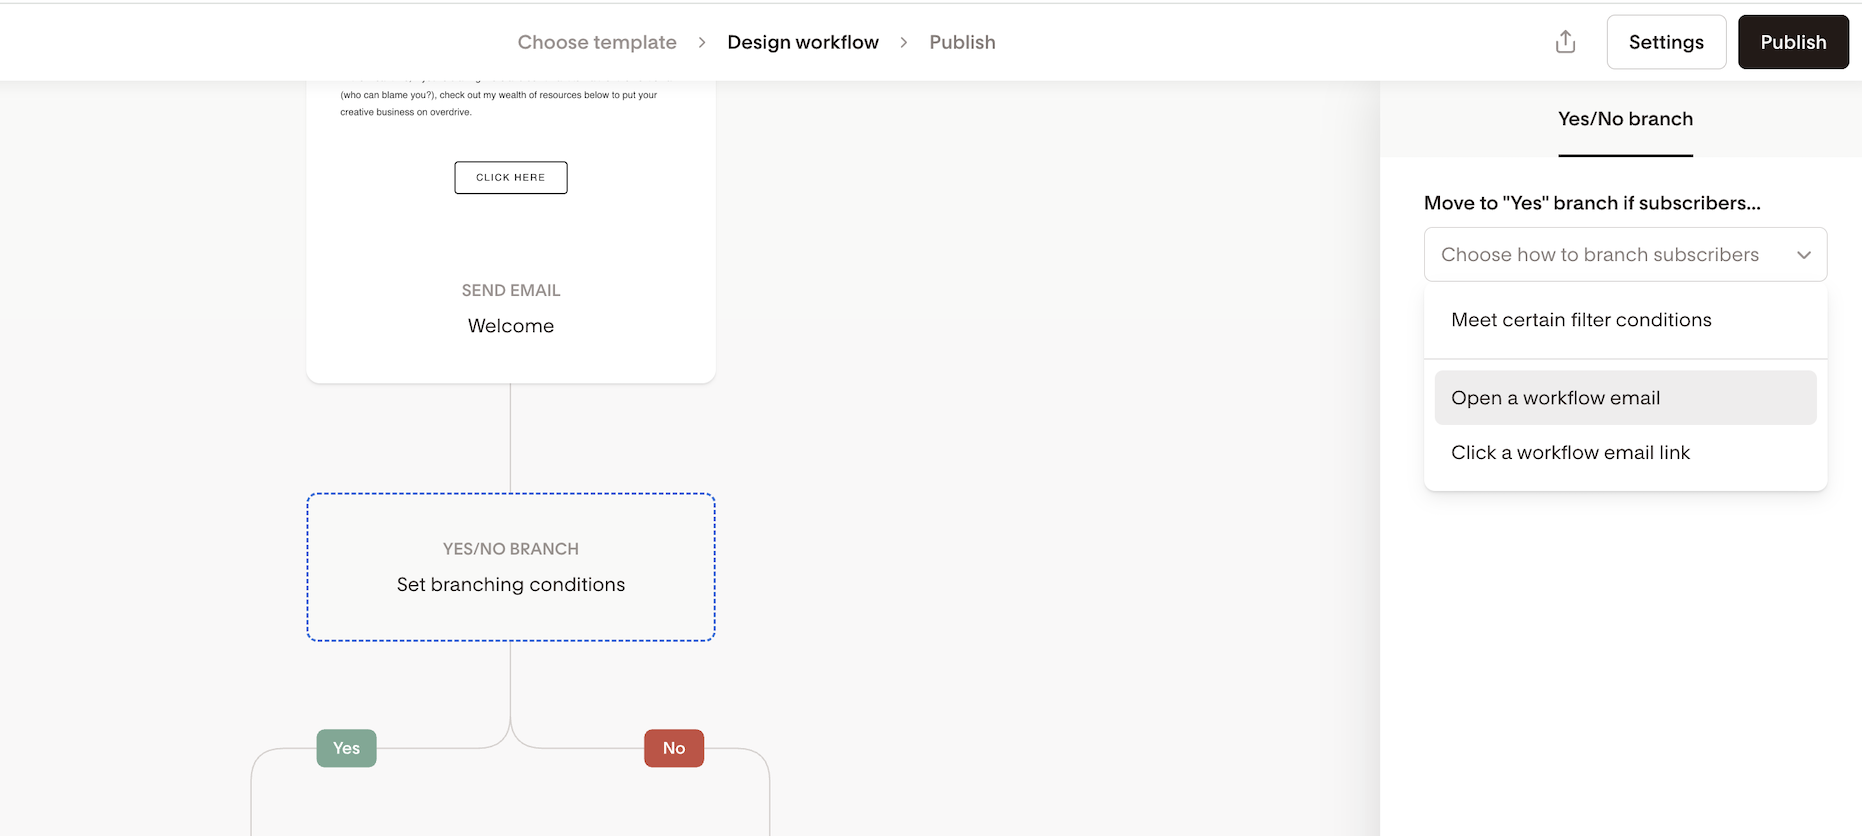
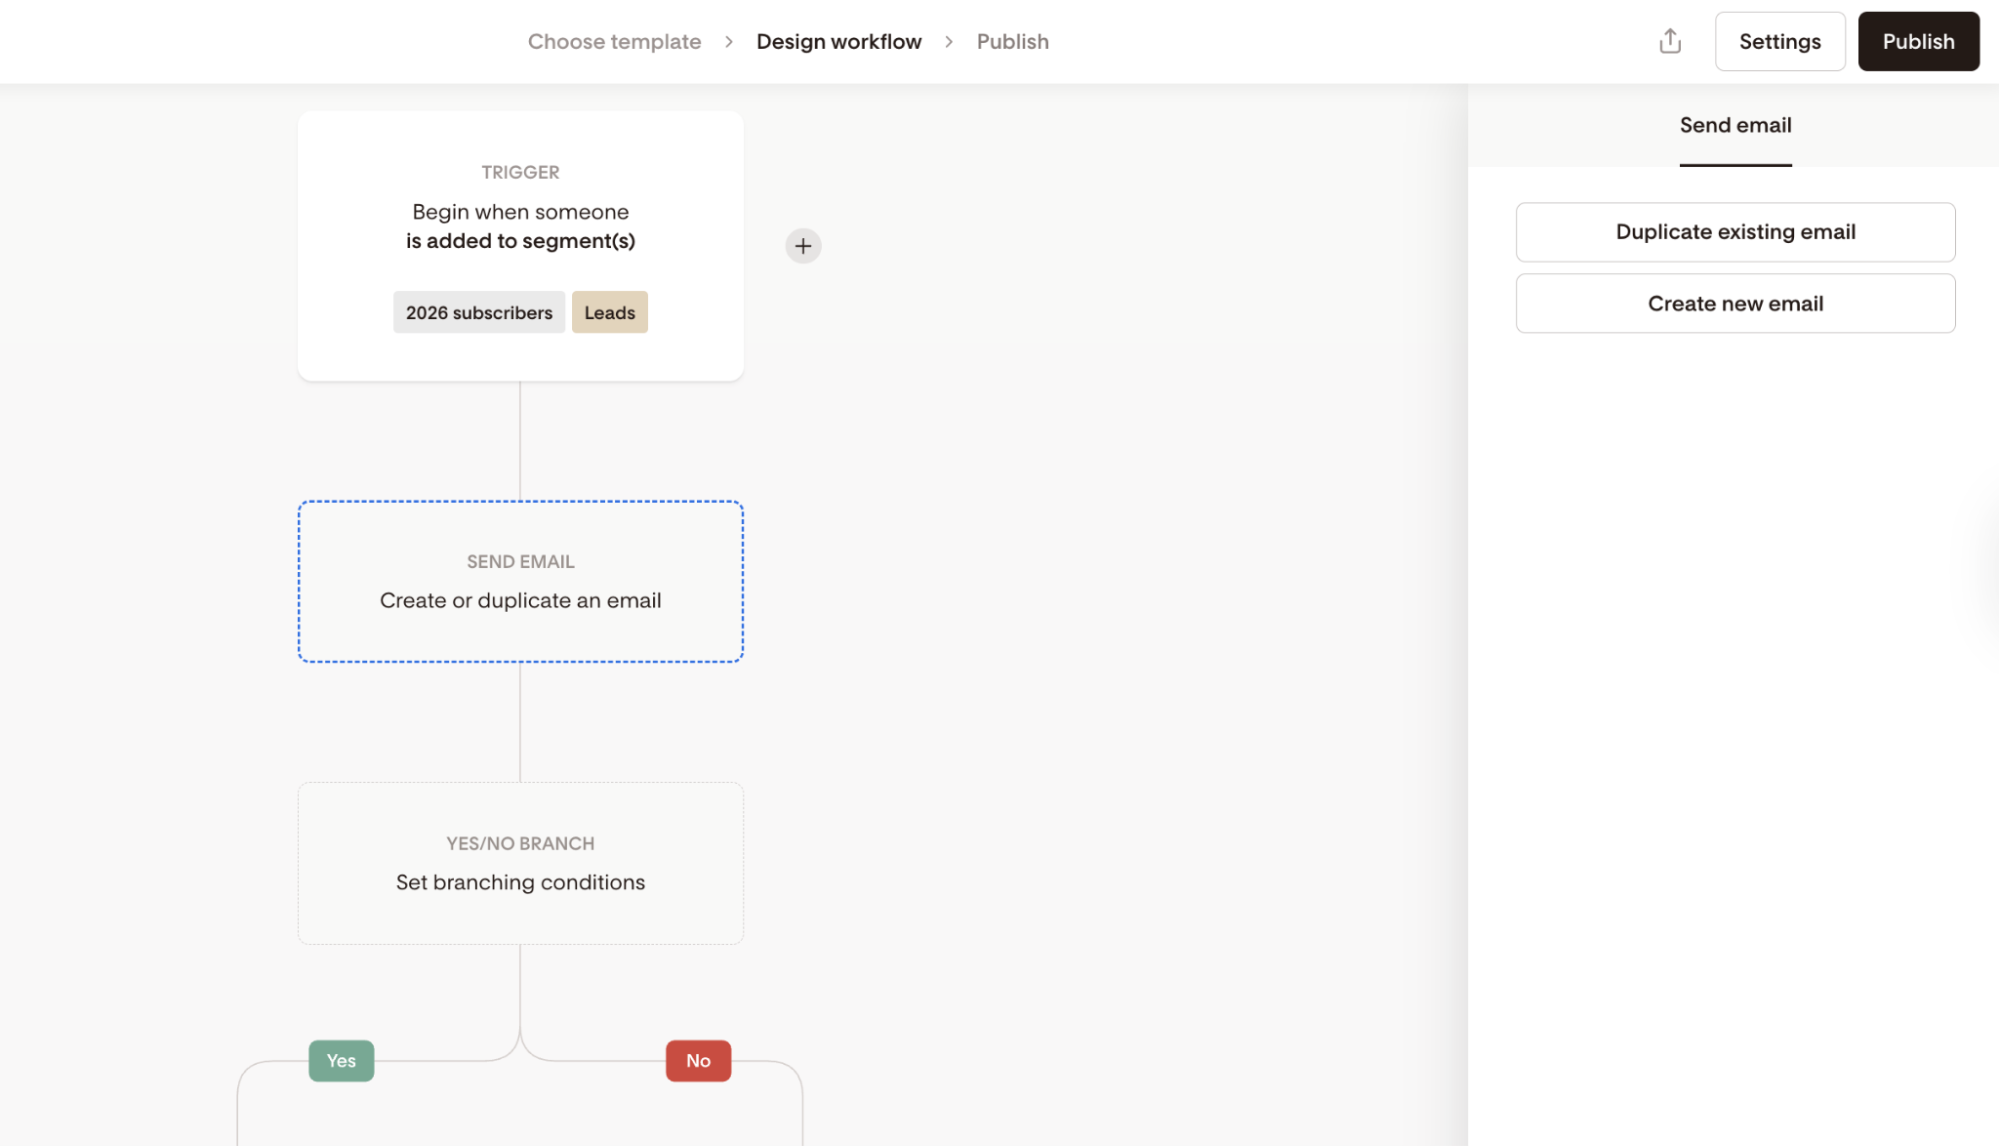
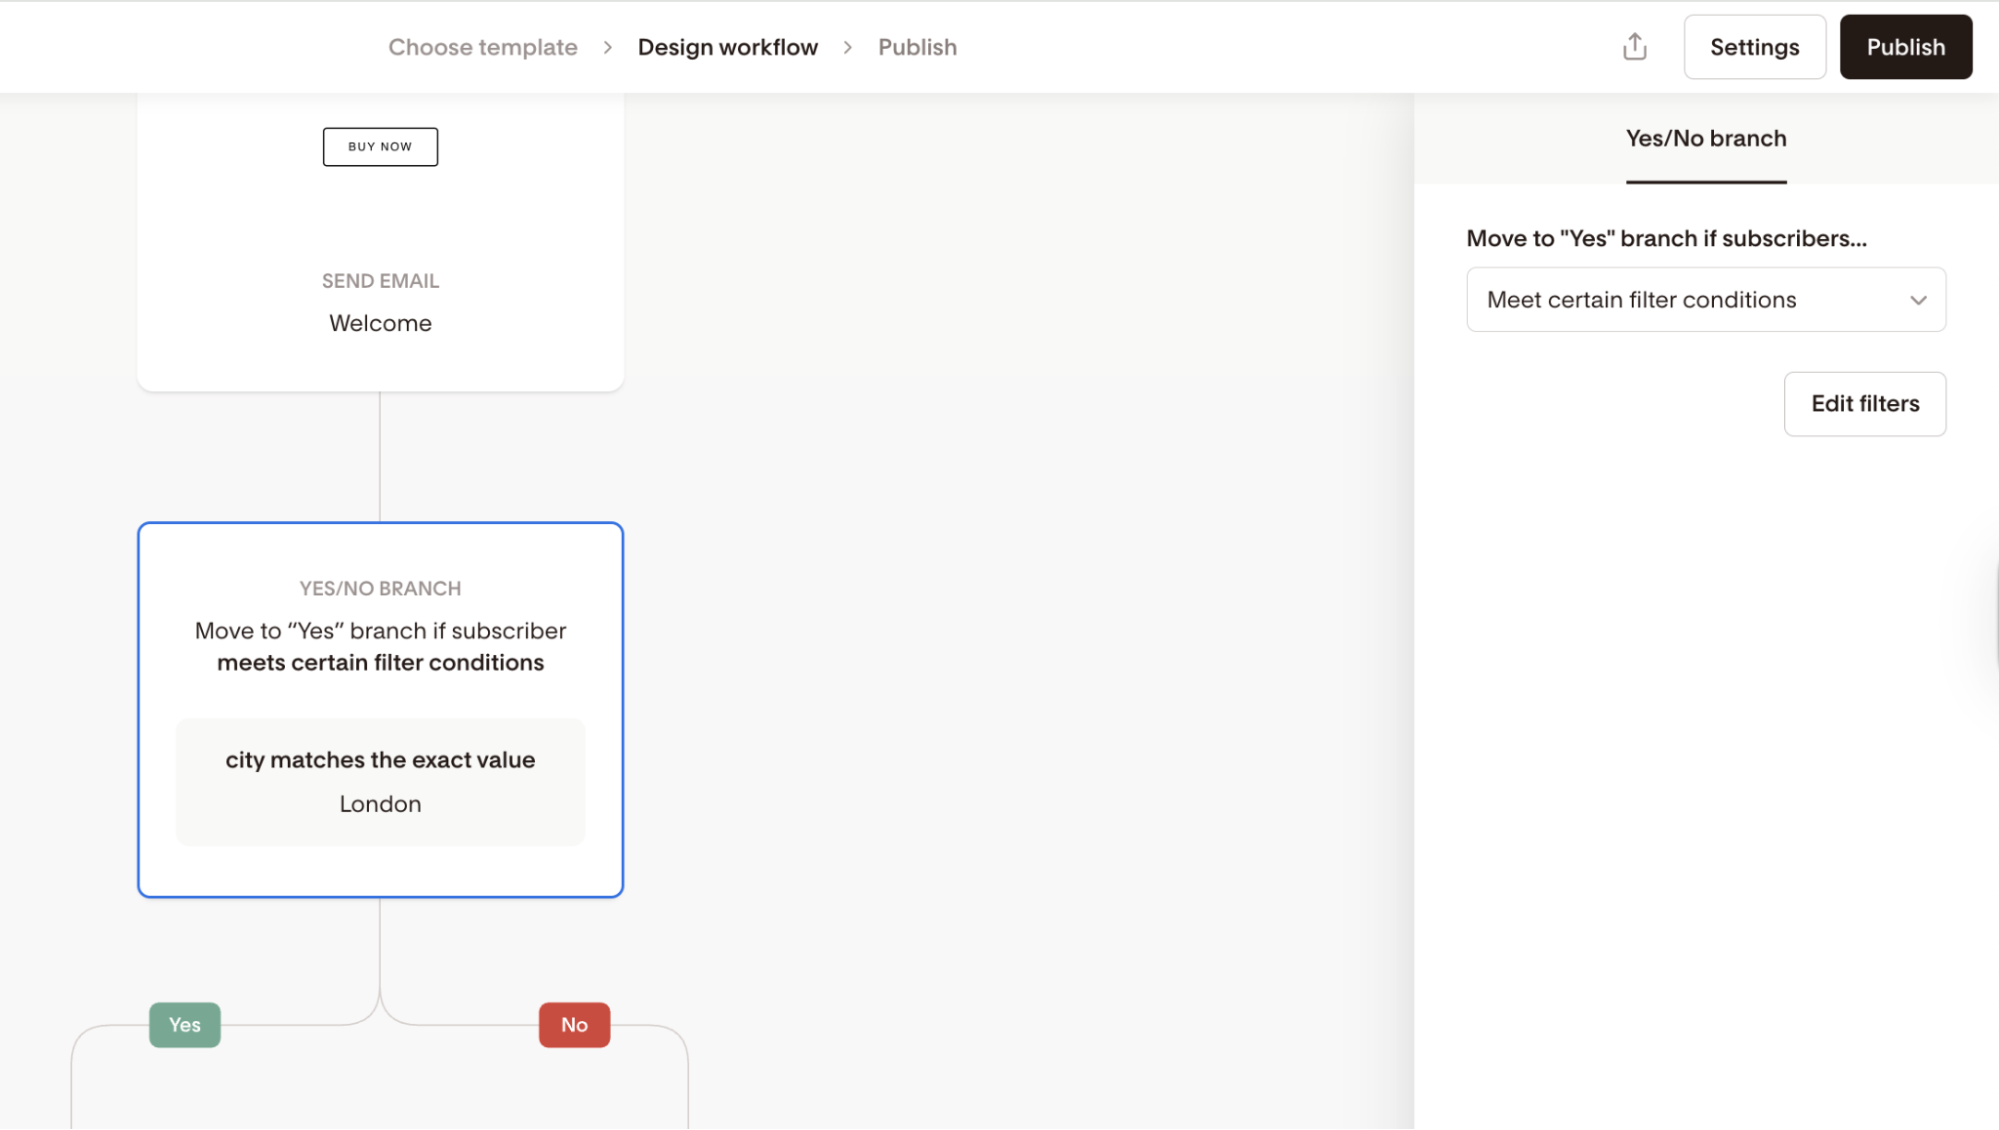
How to add a Yes/No branch step
Hover over the line where you want to split subscribers.
Select + → Yes/No branch.
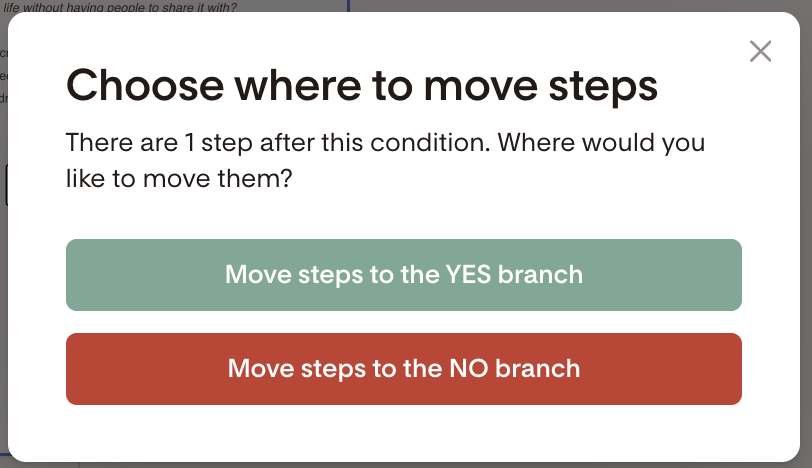
If steps exist below that point, choose where to move them.
Use the right-hand panel to choose the condition type.
Build out the Yes and No paths below.
What happens after the split?
The Yes and No paths are temporary conditional paths
You can add emails, delays, actions, or more branches inside each path
If there is no Exit step in a split branch, subscribers automatically rejoin the main workflow below the branch
Think of it as:
Split → personalize → rejoin → continue
Use Cases & Step-by-Step Instructions
Branch subscribers based on Segment membership
Example:
“Is this subscriber in Segment A and Segment B?”
Yes → send niche content
No → move them into a general nurture series
How to set this up
Step 1. Add a Yes/No branch.
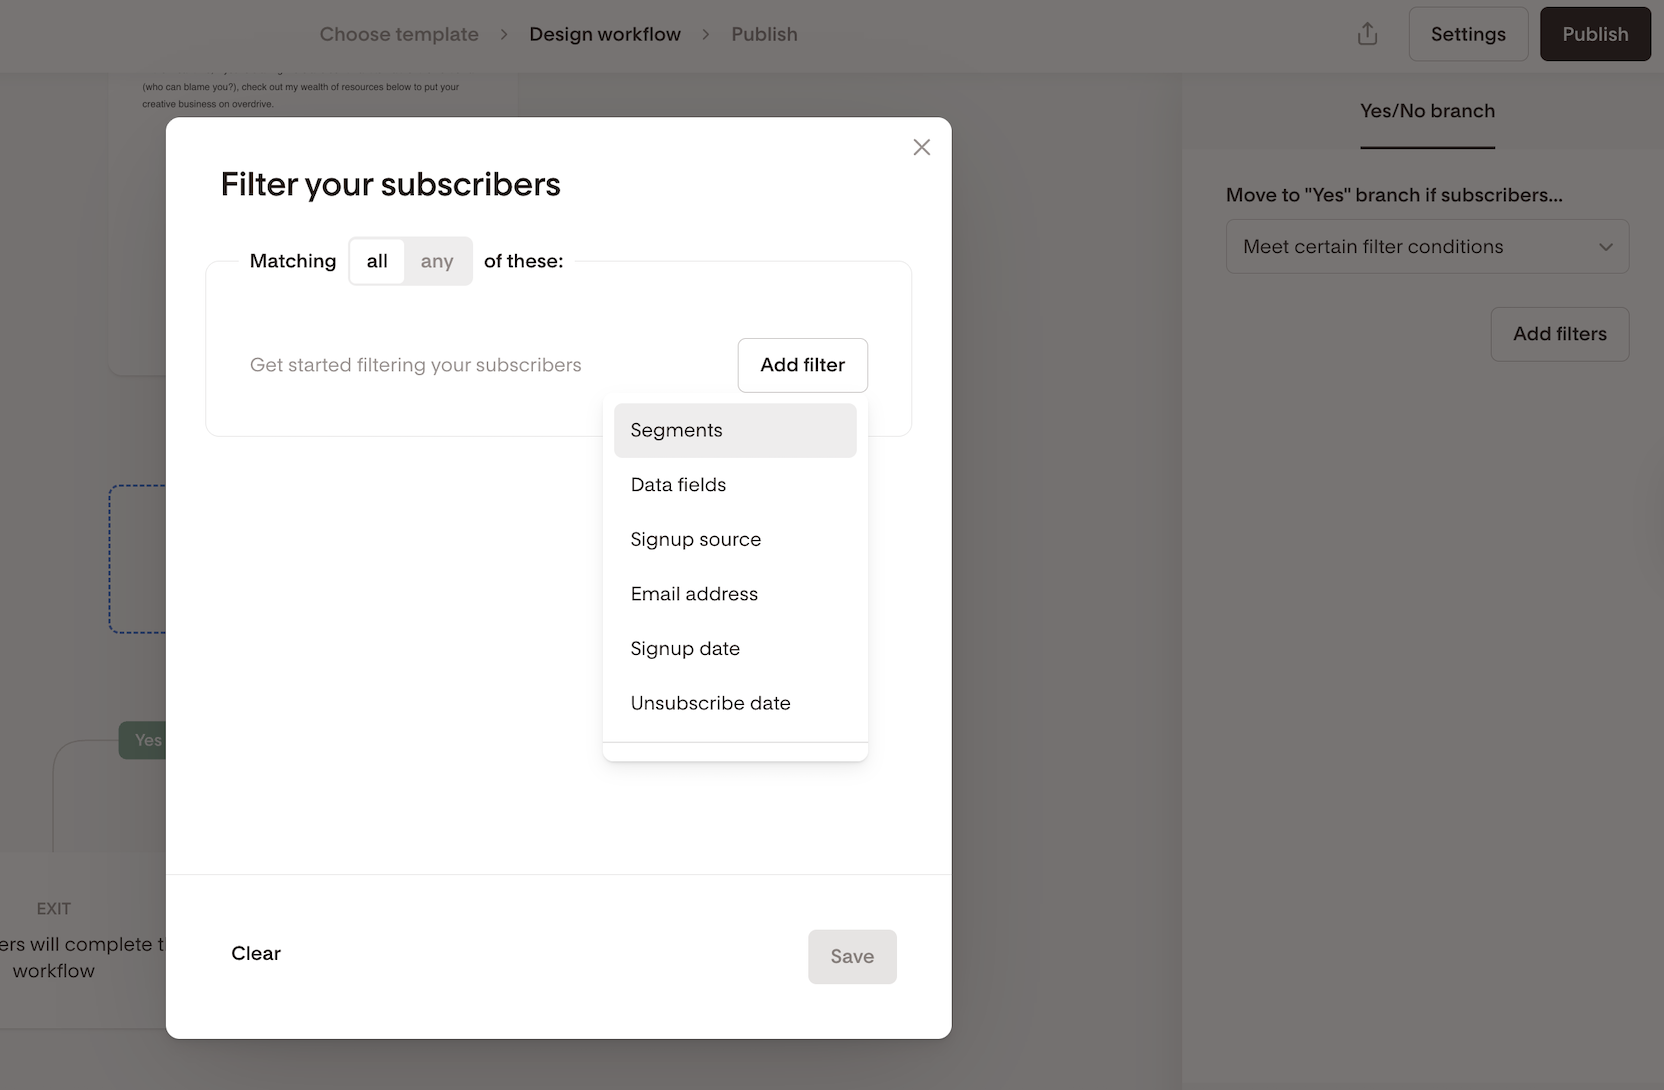
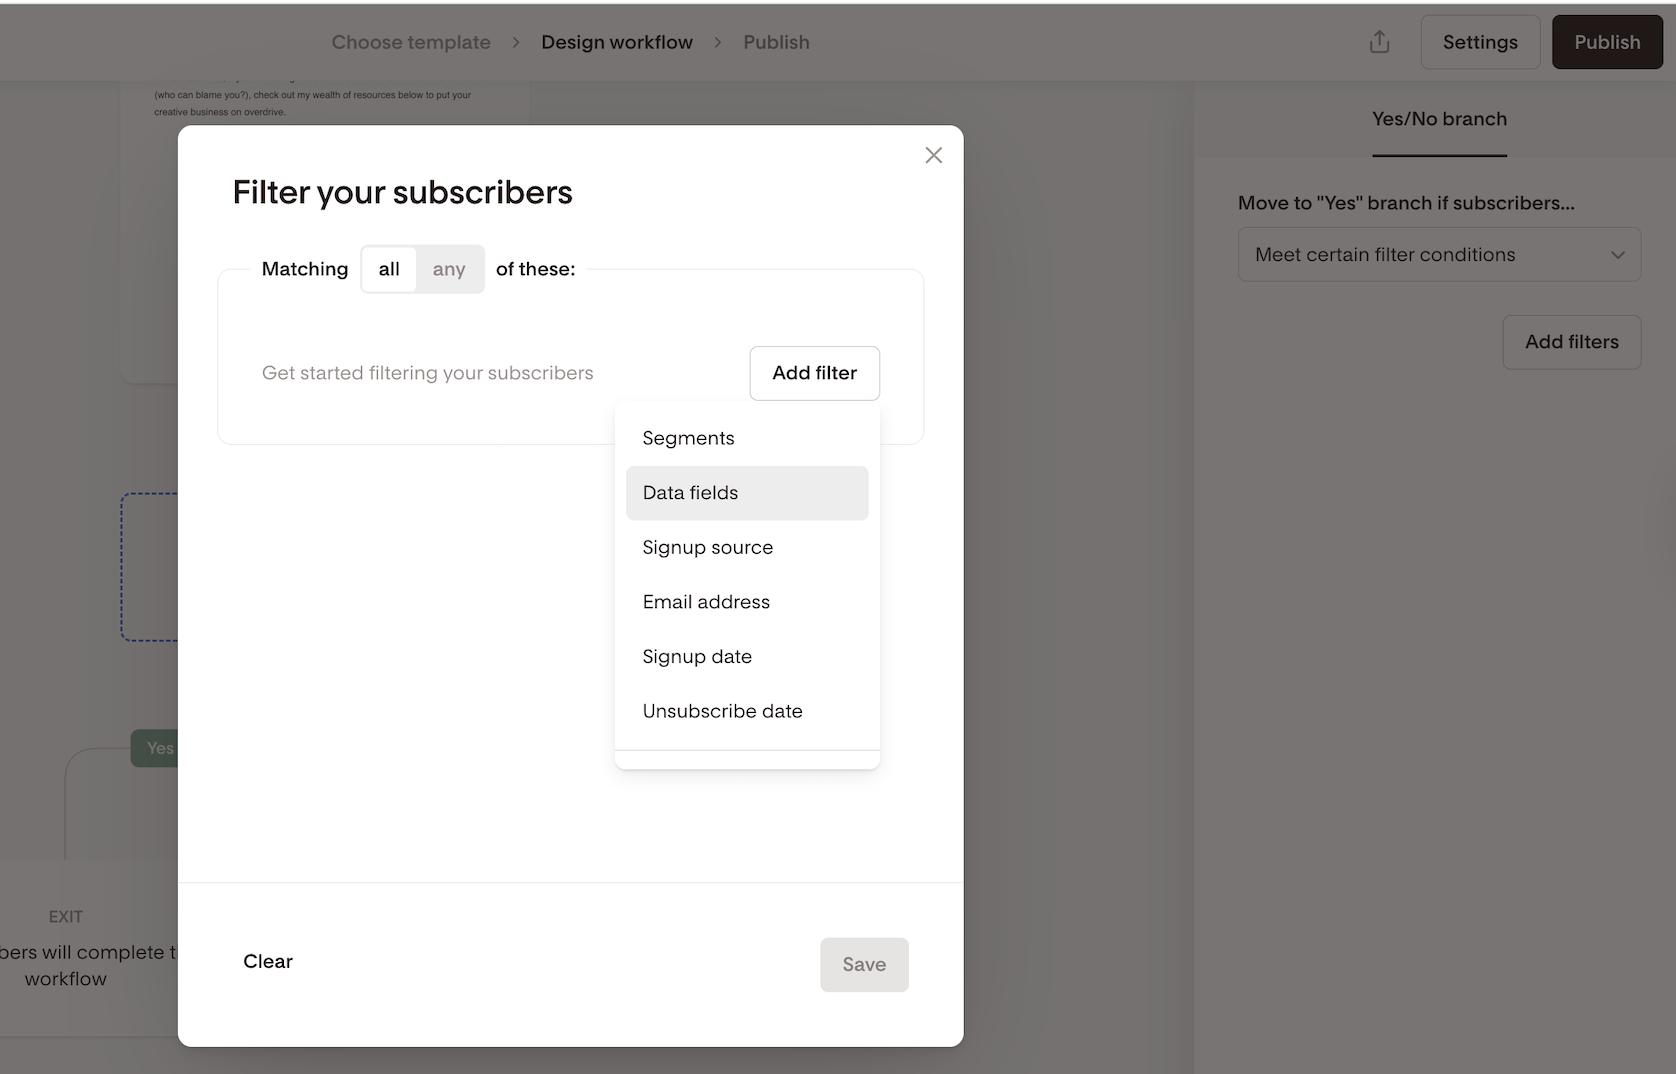
Step 2. Under Move to “Yes” branch if subscribers…, choose Meet certain filter conditions → Add filters.
Step 3. Select Segments.
Step 4. Choose the segment(s) and specify whether the subscriber must match all (AND) or any (OR) of them.
You may specify as many segments as you like.

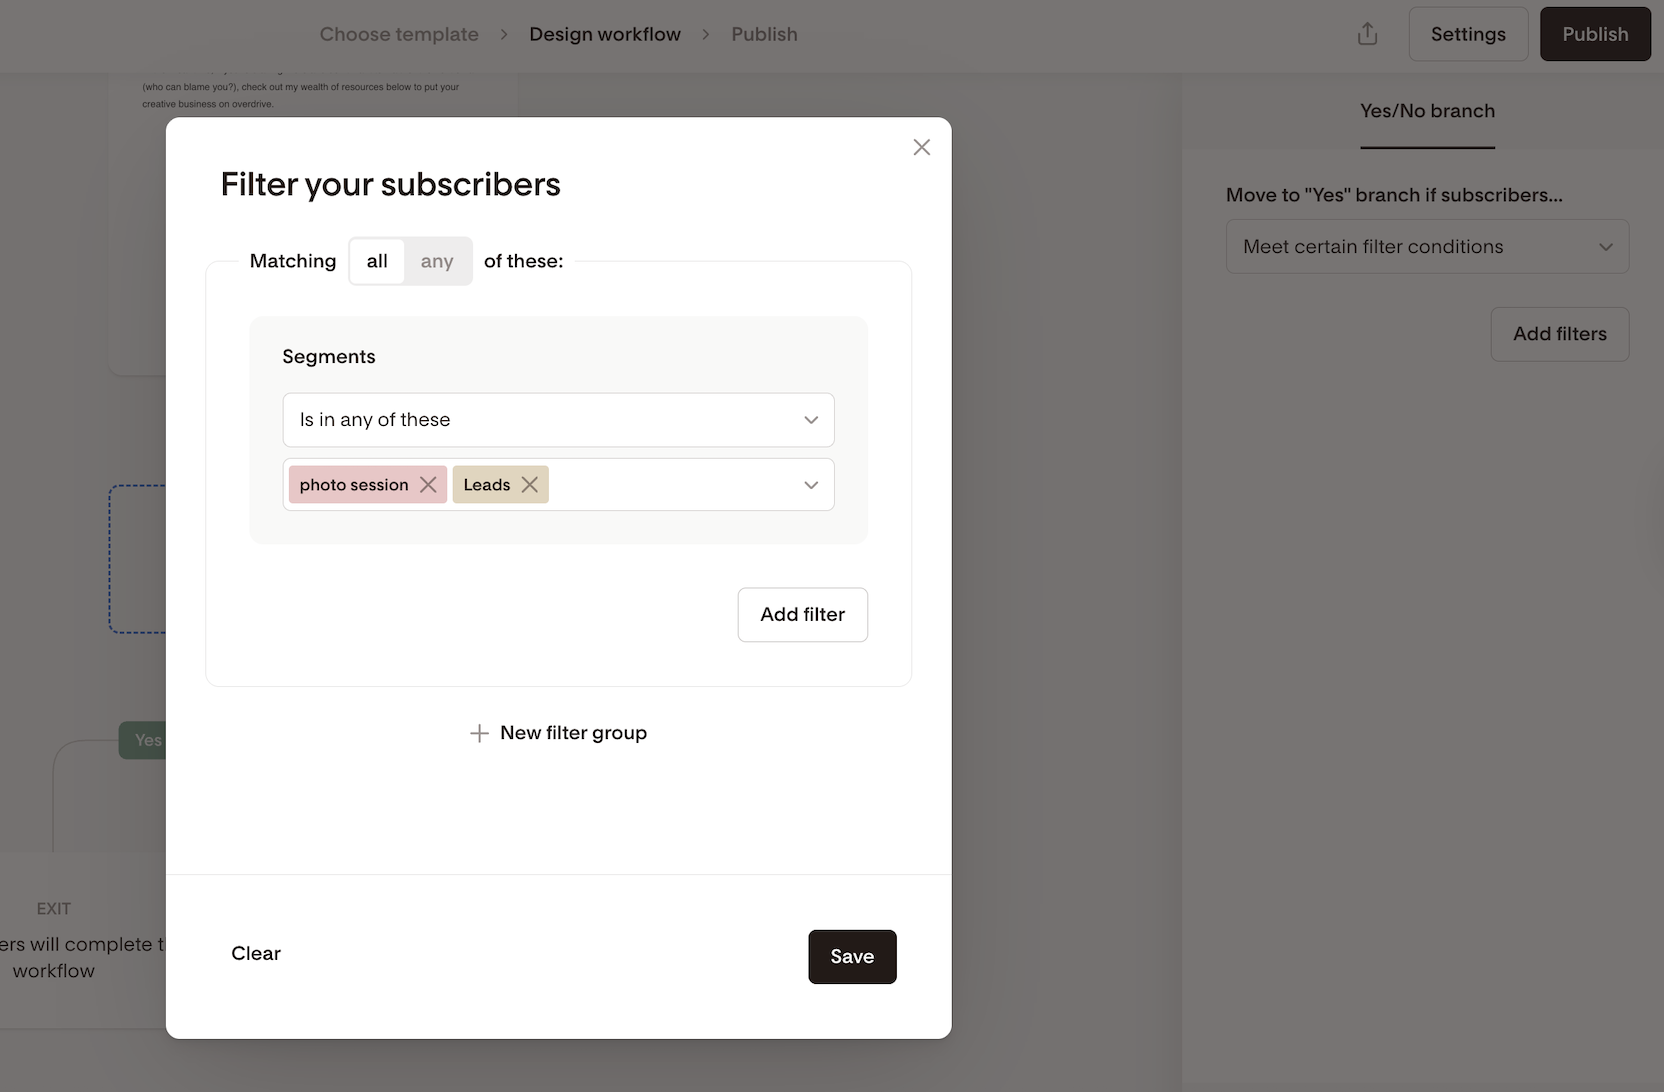
Step 5. Save and continue building both branches. After completing the Yes or No path, subscribers automatically rejoin the main workflow unless an Exit step is added.

Branch subscribers who opened a workflow email
Example:
Check if subscribers opened Email 1 within one day:
Yes → continue the workflow
No → send a reminder or alternative message
How to set this up
Step 1. Add a Yes/No branch after an email step.
Step 2. Select Open a workflow email.
Step 3. Choose the specific email (listed by subject line, also visible on the workflow email step card).
Step 4. Select a timeframe (e.g., Within 1 day). This means that as soon as a subscriber opens the specified email, they will immediately move to the next step under the Yes branch if that happens within 1 day.
After the 1 day timeframe expires, everyone who hasn’t opened the email yet will automatically move to the next step under the No branch.
Important: No separate time delay step is needed before the Yes/No branch as the timeframe is built in.
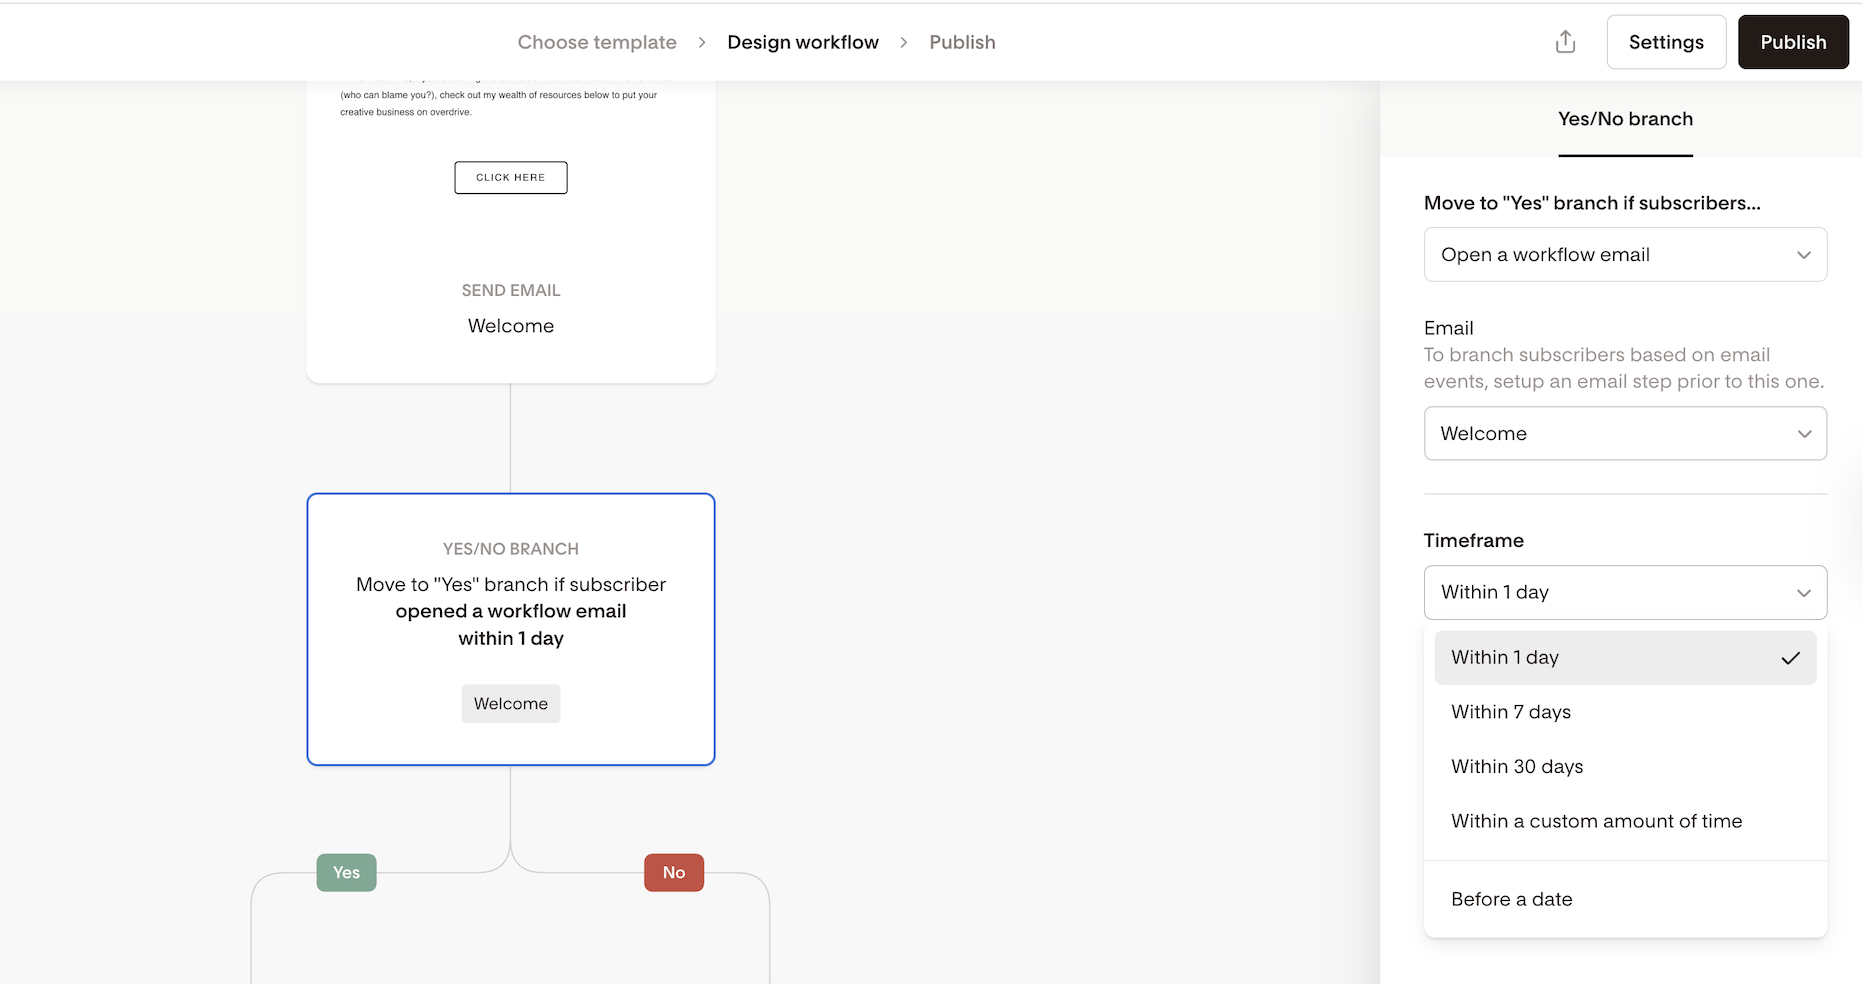
Step 5. Continue building your workflow below the Yes and No branches. Subscribers automatically rejoin the main workflow after the branch unless an Exit step is added.
Branch subscribers who clicked a link in a workflow email
Example:
Check if subscribers clicked a product link:
Yes → add them to a high-intent segment
No → send a reminder or follow-up offer
How to set this up
Step 1. Add a Yes/No branch after an email step.
Step 2. Select Click a workflow email link.
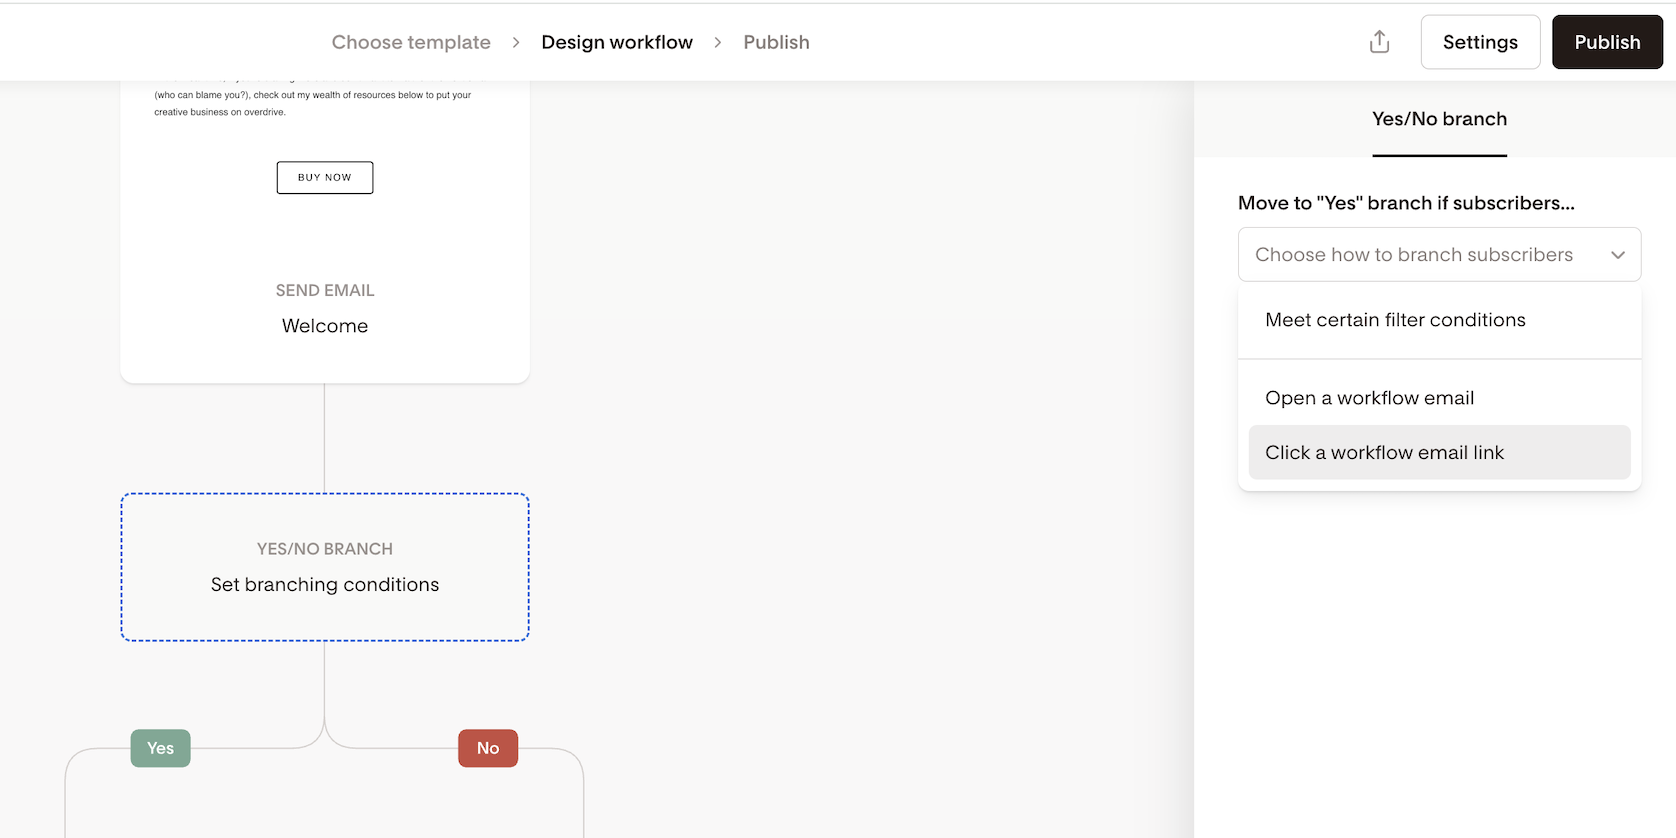
Step 3. Choose the email, then select the specific link and set a timeframe (e.g., Within 1 day).
In the example below, we selected “Within 1 day”. This means that as soon as a subscriber clicks the specified email link, they will immediately move to the next step under the Yes branch if that happens within 1 day.
After the 1 day timeframe expires, everyone who hasn’t clicked that email link yet will automatically move to the next step under the No branch.
Important: No separate time delay step is needed before the Yes/No branch as the timeframe is built in.
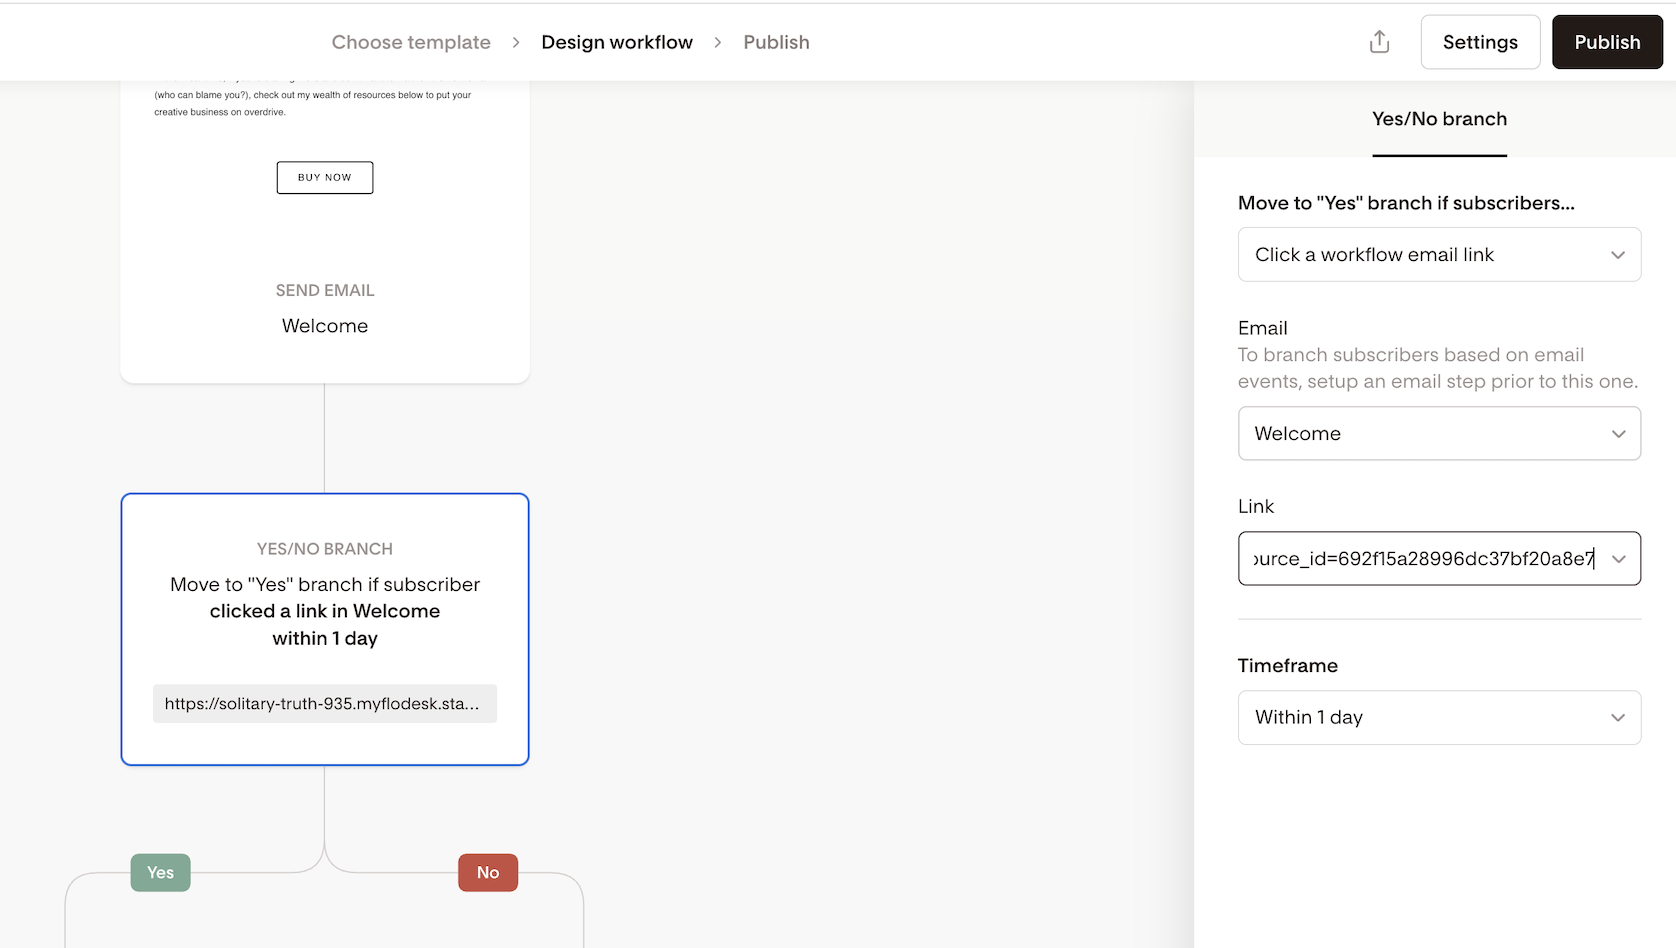
Step 4. Continue building your workflow below the Yes and No branches. Subscribers automatically rejoin the main workflow after the branch unless an Exit step is added.
Note: If there is no email step before the Yes/No branch and you want to branch subscribers based on who opened a workflow email or clicked a workflow email, you will be prompted to add an email step first.

Branch subscribers based on custom data fields
This is helpful for birthday months, purchase preferences, locations, or event-based marketing.
Example:
Custom data field: Wedding Month = May
Yes → send May-specific planning emails
No → send a general sequence
How to set this up
Step 1. Add a Yes/No branch.
Step 2. Choose Meet certain filter conditions → Add filters.

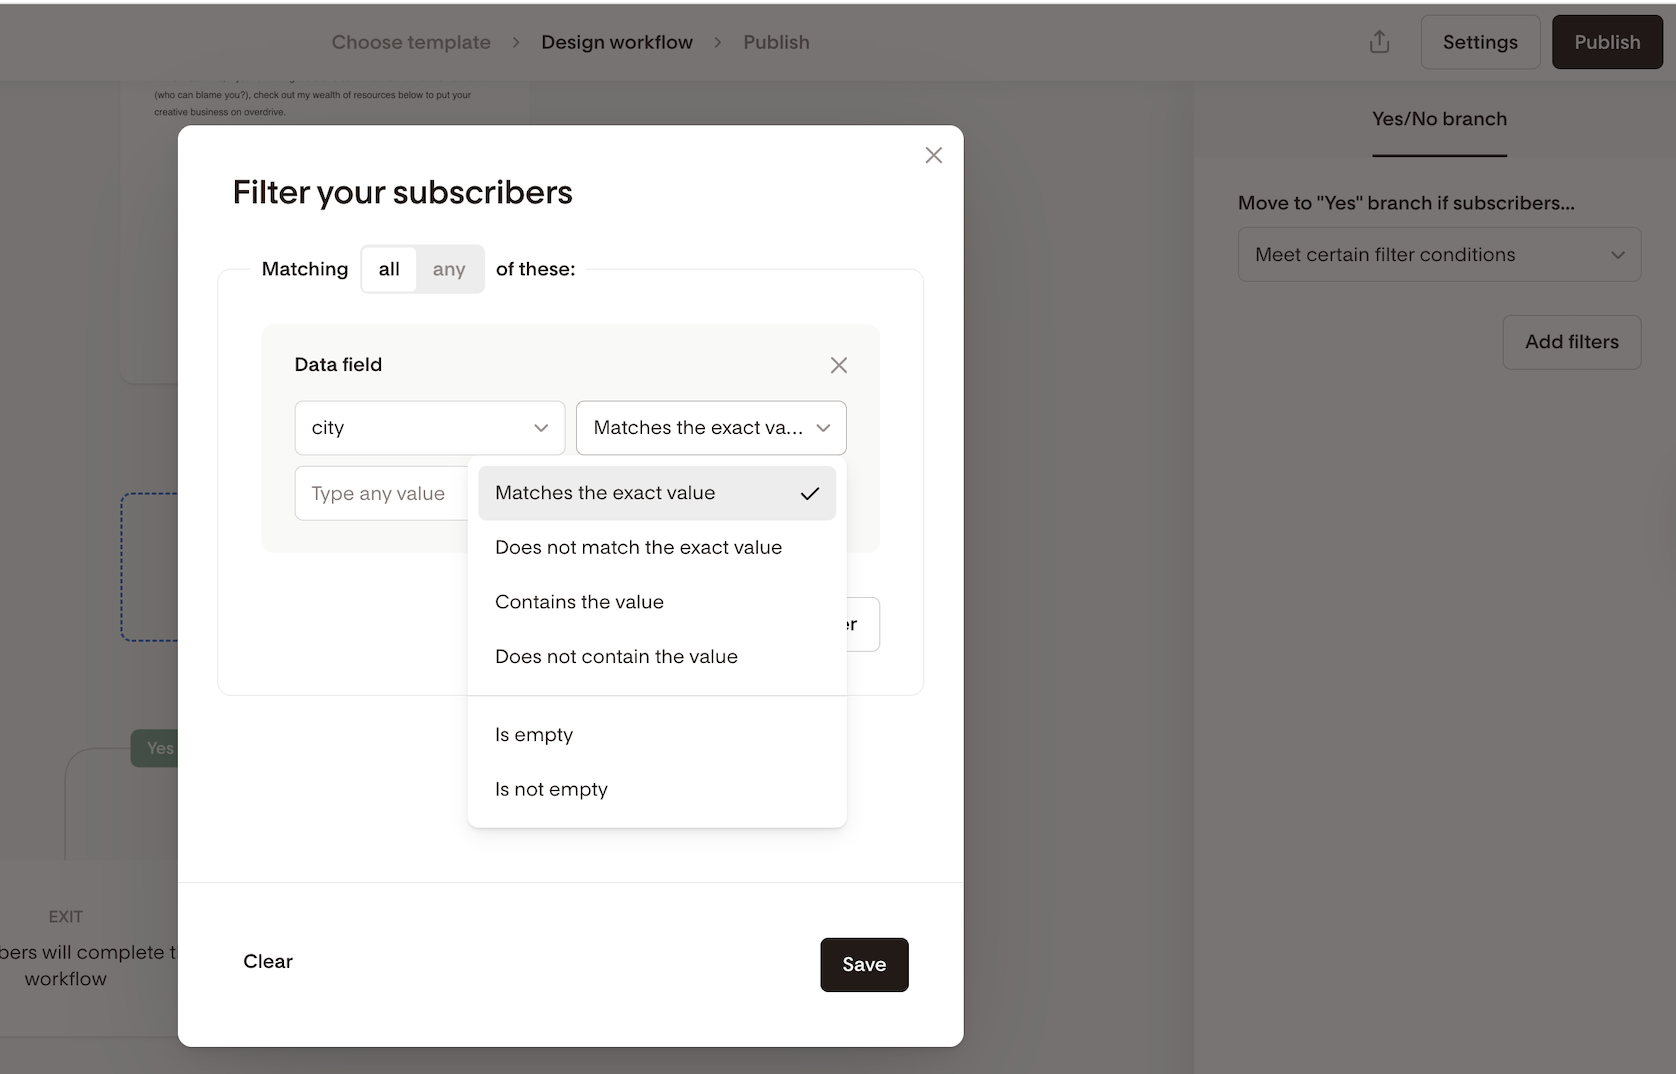
Step 3. Select Data fields.
Step 4. Choose your data field and specify the value. Hit Save.
Step 5. Continue building your workflow below the Yes and No branches. After each path, subscribers rejoin the main workflow unless an Exit step is added.
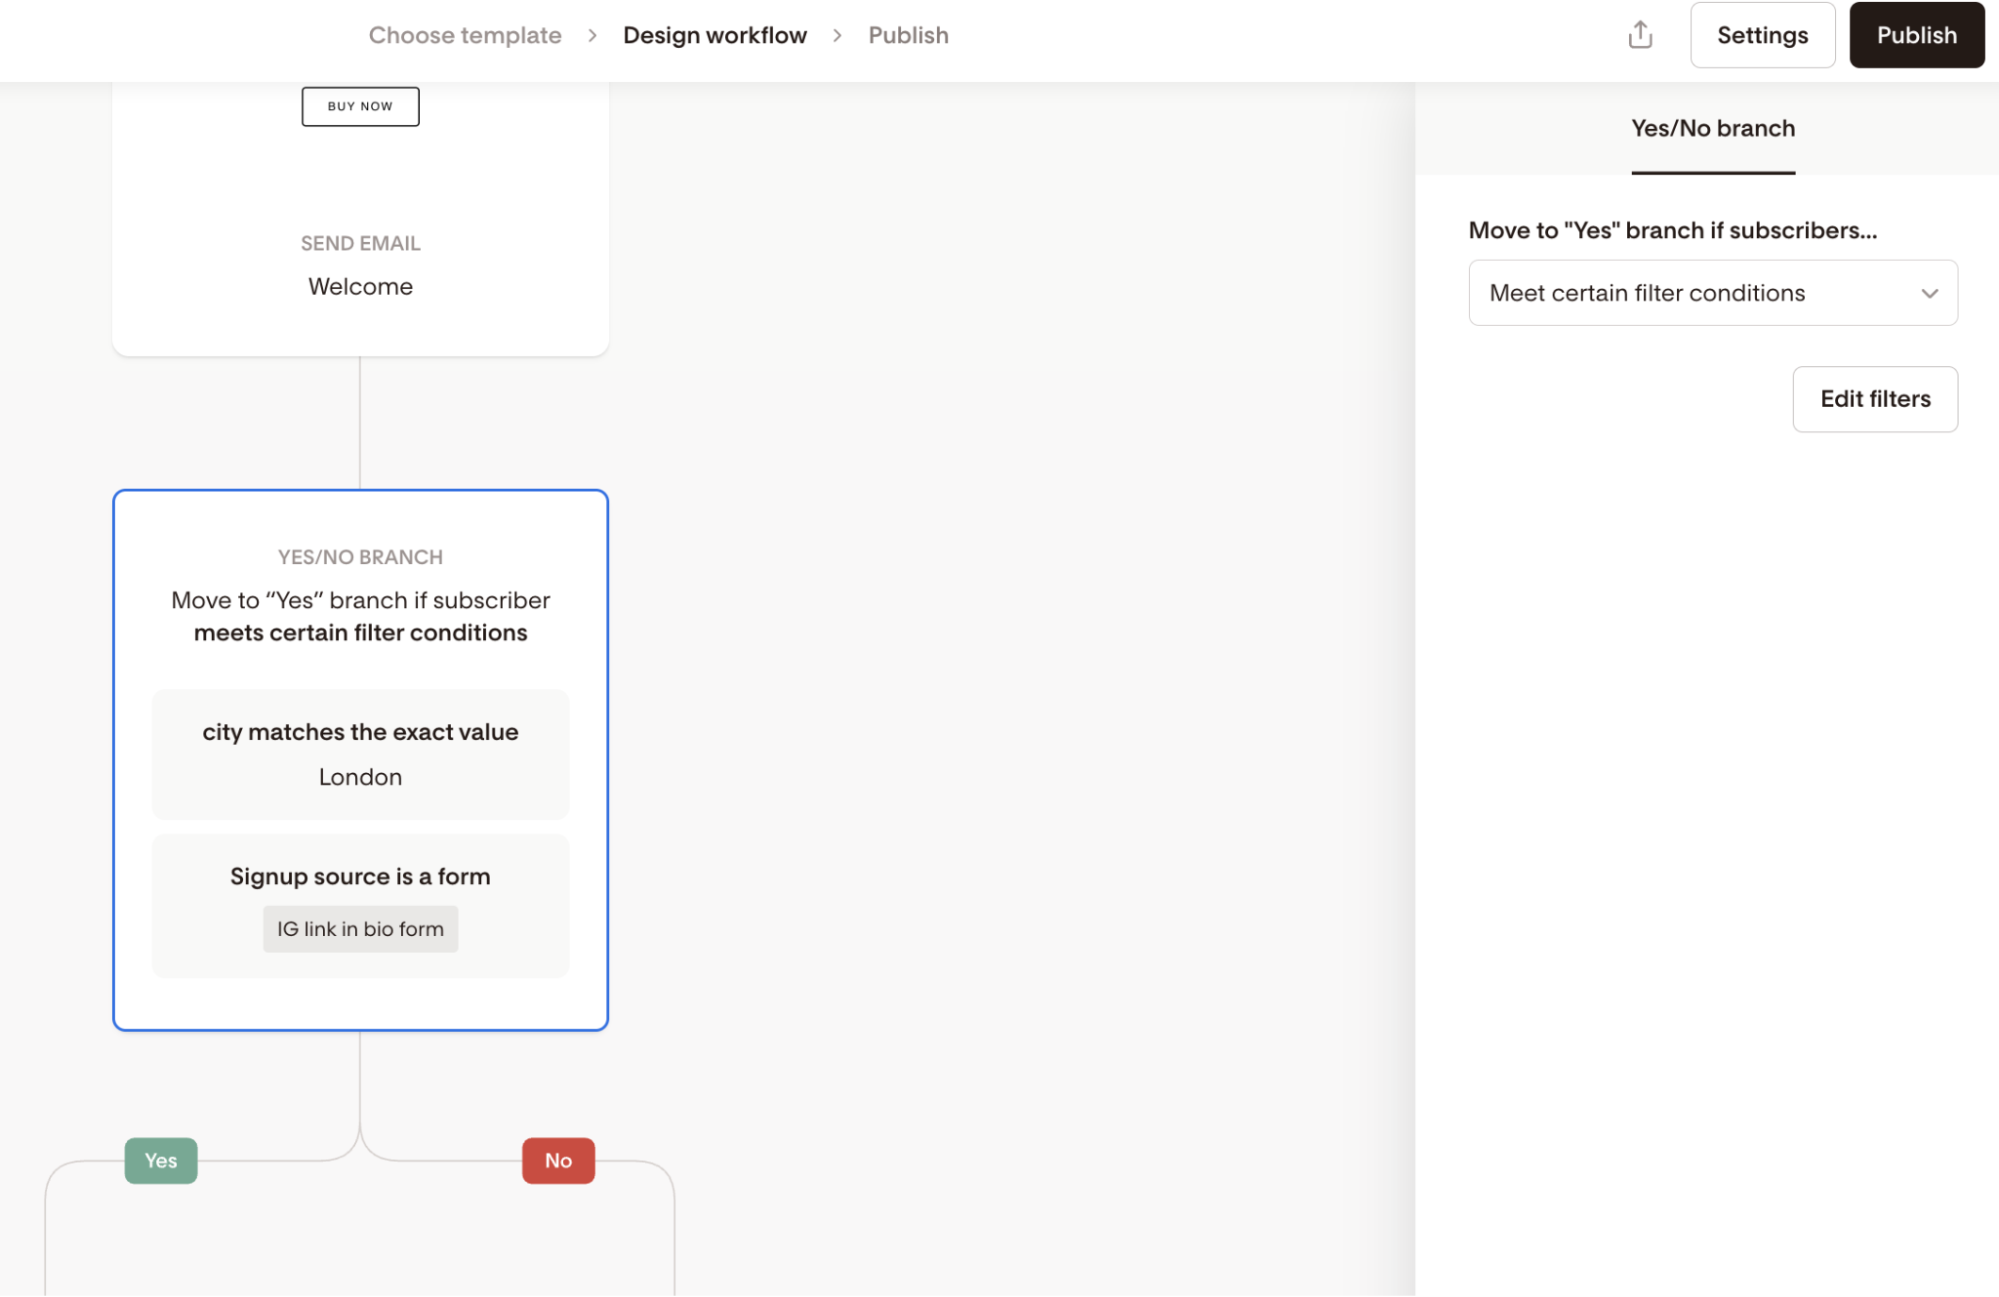
Add Multiple Condition Criteria
You can add more than one set of conditions to a single Yes/No branch step using the +New filter group option.
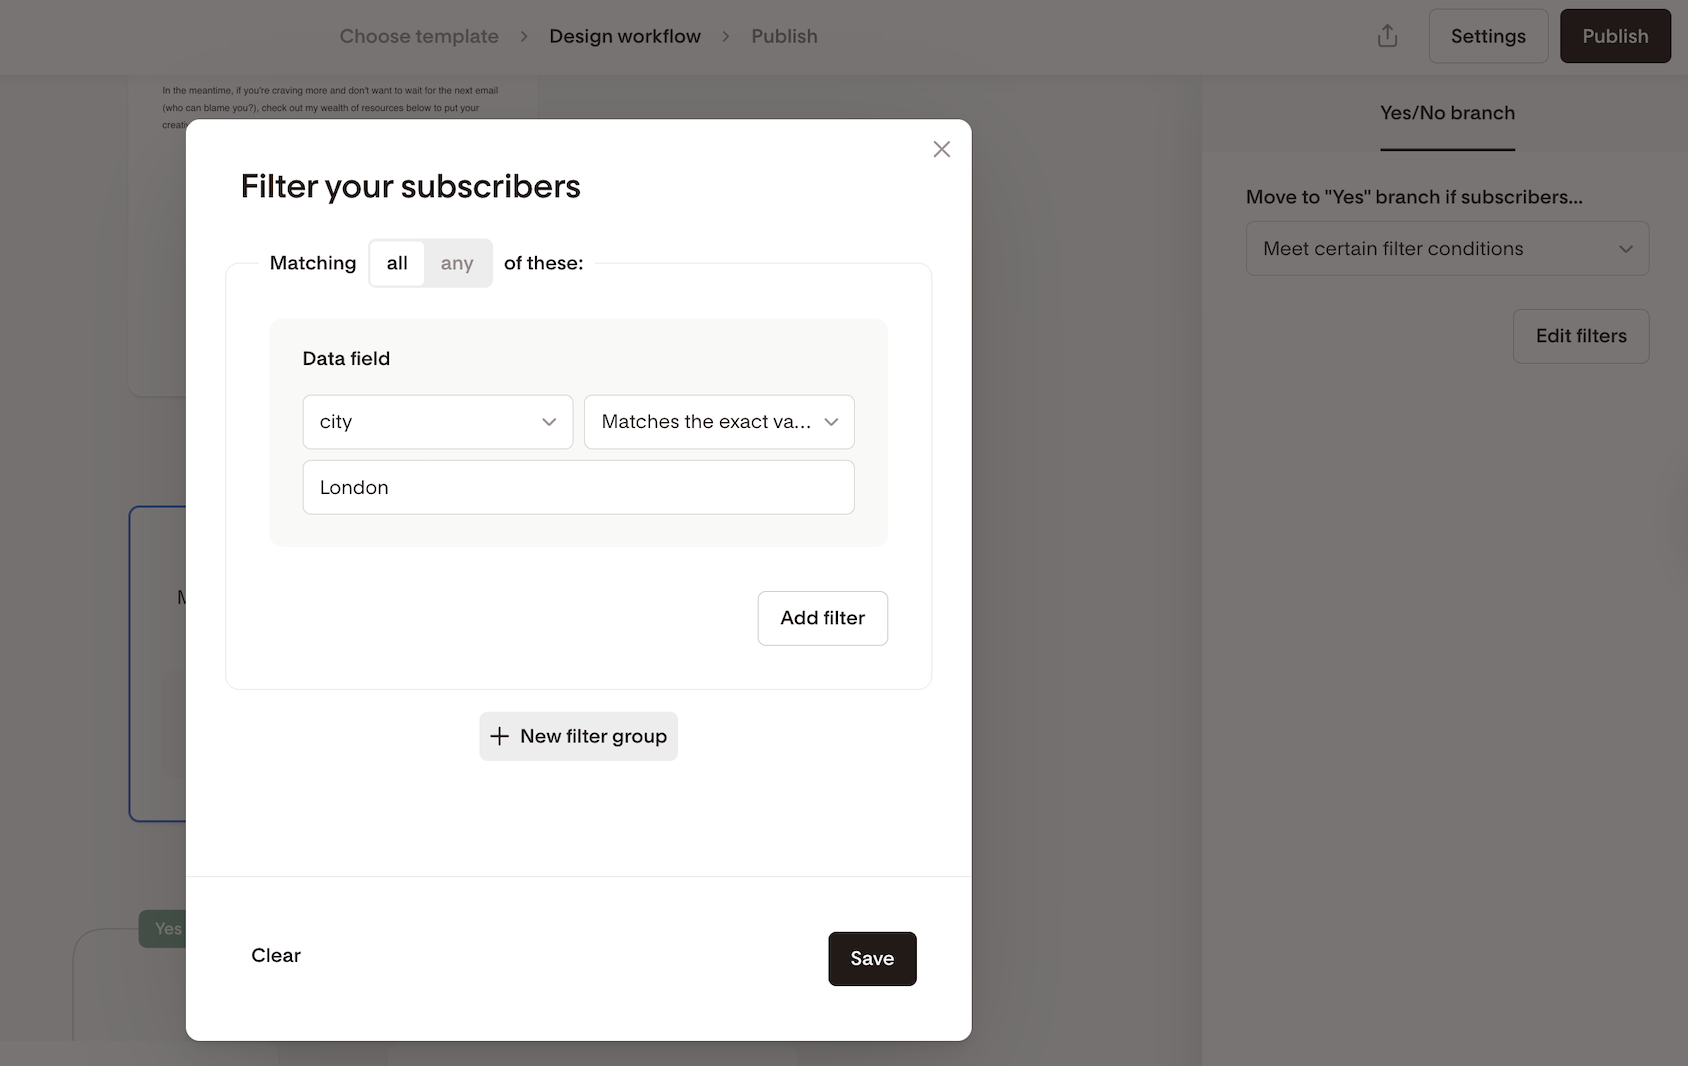
Use the toggle to define it to be an AND or OR condition.
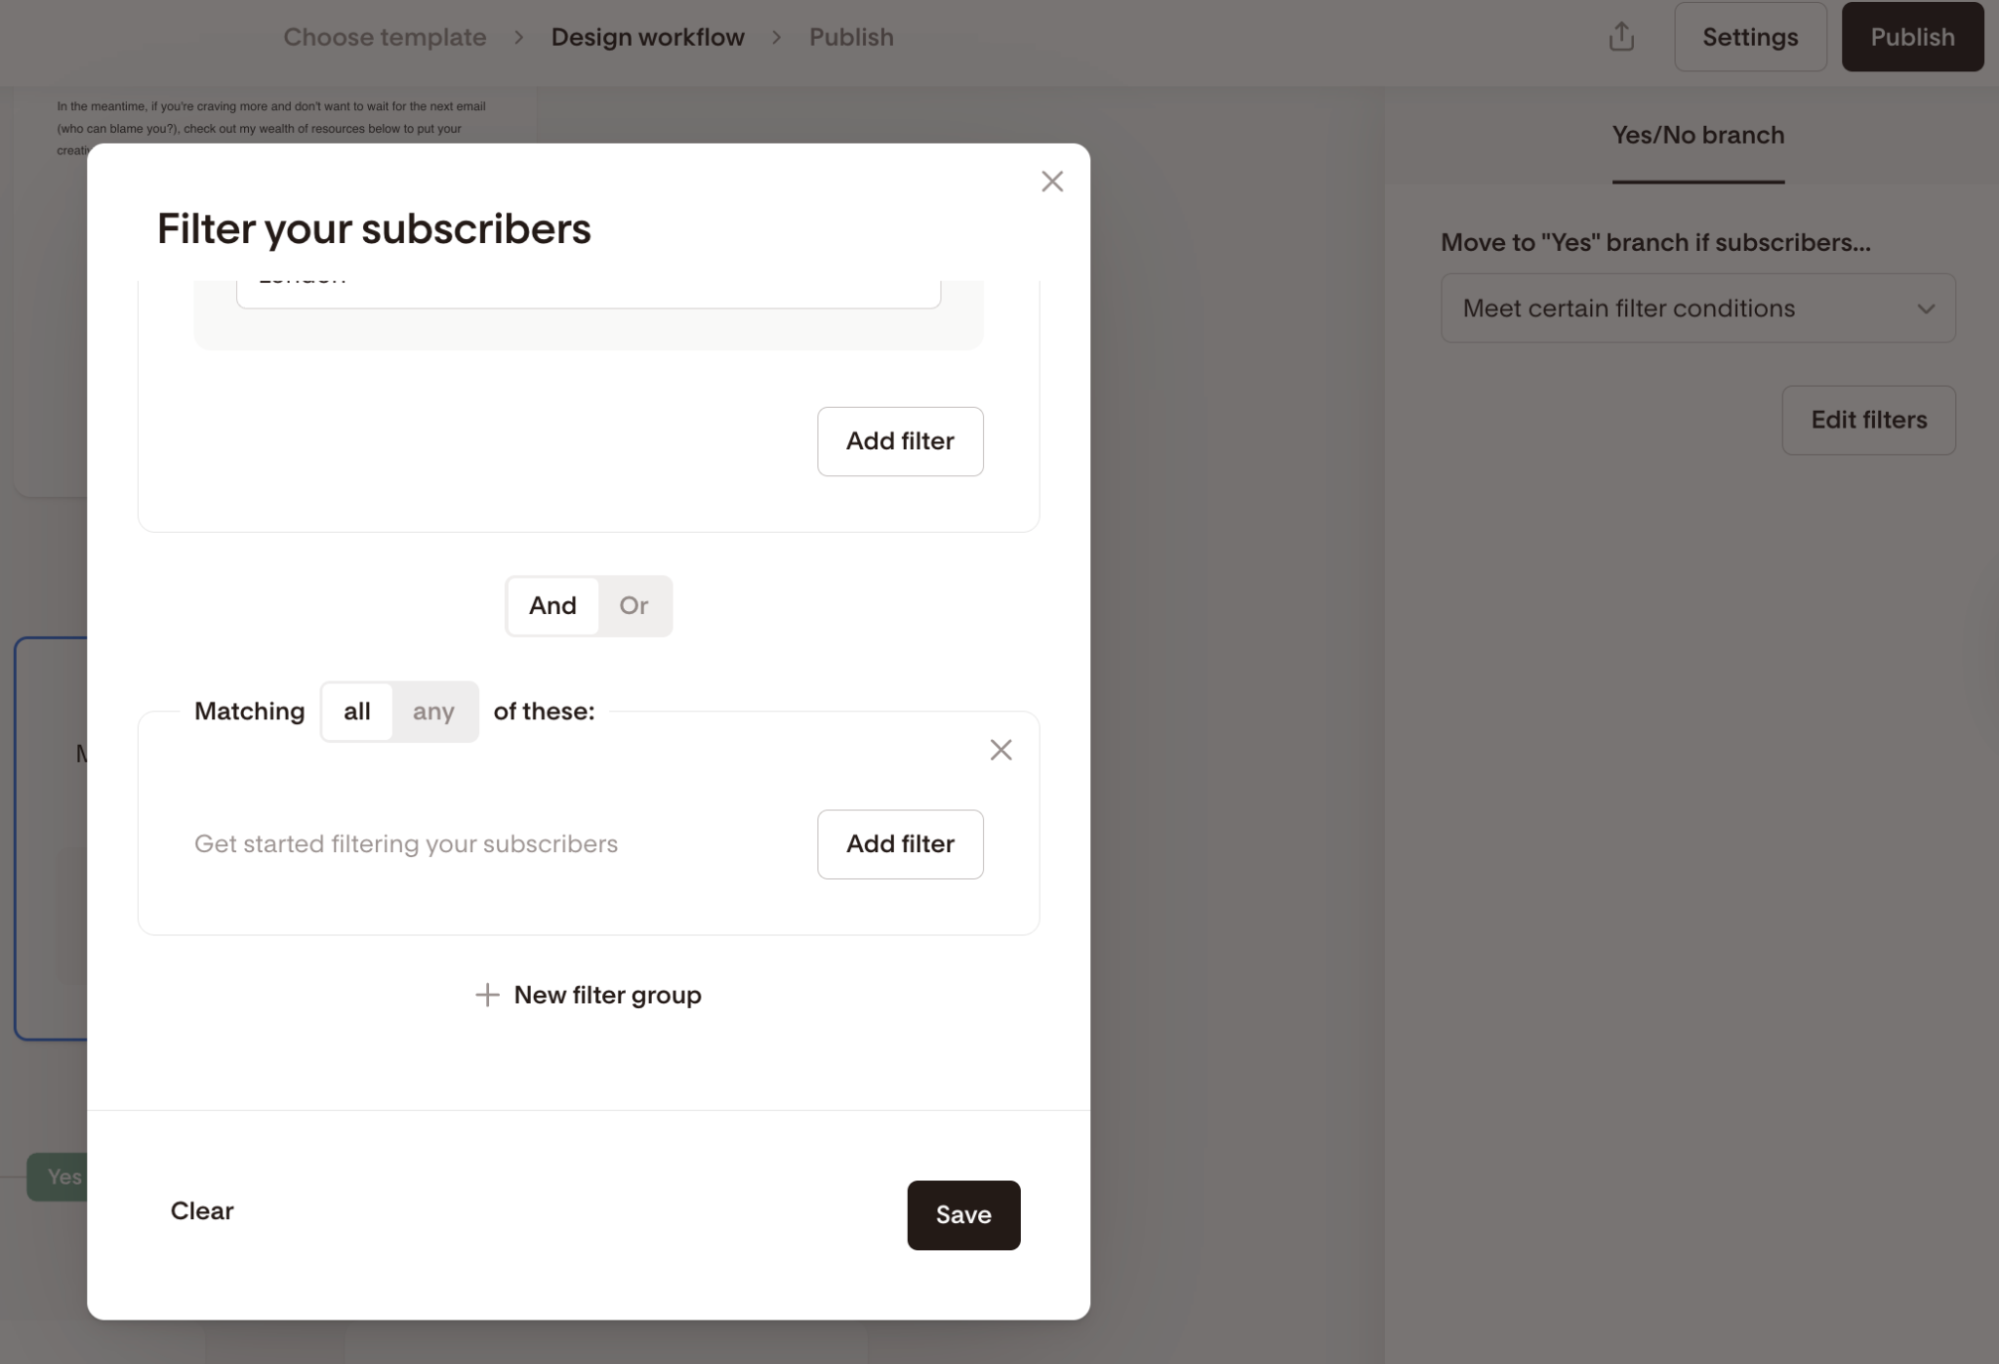
Then click “Add filter” to specify additional criteria. In the example below, we chose the subscriber’s signup source.
Stopping the re-join with Exit steps
If you don’t want subscribers to rejoin the main workflow, add an Exit step inside the Yes or No branch.
Common reasons to use Exit steps:
Stop subscribers after reaching a goal
Prevent over-emailing
Important behavior to know:
A branch with an Exit step will not rejoin the main workflow
If you remove the Exit step later, that branch will reconnect automatically
How legacy Condition steps behave
Older workflows may still show “Condition” instead of Yes/No branch. Here's what to expect:
You cannot add new criteria to legacy condition steps.
When you remove one of the conditions, Flodesk automatically converts the step to a Yes/No branch.
The remaining condition is moved into the new interface.
How auto re-join works in existing workflows
Auto re-join applies differently depending on whether a workflow is new or previously created.
Existing Yes/No branches in older workflows
If your workflow was created before auto re-join was introduced:
Yes/No branches that end in an empty step (sometimes called an “evergreen” branch) will stay exactly as they are
Subscribers already waiting in those empty branches will not be moved or re-routed automatically
This prevents subscribers from receiving emails that weren’t originally intended for them.
Note: If your existing, older workflow has a Yes/No branch (former “condition” step) that ends in an empty step (evergreen), and you add a step of any kind to it (other than an exit step), it will rejoin to the main flow. If you add an exit step to this empty node and then delete it, the branch will rejoin.
Adding new branch steps to older workflows
Existing Yes/No branches in older workflows will remain unchanged unless you add new branch steps or modify them.
If you edit an older workflow and add:
A new Yes/No branch → that branch will auto re-join by default, unless you add an Exit step
A Multiple branch step → all branches will auto re-join by default, unless you add an Exit step
Only the newly added branch steps follow the auto re-join behavior.
Deleting Exit steps in any workflow
If you delete an Exit step from a Yes/No or Multiple branch path:
That path will not become an evergreen (waiting) branch
Instead, it will reconnect to the main workflow automatically
Summary of available Yes/No branch conditions
You can create branches based on:
Workflow Email opens
Workflow Link clicks
Segments
Custom Data Fields
Signup Source
Email Address
Signup Date
Unsubscribe Date
Last Activity
Emails delivered
Emails opened
Open rate
Emails clicked
Click rate
FAQ
Do Yes/No branches automatically rejoin the workflow?
Yes. All Yes/No branches rejoin the main workflow unless an Exit step is added.
Do I still need a time delay before a Yes/No branch step?
No. When branching based on email opens or link clicks, the timeframe you select inside the Yes/No branch replaces a separate time-delay step.
Why can’t I select an email for open or click conditions?
You can only check opens or clicks for workflow emails that appear before the Yes/No branch. Emails after the Yes/No branch won’t be available for selection. If you don’t see an email available, make sure you added an email step above the branch.
What’s the difference between a legacy Condition step and a Yes/No branch?
Legacy Condition steps appear only in older workflows. Once you edit them:
They convert to a Yes/No branch
The remaining criteria move into the new interface
You can no longer add additional conditions to the legacy version
Can I add multiple conditions to a Yes/No branch?
Yes. Use + New filter group to combine conditions, and choose whether subscribers must match all (AND) or any (OR) of them. This allows for flexible and advanced targeting.
What happens if a subscriber meets some—but not all—filters?
It depends on your filter logic:
Match all of these (AND) → Subscriber must meet every condition
Match any of these (OR) → Subscriber only needs to meet one condition
What if a subscriber completes the action after the timeframe ends?
Any action taken after the timeframe (e.g., opening the email too late) will not change their path. They will already have moved to the No branch following timeframe expiration.
Can I branch subscribers based on general email activity (not just workflow emails)?
Yes. In addition to workflow-based opens/clicks, you can branch based on profile and behavior data such as:
Signup source
Email address
Signup date
Last activity
Emails delivered/opened/clicked
Open or click rate
What if I want to segment link clickers without time limits?
Instead of a Yes/No branch, you can use Link Actions to automatically segment subscribers whenever they click a link—no timeframe needed. Learn more about how to use link actions here.
When should I use Multi-branch instead?
Use Yes/No for two outcomes.
Use Multi-branch when you need more than two paths (segments, data fields, or percentages). Learn more: How Multiple branch workflows work
Will my old workflows change automatically because of auto re-join?
No. Existing Yes/No branches in older workflows will remain unchanged unless you add new branch steps or modify them.
What happens if I add a new Yes/No or Multi-branch step to an old workflow?
New branch steps will follow the current behavior and automatically rejoin the main workflow unless you add an Exit step.
What happens if I delete an Exit step?
The branch reconnects to the main workflow instead of turning into a waiting (evergreen) state.