
How to Use Link Actions in Your Emails
Automate your workflows, segment your list, and personalize your subscriber experience—all with a simple click.
You asked:
“How can I add an automatic link to my email, so that subscribers are added to the new segment & workflow with one click?”
“How can I automate removing someone from a workflow and segment? I want to give people the option to change their minds after my sequence starts, and not keep getting the emails [without unsubscribing from my entire list].”
Whether you want to allow subscribers to opt out of your Mother’s Day emails or your seasonal sales sequence, or segment your readers based on which link(s) they click in your emails, link actions help you achieve that. And much more!
What are link actions?
You may have heard elsewhere referred to as “link triggers.”
Link actions let you assign automated behaviors to any link in your Flodesk emails—including emails inside workflows.Think of it as a behind-the-scenes way to segment subscribers based on what they’re interested in—without needing them to fill out a form again.
Whenever a subscriber clicks on a link, you can trigger an action like:
Add subscribers to one or multiple segments
Remove subscribers from one or multiple segments
Add subscribers to one or multiple workflows
Remove subscribers from one or multiple workflows
Tag subscribers with a custom field
A custom field is a subscriber data field that isn’t First name, Last name, or Email address. It can be data such as their geographic location, Enneagram type, Instagram handle, or wedding month.
Where can I use link actions?
You can use link actions in both standalone emails and workflow emails on these block types:
Text block
Layouts block
Image block
Video block
Instagram block
Link bar block
Button block
Countdown block
E-commerce block
How to set up a link action
Step 1: Add a link
Within Flodesk’s email builder, click on the block where you want to add your link. Then:
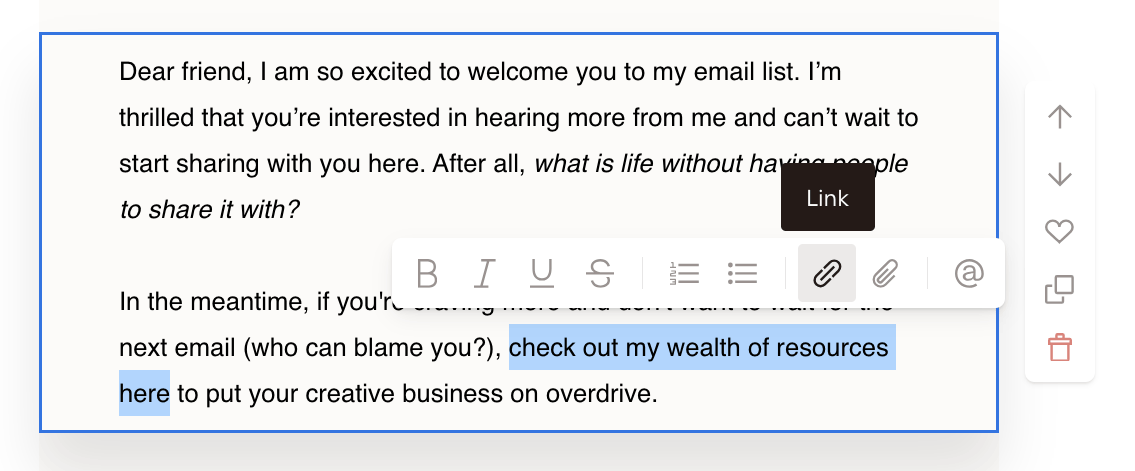
For text, highlight the text and click the 🔗 link icon
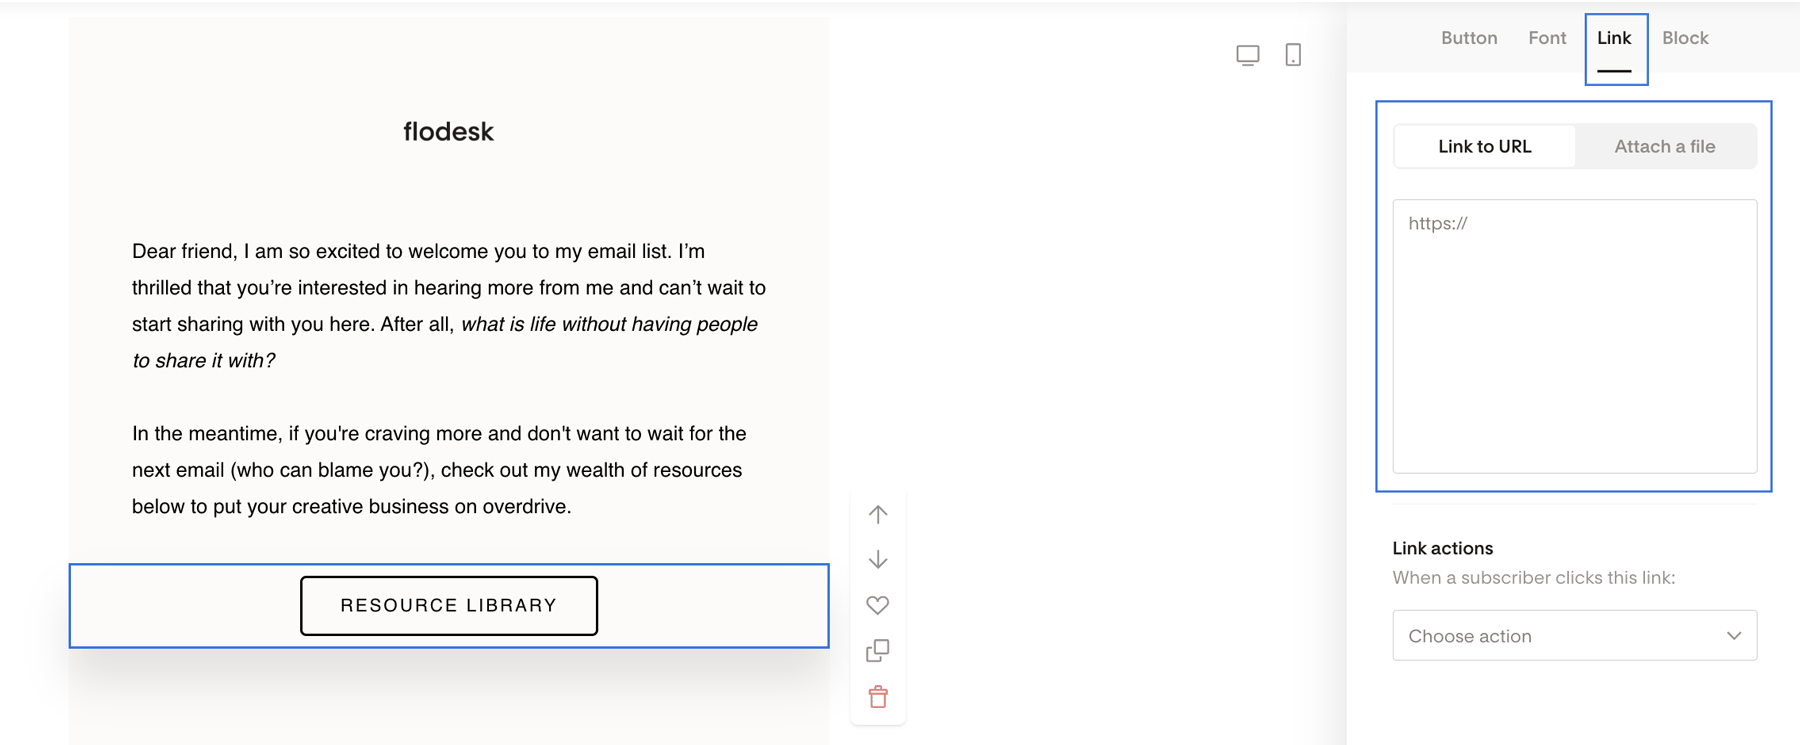
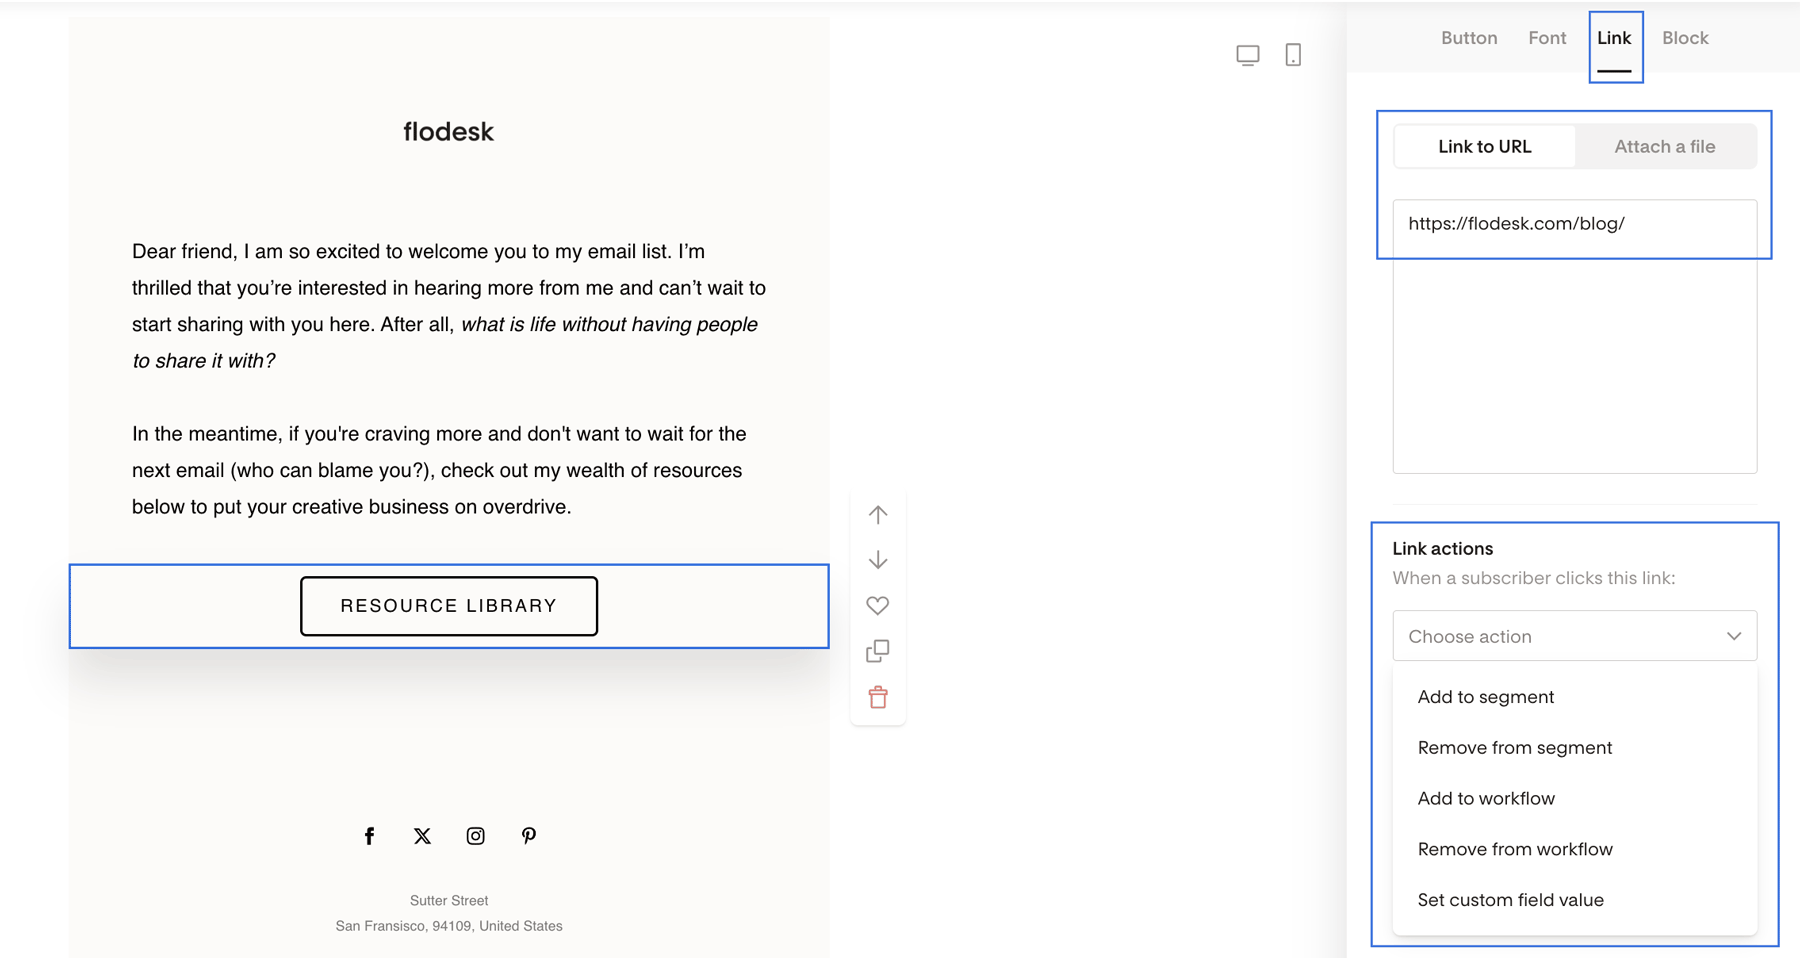
For other blocks (like buttons or images), open the Link tab on the right-hand sidebar
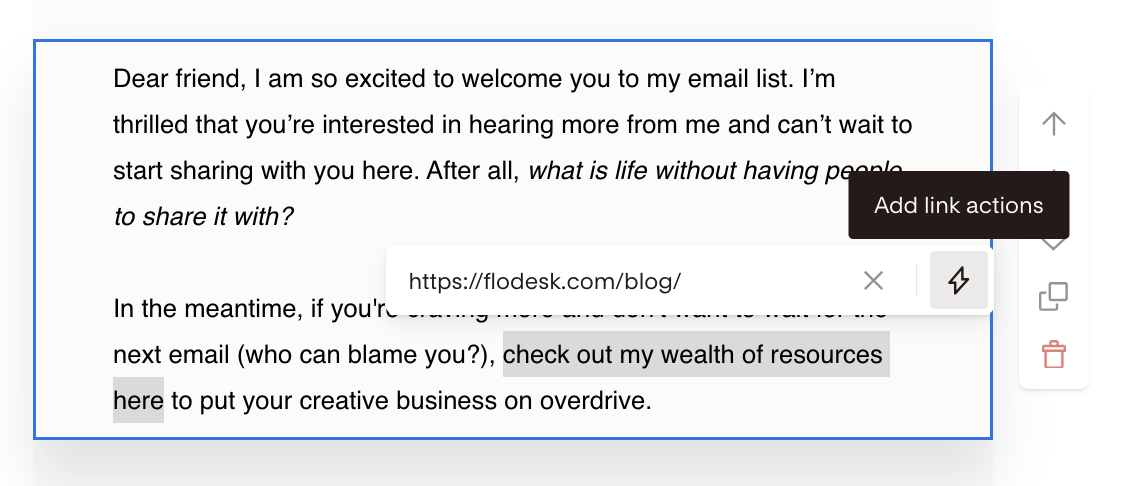
Add a valid URL (starting with https://). Link shorteners are not supported.
Step 2: Assign link actions
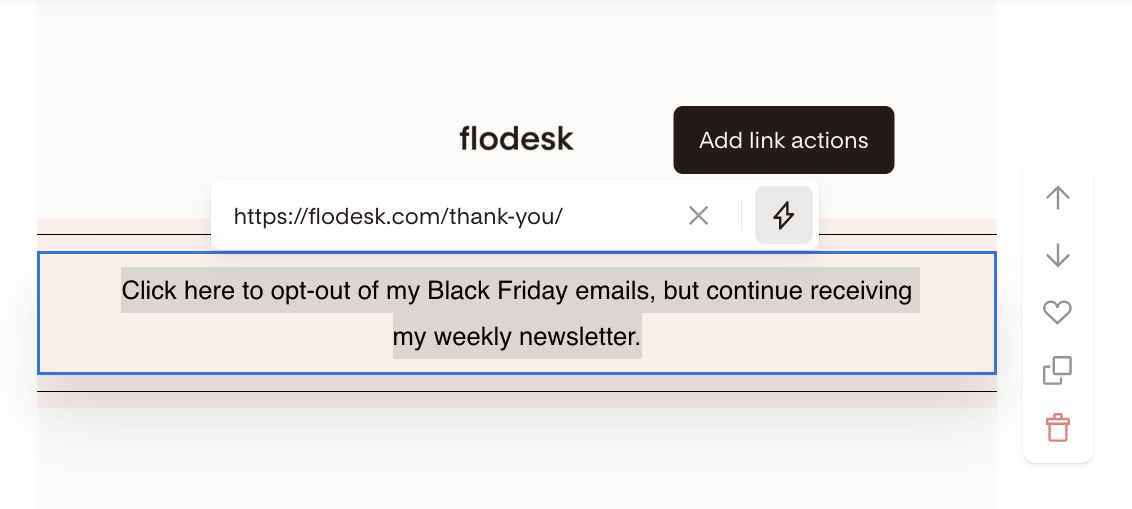
Click the ⚡️ lightning bolt icon (for text), or open the Link actions section (for other block types).
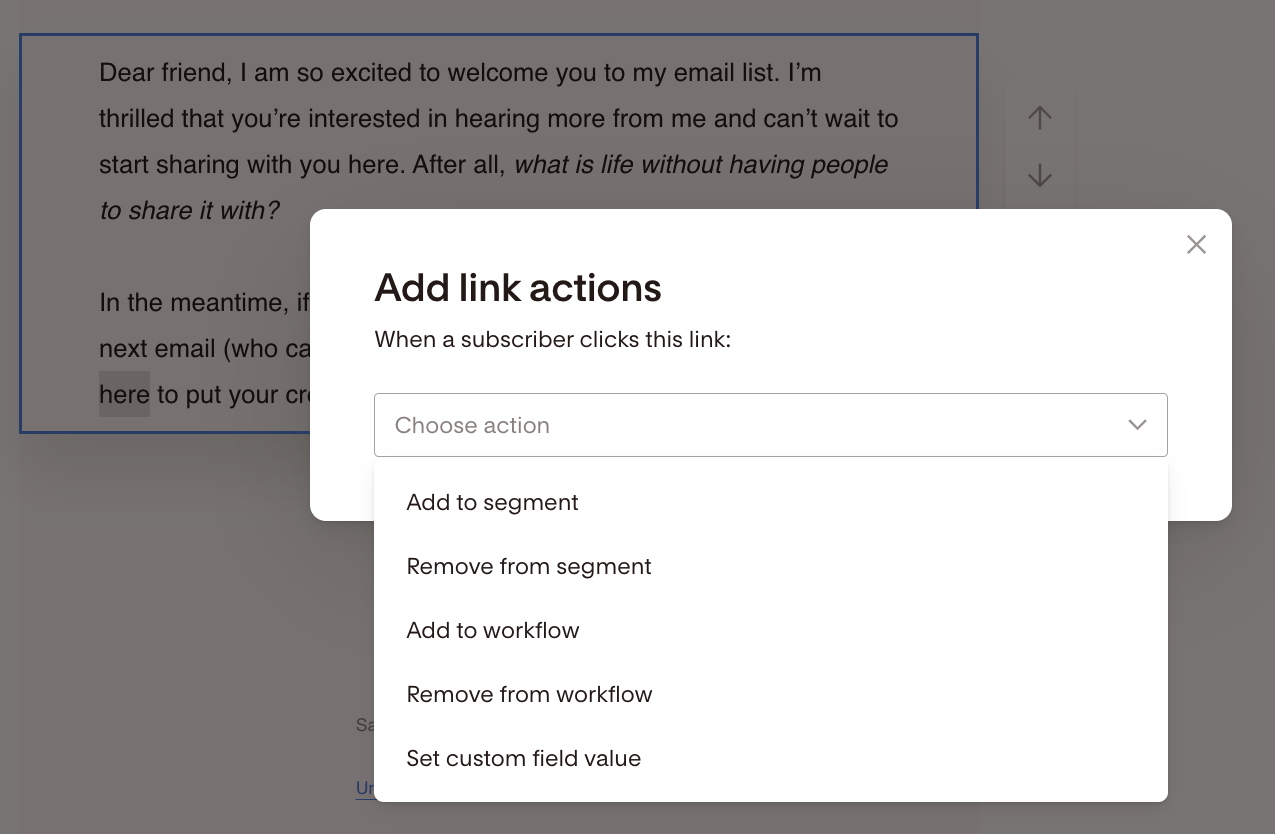
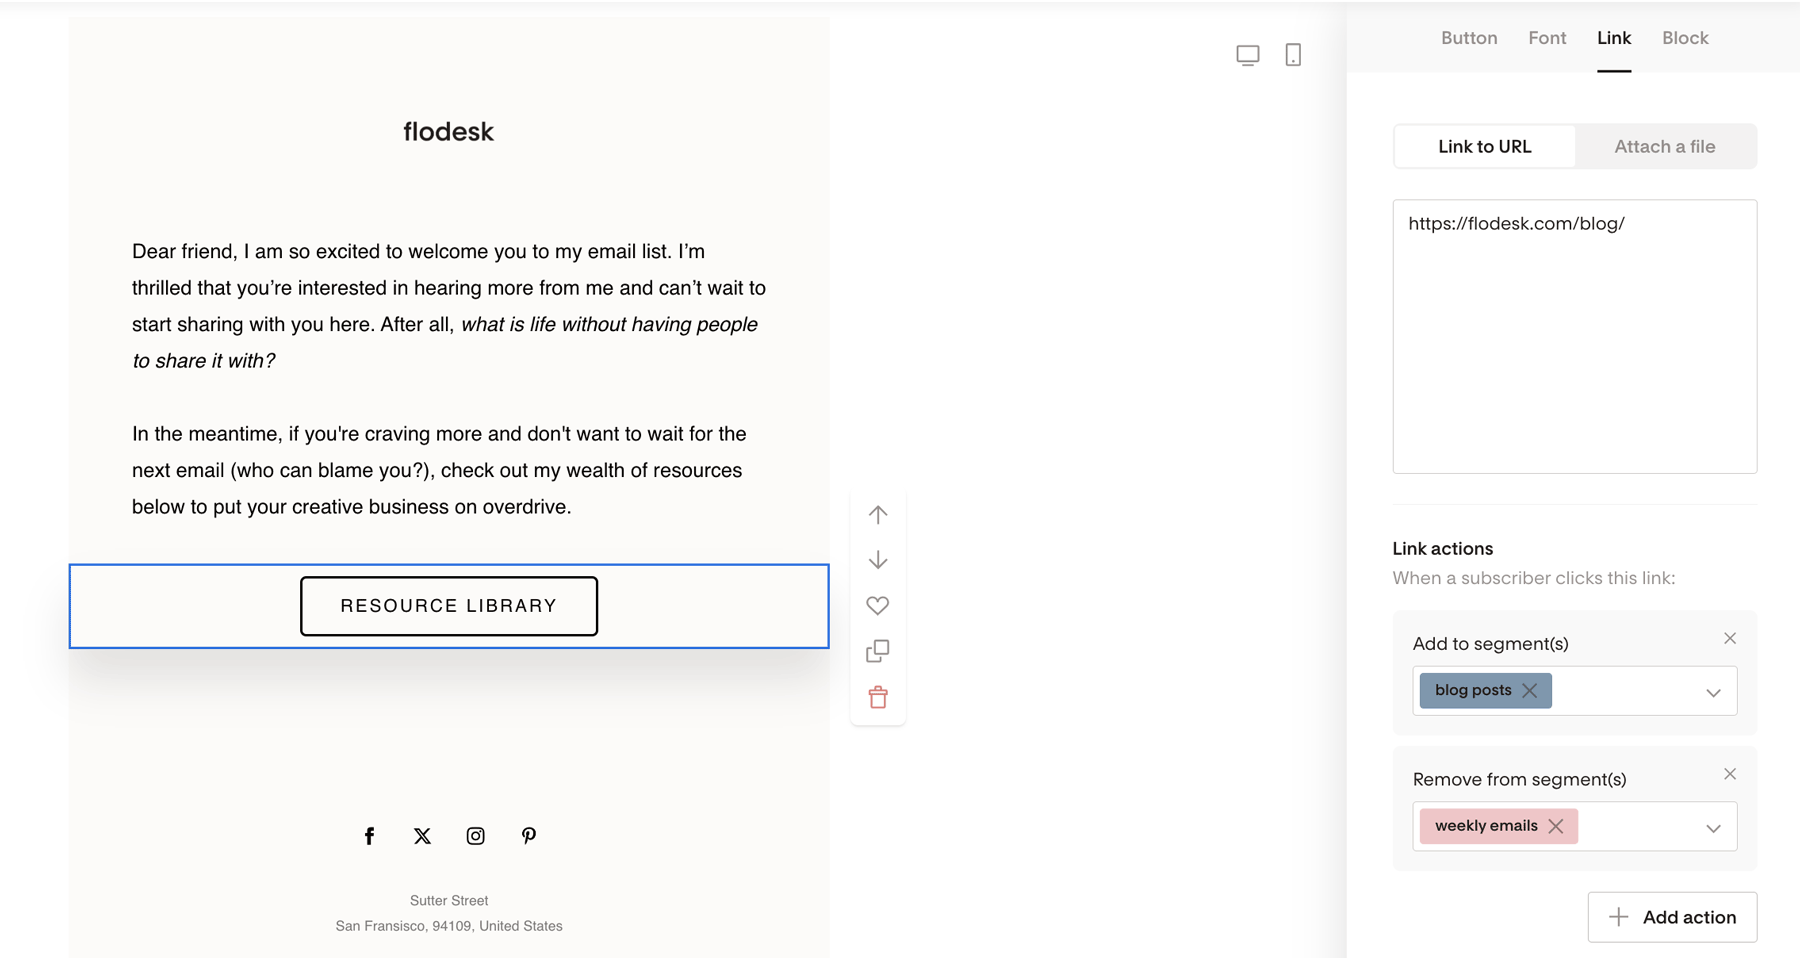
Choose your actions:
Add/remove from segment(s)
Add/remove from workflow(s)
Set a custom field value - Note: You can only set one custom field value per link.
You can add multiple link actions to a single link, but there’s a maximum limit of 10 segments and workflows you can set for a single link action. When subscribers click the link, you can add them to one or multiple segments, remove them from one or multiple segments, add them to one or multiple workflows, remove them from one or multiple workflows, or tag them with a custom field.
Step 3: Save and send
Your link actions are now active—but remember:
Link actions are optional and not “required”.
You don't have to assign link actions to all links in your emails. You can leave the link actions empty.
They won’t work in test emails, only when your email goes out live to your selected audience.
They won’t carry over in shared templates
The link actions will be cleared from the template and not be imported into the importing member’s email.
They will copy over when you duplicate or favorite a block/email
Link action execution order
No matter how you set them up, Flodesk processes link actions in this order:
Remove from workflow
Remove from segment
Add custom field
Add to segment
Add to workflow
The impact of bot clicks on link actions
If many of your subscribers have .org, .edu, or .gov email addresses, their organizations' security settings might use bots to automatically open or click links in your emails to protect their employees or members from malicious emails. These automatic link clicks can affect link actions, so use this feature with caution.
To lessen the impact of automatic clicks and opens, especially from subscribers with such strict domains, you can ask them to use a personal email address when signing up.
Use cases for link actions
Let subscribers opt out of certain emails
If you’re planning to send more emails than usual during a given period, like a launch or seasonal sale, you can give your subscribers the option to opt out of receiving certain types of emails rather than unsubscribing from your list.
For example, if you’re sending a series of Black Friday sales emails, you can include a message like, “Click here to opt-out of my Black Friday emails, but continue receiving my weekly newsletter.” Then, add a link action that automatically removes anyone who clicks on the link from your Black Friday workflow.
You can also connect the link action to a button or layout block, not only to inline text, as we show in the example below.
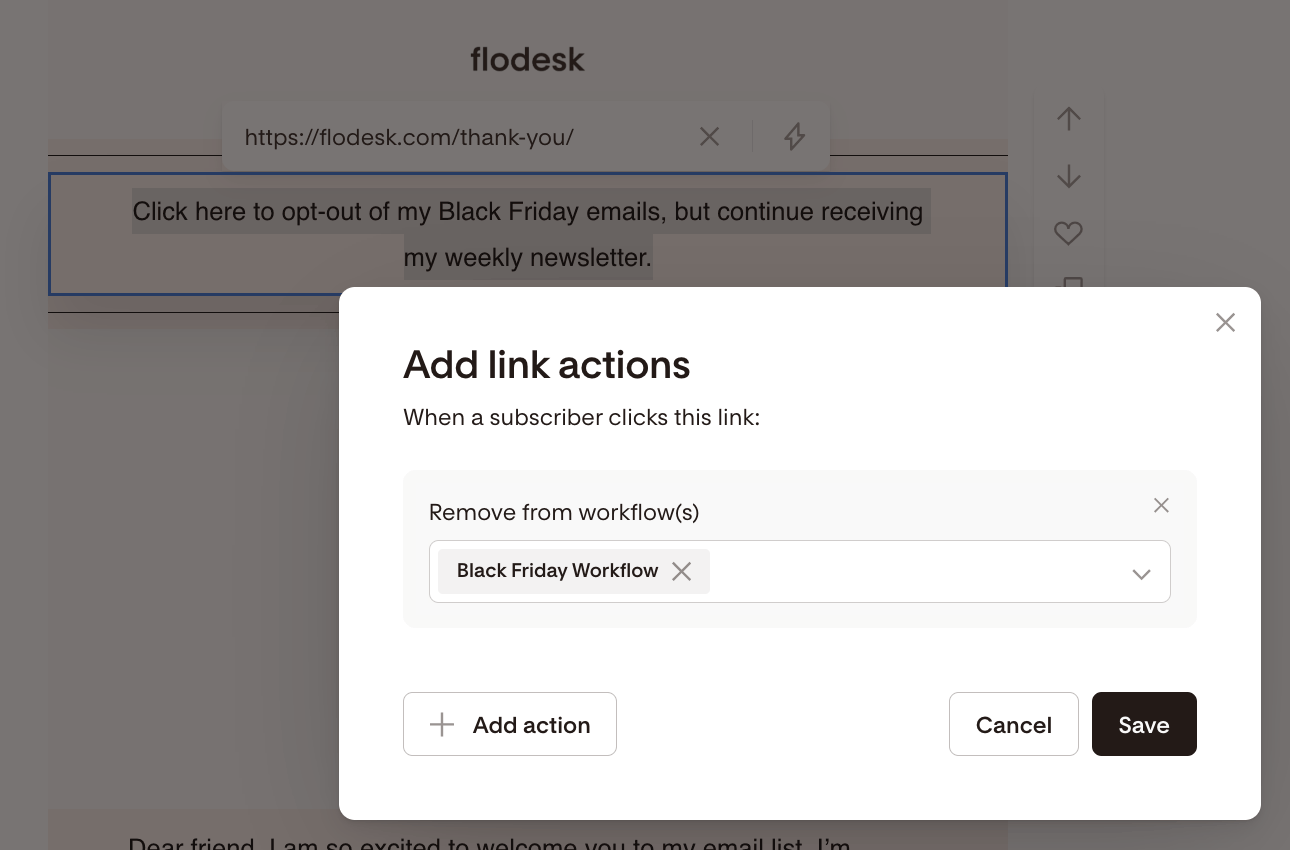
Add this link action to each of your workflow emails. Some may opt out after the first email, and others may opt out later in the email workflow series.
Note: you need to select the link action “Remove from workflow(s).” If you only choose “Remove from segment(s),” they will continue to receive the workflow emails.
Where should that link point to? You can set up a hidden page on your website that says something like “Thanks for letting me know!” or something similar. Then, use the URL of this page for your link action.
If you don’t have a website, you can link, for example, to a relevant GIF from Giphy, like this one or create a simple thank you page website in Canva and link to that.
Create a mini-poll and let subscribers self-segment
Give your subscribers the option to opt in to receive emails about various topics or create a fun and engaging poll within your email. All you need to do is generate link actions that automatically add subscribers to one or multiple segments in your list that correspond with what they’ve clicked on.
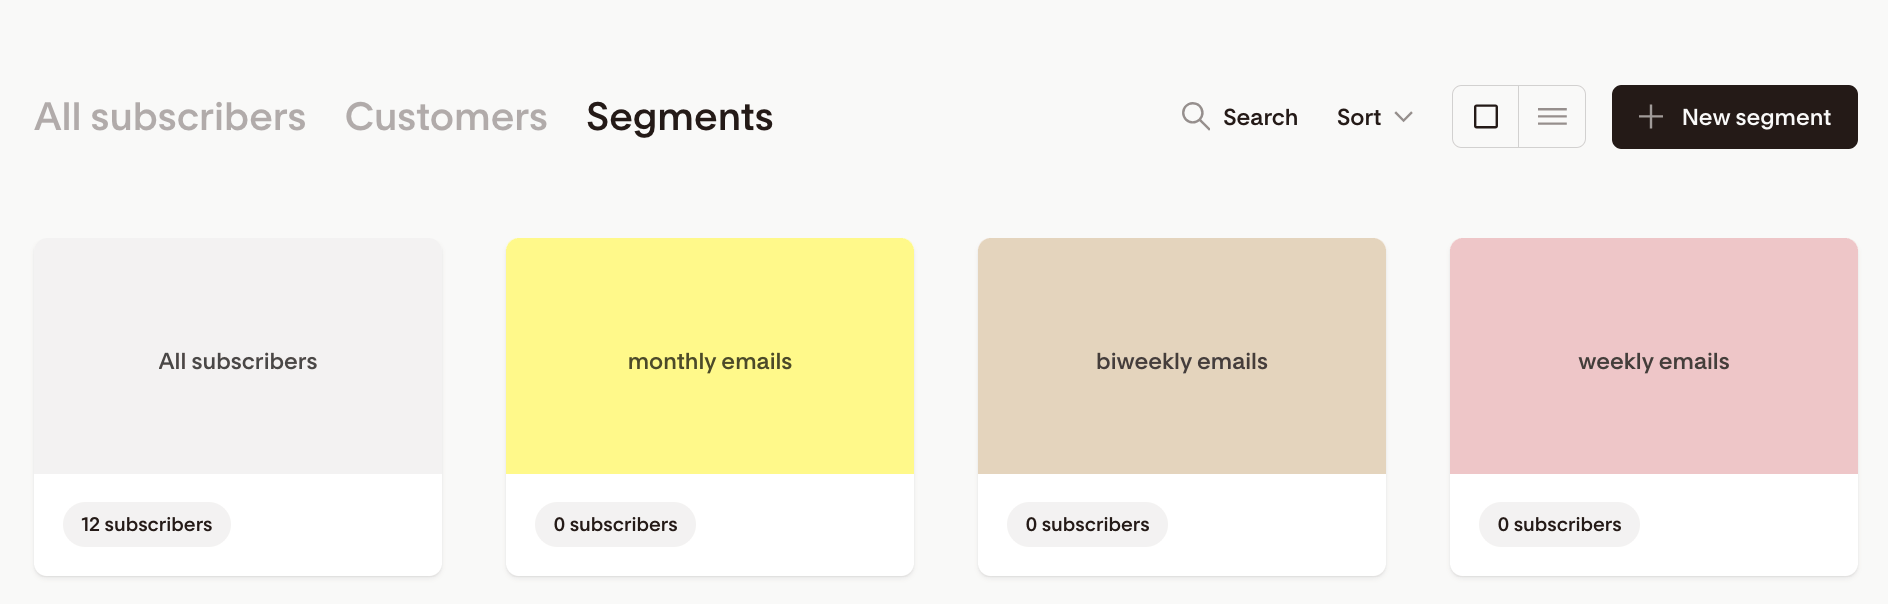
If you want to poll your subscribers on how often they want to hear from you, first create the relevant segments (weekly, biweekly, monthly).
To do that, go to your Audience > Segments dashboard and click the “+New segment” button to create those segments.
Next, create the poll in your email with the help of button blocks. Make sure each button block links to a separate URL. You can use hidden pages on your website that say something like “Thanks for letting me know!” or something similar. Alternatively, you can direct them to a relevant GIF from Giphy, like this one.
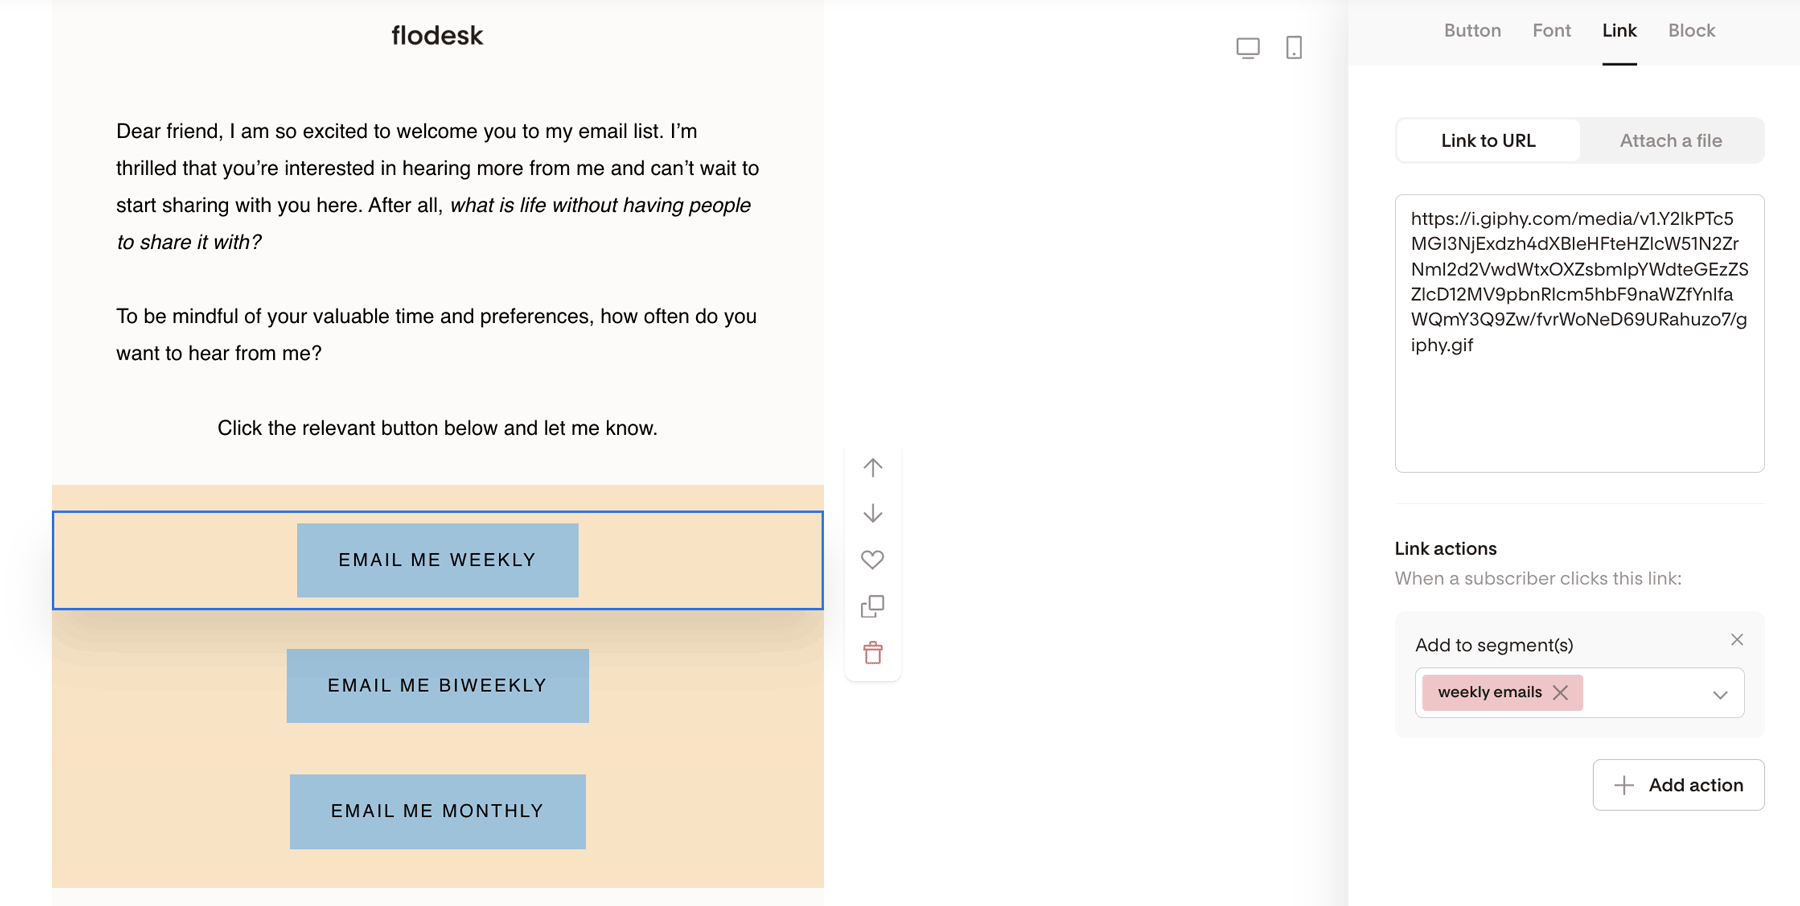
Pro tip: you can create the same setup to build polls asking your subscribers what they want to hear about in your newsletters—like listing your content topics, sales promotions, and specific offers, for example.
Summary
With link actions, you can turn clicks into automation. After adding a valid link to a
Text block
Layouts block
Image block
Video block
Instagram block
Link bar block
Button block
Countdown block
E-commerce block
You can use specific link actions that include:
Adding subscribers to one or multiple segments
Removing subscribers from one or multiple segments
Adding subscribers to one or multiple workflows
Removing subscribers from one or multiple workflows
Tagging subscribers with a custom field
Action | What it does |
|---|---|
Add to segment | Helps organize by interest |
Remove from workflow | Opt-out without unsubscribing |
Set custom field value | Personalize future messaging |
Add to workflow | Seamlessly enroll into sequences |
Link actions help you leverage advanced segmentation, get hyper-targeted with your list, and automate your email strategy.