
How to set up double opt-in for your subscribers
Use double opt-in to make sure new subscribers truly want to hear from you—and to keep your list engaged, compliant, and spam-free.
This guide explains:
What double opt-in is and how it works in Flodesk
How to enable and customize it for your forms
When the double opt-in email is and is not sent
How to resend confirmation emails
How to troubleshoot double opt-in deliverability issues
What is double opt-in?
Double opt-in is a two-step subscription process that asks subscribers to confirm their email address before they’re added to your list.
Here’s how it works:
A visitor submits your opt-in form (first permission).
Flodesk automatically sends them a confirmation email.
The subscriber clicks the confirmation button in that email (second permission).
Only after clicking the button are they added to your audience.
Until they confirm, the subscriber is marked as Unconfirmed in your Audience and appears greyed out.
Important: Flodesk will not send campaigns or workflows to unconfirmed subscribers.
Who receives the double opt-in email (and who doesn’t)?
This is a common point of confusion, so here’s the rule clearly stated:
Double opt-in emails are sent to:
Brand-new subscribers who are not yet in your Flodesk Audience
Double opt-in emails are NOT sent to:
Existing, already-active subscribers who opt in again through another one of your forms
Subscribers who were previously confirmed
Even if double opt-in is enabled on the form, existing subscribers will not receive the confirmation email again.
Why use double opt-in?
Double opt-in helps you:
Stay compliant with your country's email marketing and spam regulations
Prevent bots, typos, and fake email addresses from joining your list
Build a more engaged, higher-quality audience
Protect your sender reputation and deliverability
We've also seen that Flodesk members with double opt-in enabled have ~4% higher open rates and ~26% higher click rates, so the recipients who do confirm tend to be genuinely excited to hear from you.
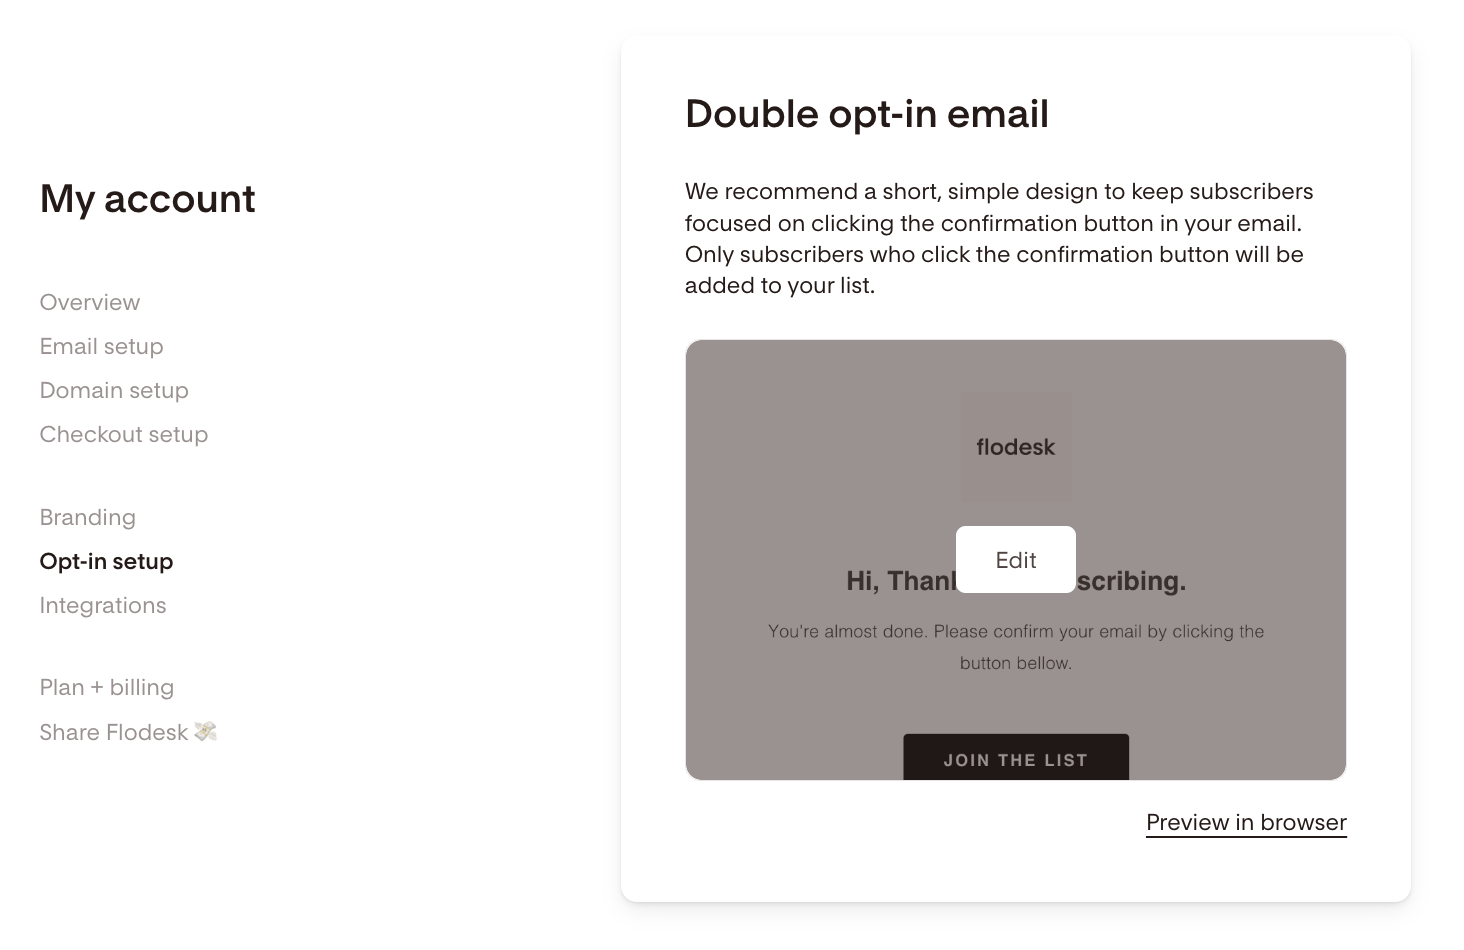
Important: For new members who joined Flodesk after April 2, 2026, double opt-in is turned on by default for opt-in forms. You can review and customize the double opt-in email and confirmation page under Account settings > Opt-in setup.
You may see a consolidated view that includes both the email and confirmation page, as shown below.
How to enable/disable double opt-in for a form
Enable/disable double opt-in on an existing form
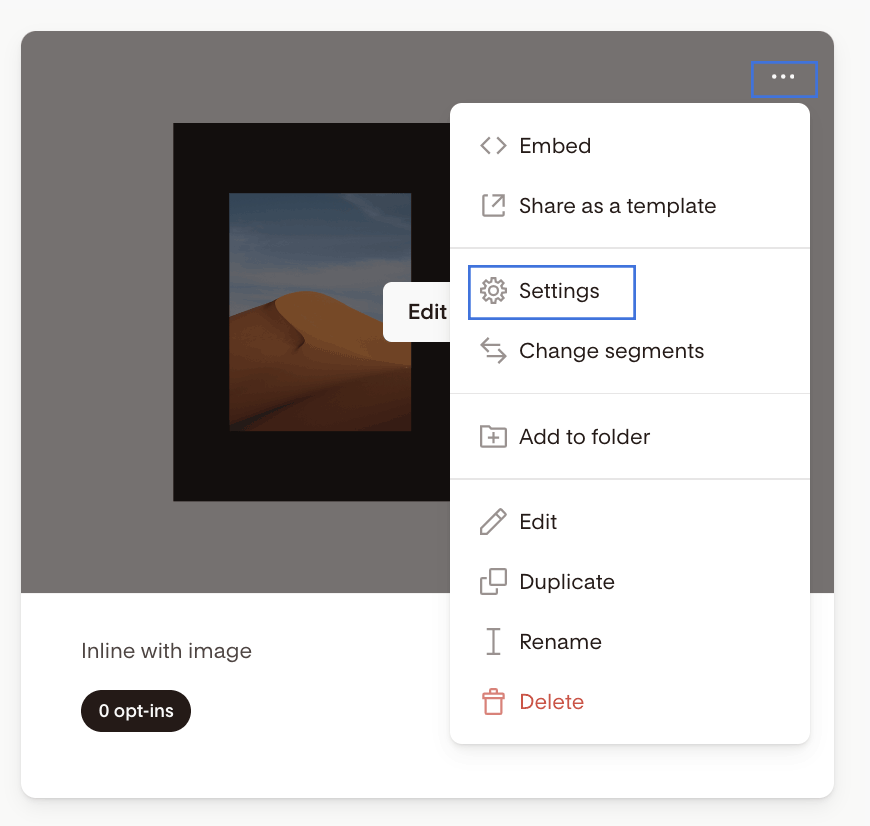
Go to your Forms dashboard
Hover over the form you want to update
Click the three dots ( … ) on the form card
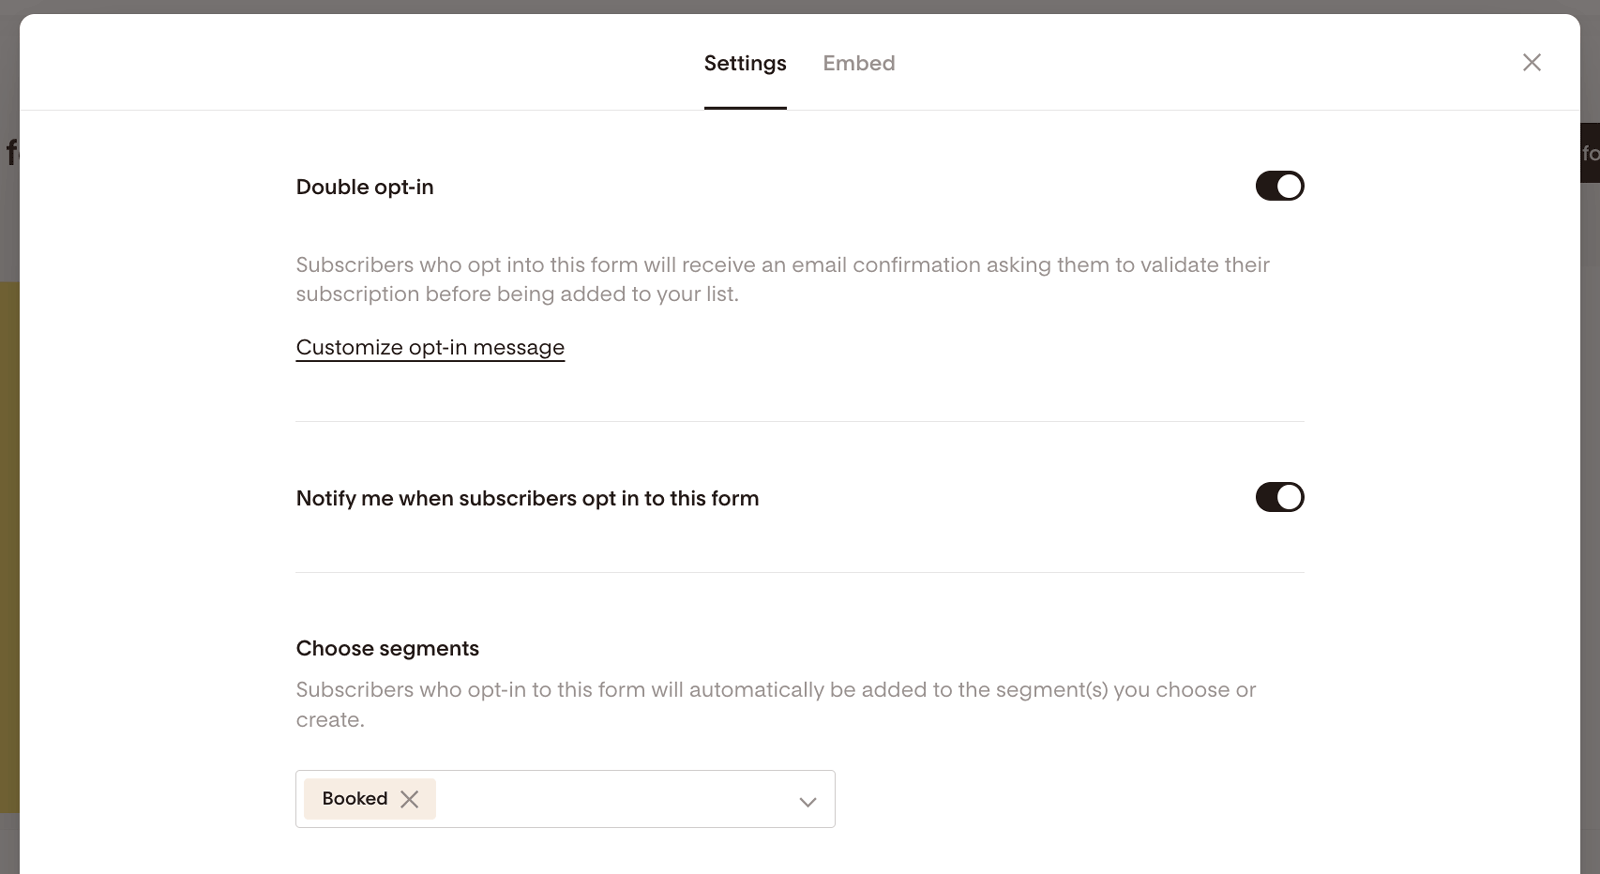
Select Settings
Toggle Double opt-in ON/OFF
Click Customize opt-in message
This opens your Account settings → Opt-in setup in a new tab.
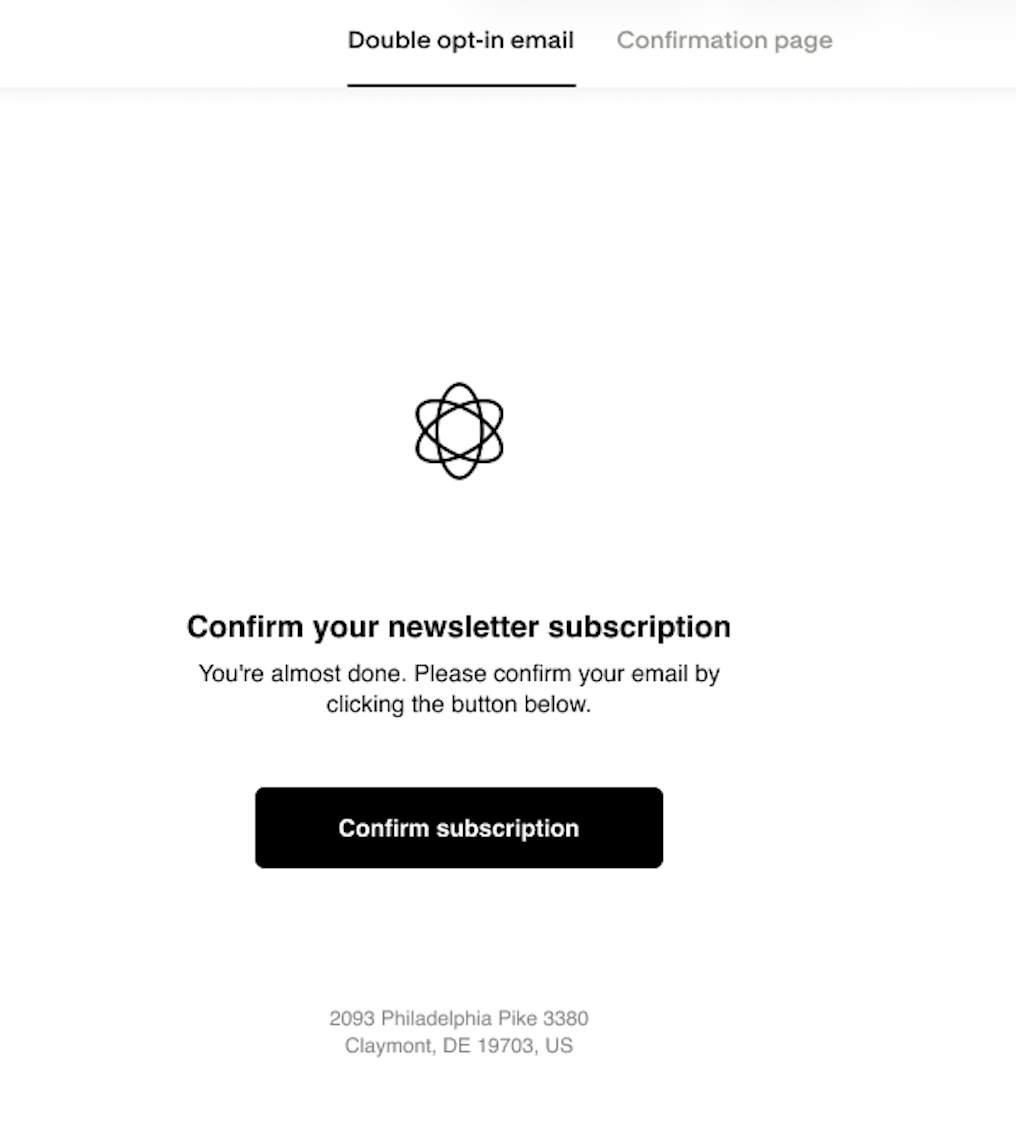
Customize your double opt-in email
Your confirmation email’s only job is to get the subscriber to click the confirmation button.
Best practices:
Keep the design short and minimal
Focus on one clear call-to-action
Avoid adding extra links or distractions
Flodesk’s default template is already optimized for high confirmation rates. Adding too much content can reduce conversions.
Important notes:
The email always sends from your default sending address
The subject line cannot be changed (this helps inbox placement)
Replace the default Flodesk signature with your business signature
Use the paper plane icon to send yourself a test email
Only subscribers who click the confirmation button will be added to your list.

Customize your Thank You page
After confirming, subscribers see your Thank You page.
You can:
Edit the header and message text
Thank them for joining
Let them know what emails to expect
Link back to your website
Add social links or a custom URL
Clicking the logo on this page redirects subscribers to your website.
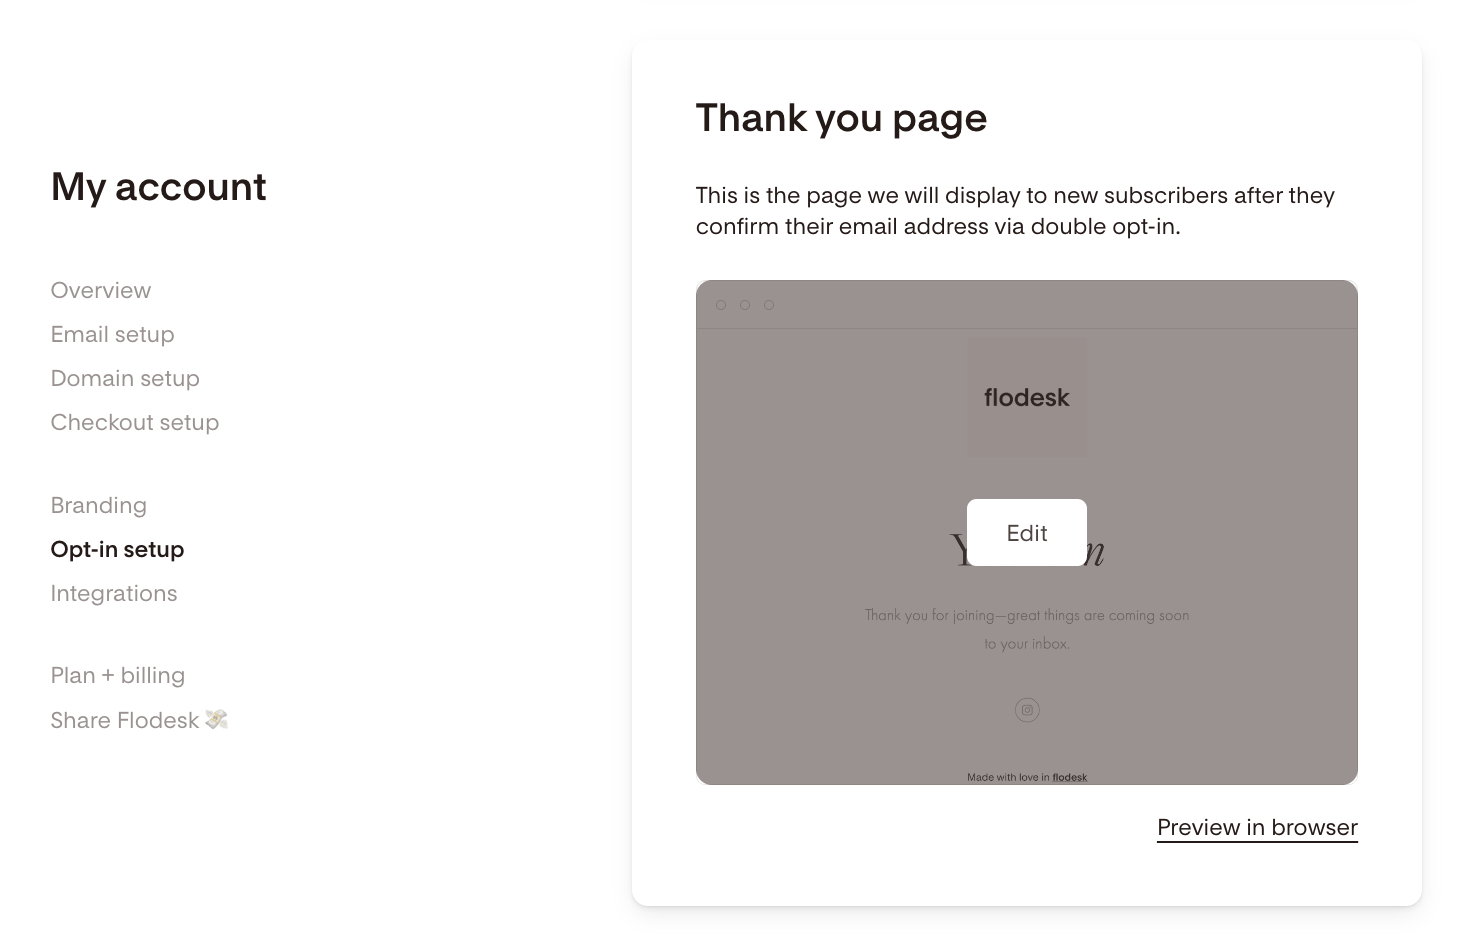
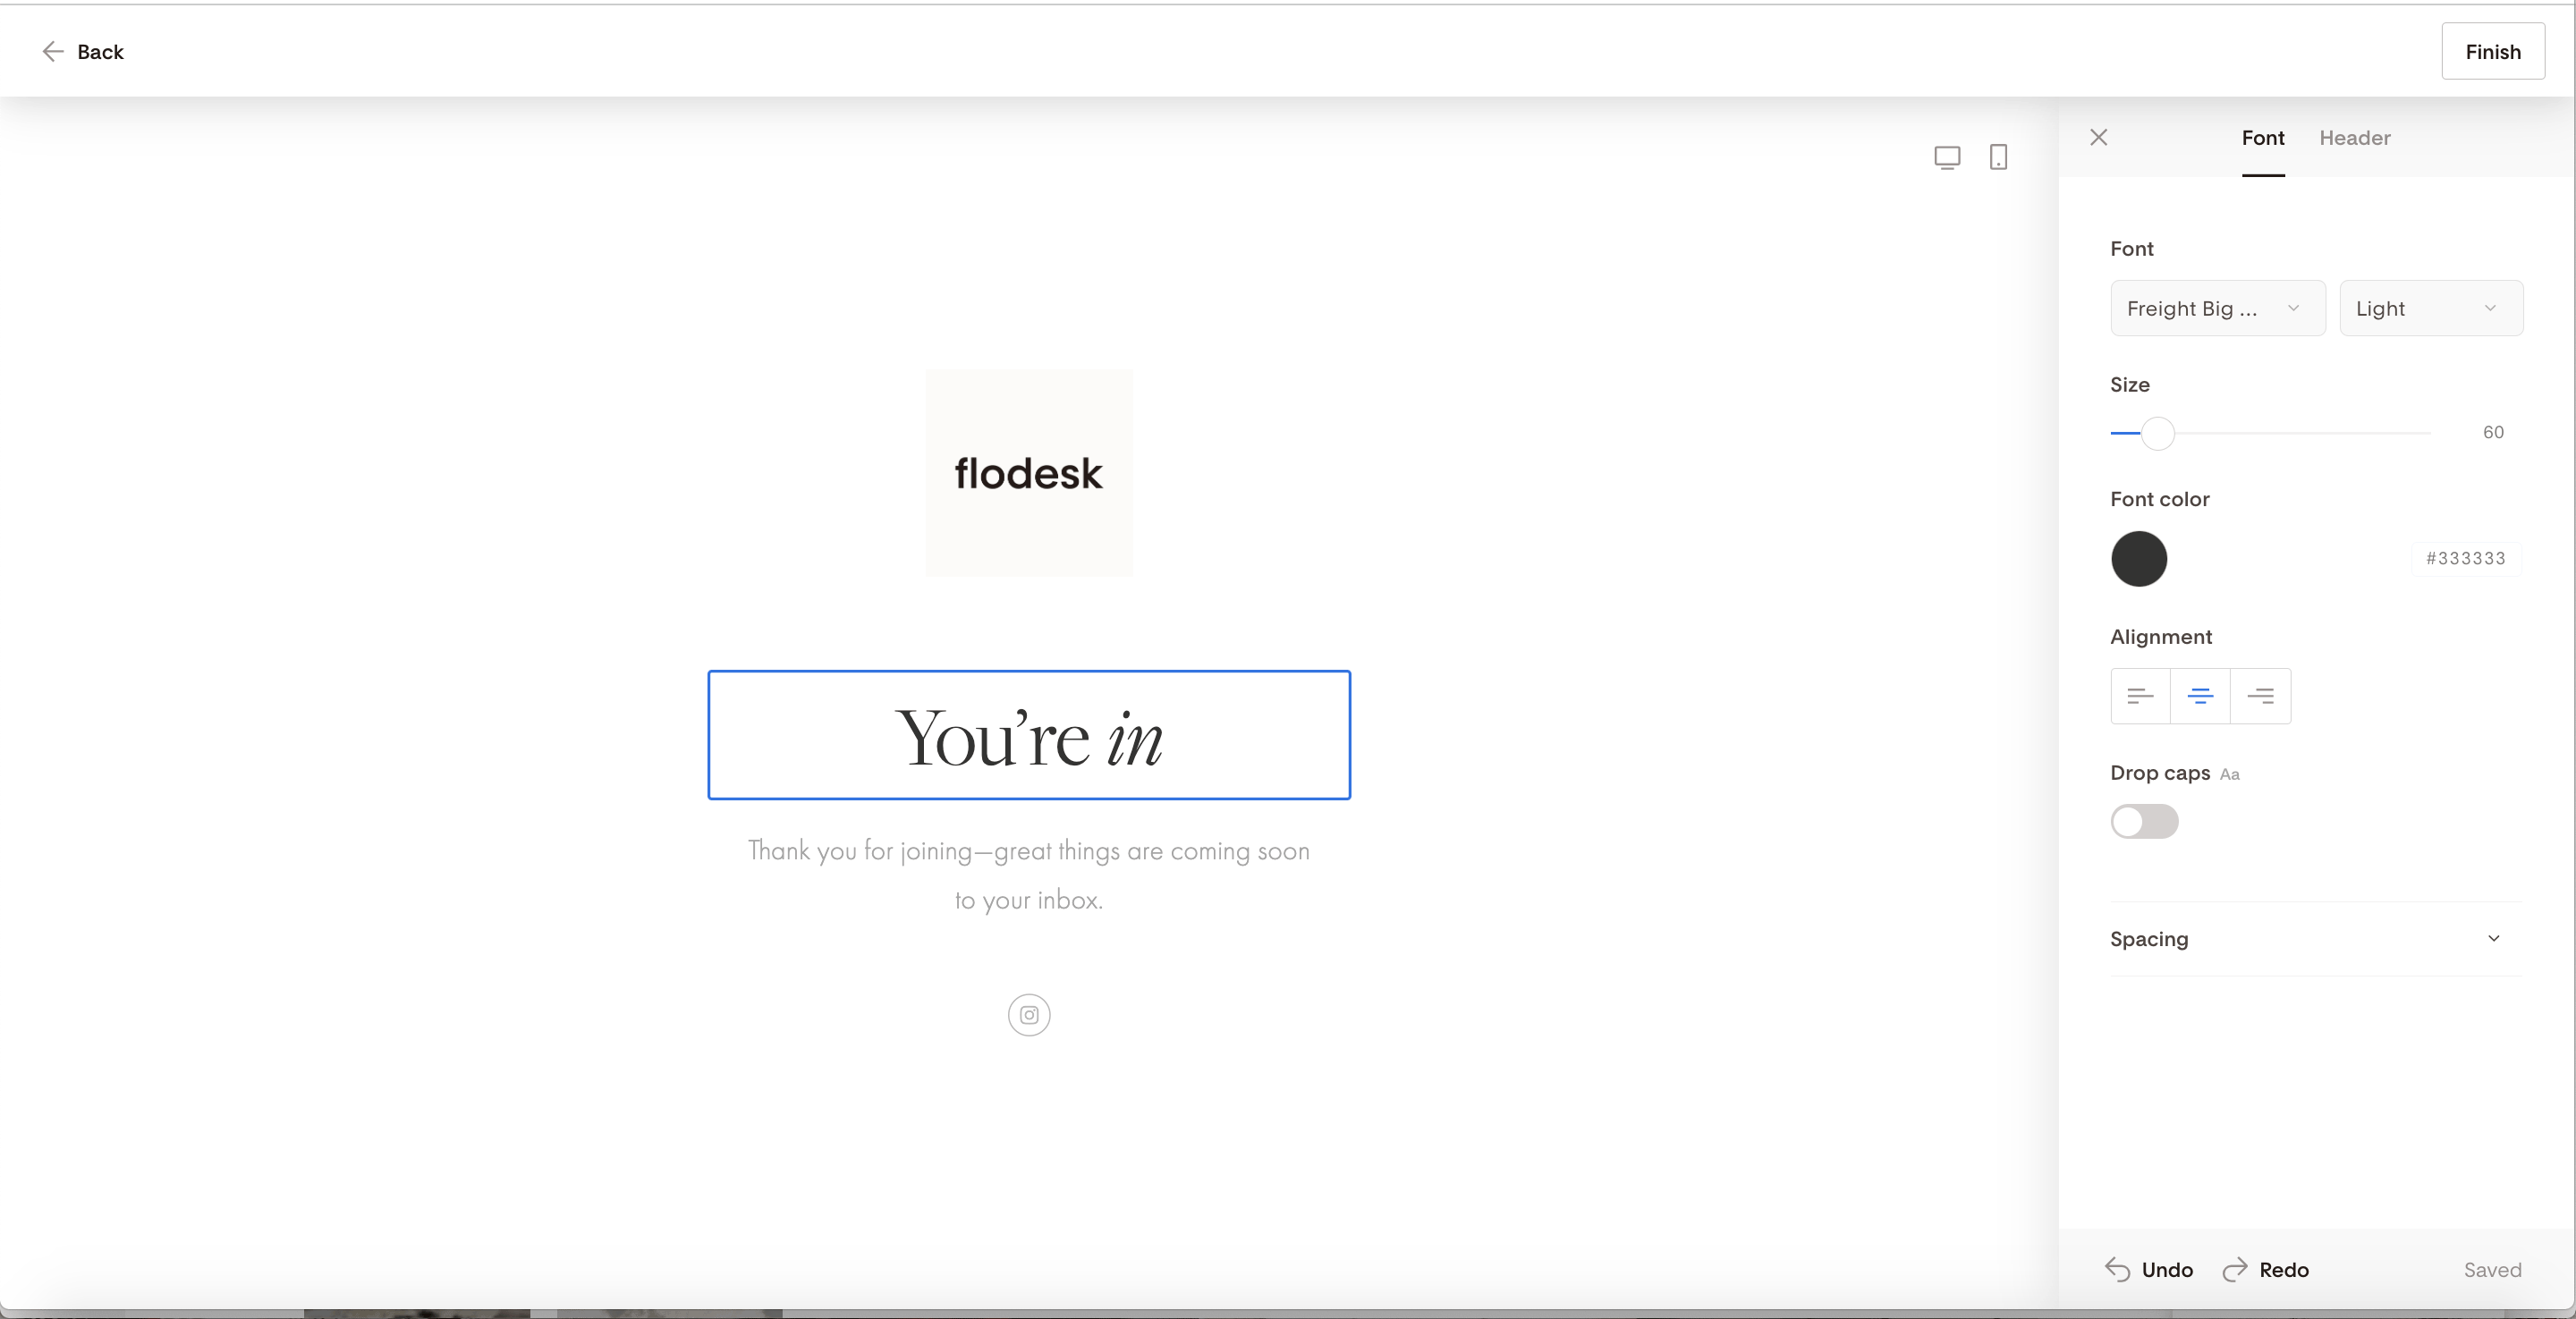
Once you've finished customizing your Thank you page click Finish at the top.
Important things to know about double opt-in
Your double opt-in email and Thank You page are account-wide, not form-specific
You only need to customize them once
You must enable double opt-in separately for each form
Turning it on for one form does not enable it for all forms
The default form submission success message for forms with double opt-in turned on is "Got it! Check your inbox for an email to confirm your subscription." If you want to say something different, choose the custom success message option and write your own.
Existing active subscribers will never receive the confirmation email again
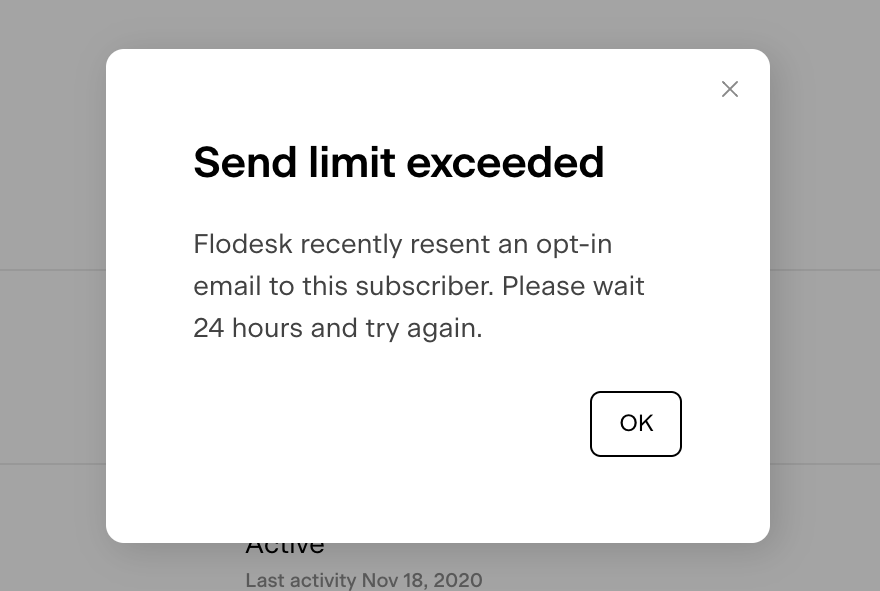
How to resend the double opt-in email
If a subscriber hasn’t confirmed:
Go to Audience
Filter or select the Unconfirmed subscriber(s)
Click Resend opt-in → Resend now
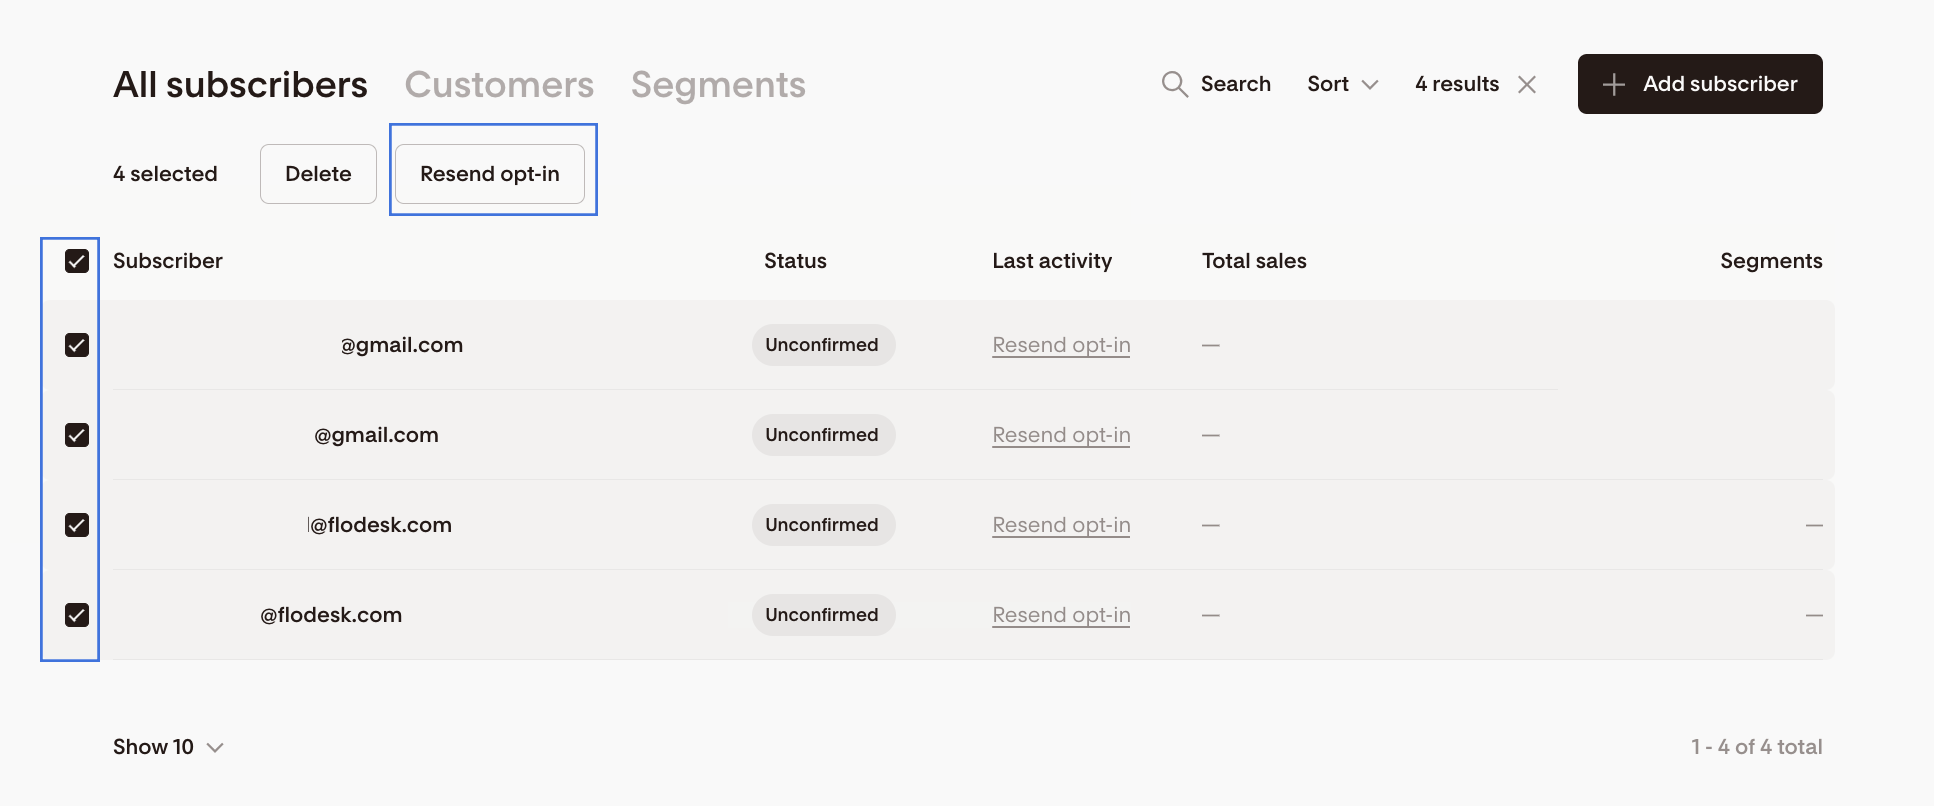
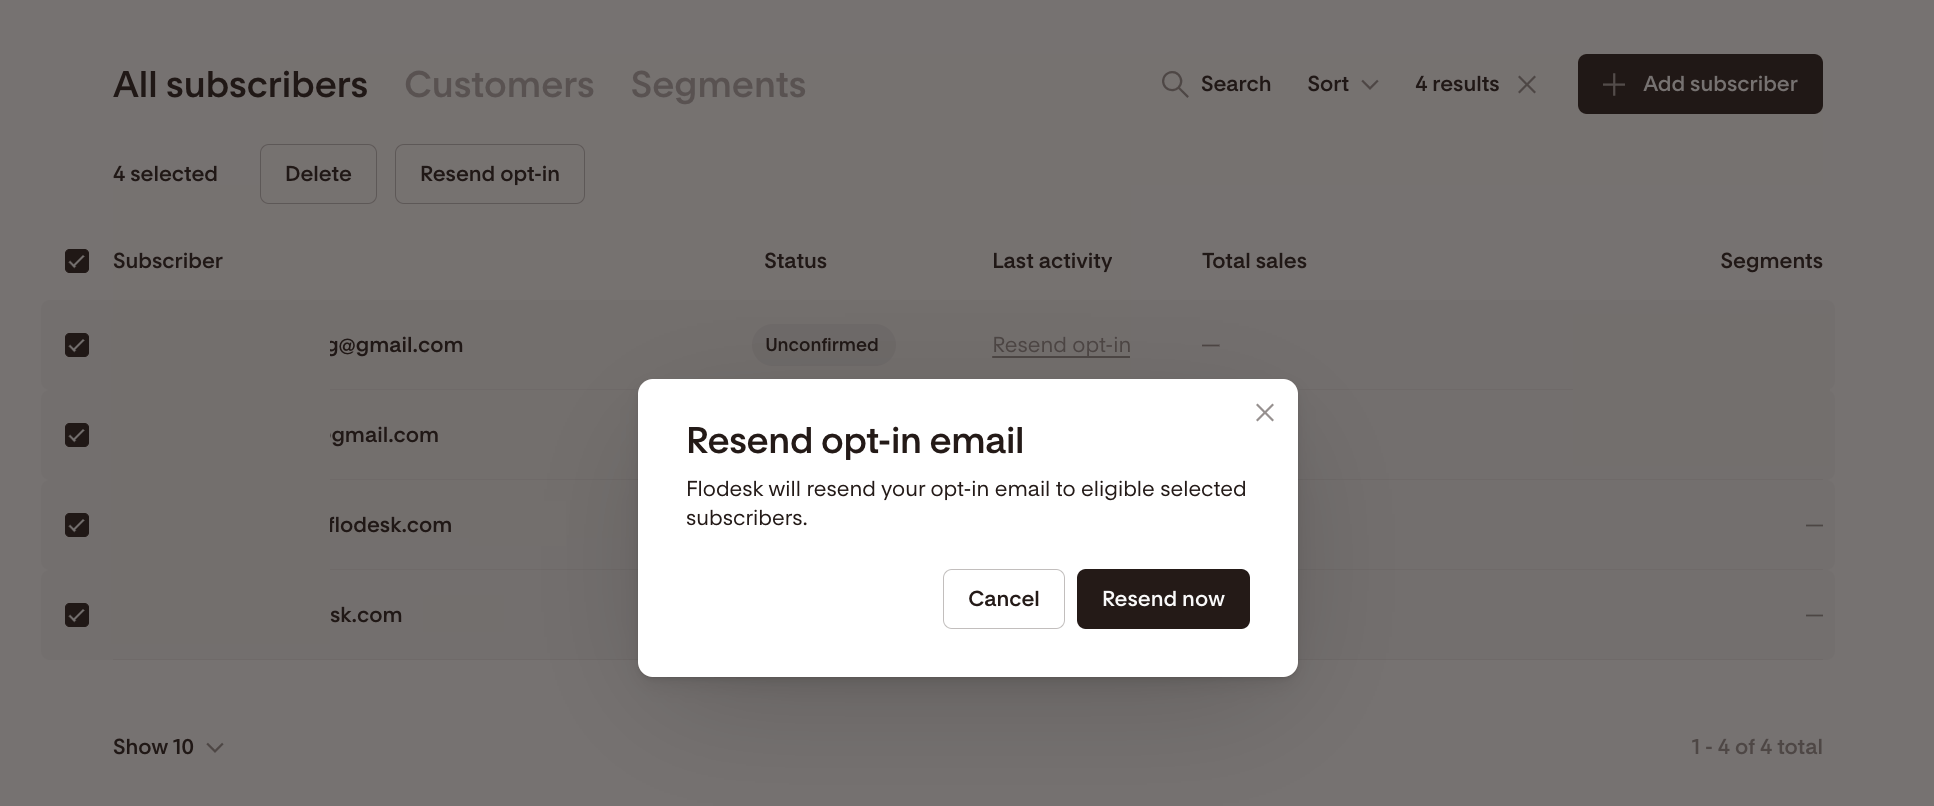
Resend rules:
You can resend the email as many times as needed
You must wait 24 hours between sends to the same subscriber
Troubleshooting double opt-in deliverability issues
If subscribers say they didn’t receive the confirmation email, check the following:
1. Ask them to check spam and promotions folders
Confirmation emails are automated and can sometimes be filtered.
2. Verify the email address was entered correctly
Typos are a very common cause of missing confirmation emails.
3. Confirm they are a brand-new subscriber
Existing subscribers will not receive the double opt-in email again.
4. Send a test to yourself
Use the test send option to confirm inbox placement.
5. Check your sending domain setup
Using a custom domain email with proper authentication (SPF, DKIM, DMARC) improves deliverability.
6. Resend after 24 hours
If the subscriber is still unconfirmed, resend the opt-in email manually.
Summary
Double opt-in ensures subscribers genuinely want to hear from you by requiring email confirmation before they’re added to your list.
Enable it per form
Customize the confirmation email and Thank You page once
Only brand-new subscribers receive the opt-in email
Unconfirmed subscribers won’t receive campaigns
You can resend the confirmation email after 24 hours
When used correctly, double opt-in improves compliance, engagement, and deliverability.
FAQ
What is double opt-in?
Double opt-in is a two-step signup process where subscribers must confirm their email address before being added to your list.
Is double opt-in enabled by default?
For new members who joined Flodesk after April 2, 2026, double opt-in is turned on by default for opt-in forms. Be sure to review and customize your double opt-in email and confirmation page under Account settings > Opt-in setup.
Will existing active subscribers receive the double opt-in email?
No. Double opt-in emails are only sent to brand-new subscribers.
Can I manually confirm a subscriber?
No. Subscribers must confirm themselves by clicking the confirmation button.
Can I resend the double opt-in email?
Yes. You can resend it every 24 hours to unconfirmed subscribers.
Why isn’t someone receiving the confirmation email?
Common reasons include spam filtering, email typos, or the subscriber already being active in your audience.